• Hey there Guest!
    If you enjoy BCF and find our forum a useful resource, if you appreciate not having ads pop up all over the place and you want to ensure we can stay online - Please consider supporting with an "optional" low-cost annual subscription.
    **Upgrade Now**
    (PS: Subscribers don't see this UGLY banner)
Tips
Tips

TR2/3/3A TR3 Rear Body Damage

mallard

Luke Skywalker
Country flag
Offline
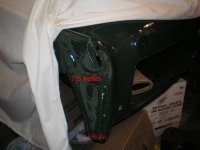
The 56 TR3 that I'm restoring was hit in the left rear were the overrider would be. After spending 3 hours with a hammer and other tools I think I'm getting close to the right shape. My question is about the profile of the curve between the spare tire cover and the edge of the fender. I made numerous templates of the good right side and they are off by about 1/4" from the left. When the factory stamped the rear trunk panel were the two sides exactly the same? The curve on the upper part of the area does not look like it has been damaged but it is not the same. I'm going to try to attach some pictures of the area but I have not had much luck with pictures yet. I can't seem to be able to attach more than one picture.
 

Attachments

  • 14834.jpg
    14834.jpg
    38.6 KB · Views: 326

Tinkerman

Darth Vader
Offline
Mallard, when you say that they are off by 1/4", how do you mean that. I'm sitting here looking at my rear panel and both sides look the same. I have attached a picture of my left rear panel and included measurements. both of mine are the same.

Hope this helps. I can take more pictures and more measurments and 3email them to you but I have to know where you are measuring. The important thing is that the rear fenders fit!

Cheers, Tinkerman
 

Attachments

  • 14835.jpg
    14835.jpg
    74.7 KB · Views: 323

TR3driver

Great Pumpkin - R.I.P
Offline
The early bodies did tend to be somewhat asymmetrical. Later ones (especially after the tooling was replaced at TS60,000) were much better, but still a long way from perfect.

We had a speaker at the club meeting once who had visited the factory 'back when'. I've forgotten his name, but I'll always remember him talking about the hammers that were everywhere. Big ones, little ones, funny shaped ones ... the workers literally beat on any piece that didn't fit until it did fit.

He also talked about watching a worker drill holes in the frame, with no template, no markings, no measurements of any kind. Not so much as a center punch to keep the drill bit from walking around, just poke a hole in the general area, then move on to the next one.

Wow, looking that good after only 3 hours ... you're a better body man than I, Gunga Din!
Generally by then, I've thrown the hammer through the window and gone inside for a cold one
grin.gif
 
OP
M

mallard

Luke Skywalker
Country flag
Offline
The fender will fit fine, the edge needs more work but the shape is good. The problem area is with curve behind the overrider. The picture shows the template up against the body with the gap showing. I would not be happy with this difference between the two sides. it looks like a tuff fix.
 

Attachments

  • 14839.jpg
    14839.jpg
    51 KB · Views: 281
OP
M

mallard

Luke Skywalker
Country flag
Offline
Thank you Dick and Pat for the great pictures. It seems that my car is going to need more hammering. The curve on the left side is to deep. It's stange to see what happens to metal when it takes a hit. The upper part of the curve feels so smooth but it still may have distorted. O well I hope the neighbors will put up with another day of hammering without turning me into the HOA.
 

crj7driver

Jedi Trainee
Offline
I think the metal in that area has stretched so you will need to shrink it. I attempt all my own body work but when it comes to shrinking metal I leave to the professionals just because once you heat the metal and quench it (one technique for shrinking as I am sure you know) the metal is more rigid and will create problems if not done correctly.

If you know of another way I would love to hear of the results/technique.
 

CraigLandrum

Jedi Hopeful
Offline
I'm not even close to a bodywork guy, but if I recall correctly there is a "shrinking hammer" that looks like a meat tenderizer - instead of a flat head, the head has a bunch of triangular protrusions thatstick up 1/32 to 1/16 or so. Never used one, but did bang out some sheet metal as you have done.
 
OP
M

mallard

Luke Skywalker
Country flag
Offline
Thanks everybody for the pictures and ideas. I'm going to look at a few cars next weekend to determine what my next step is going to be. I made so much noise last week that I may give it some time before we start hammering again. Thanks again.
 

MDCanaday

Jedi Knight
Offline
In the very recent past we repaired worse damage than this on a 3 by carefull drilling of the welds on the close-out panel,removing it to access the area behind the bumperette.This also lets you work that nasty little under panel and treat the metal worms that hide in this spot from the factory!!When you have this panel off put fresh nuts in the cages that hold the rear edge of the fender...its good Karma
MD(mad dog)
 
Similar threads
Thread starter Title Forum Replies Date
K TR2/3/3A TR3 rear overider distance from body? Triumph 3
jfarris For Sale TR3 Rear Sway Bar Triumph Classifieds 0
Donald1107 TR2/3/3A TR3 Rear Shocks Triumph 11
B Wanted TR3 Hardtop Rear Stiffener Brackets Triumph Classifieds 0
J TR2/3/3A TR3 Rear seat Triumph 11
K For Sale TR3 rear rebound brackets Triumph Classifieds 0
J For Sale Triumph TR3 rear differential and rear brake assembly - Northern Illinois Triumph Classifieds 1
E For Sale Tr3 rear axle, rear end Triumph Classifieds 6
K For Sale TR3 rear cockpit center capping Triumph Classifieds 0
J Wanted Need tr3 rear axle housing Triumph Classifieds 0
D TR2/3/3A TR3 Engine dumping Coolant out its rear end - HELP Triumph 5
A TR2/3/3A Newbie wrestling with TR3 rear wheel studs Triumph 3
Tinkerman TR2/3/3A TR3 A REAR WING BOLTS order of assembly? Triumph 3
Got_All_4 TR2/3/3A Tr3 rear differential seal Triumph 7
J TR2/3/3A Tramp bar for rear of TR3 or?? Triumph 7
mgedit TR2/3/3A Steady Springs Rear Brakes 56 TR3 Triumph 0
jfarris TR2/3/3A Wanted - TR3 Monza Muffler - Rear Section Only Triumph 1
M TR2/3/3A TR3 overdrive trans rear speedi sleeve Triumph 6
K TR2/3/3A TR3 Exhaust header's proximity to rear of generator? Triumph 4
J TR2/3/3A Strange fiberboard panel behind rear seat in TR3 Triumph 10
1937dodge TR2/3/3A Anyone have any photos of TR3's sporting rear finned aluminum brake drums? Triumph 8
T TR2/3/3A TR3 Rear wheel cylinder attachment clips Triumph 6
mgedit TR2/3/3A Rear Drum Brakes 56 TR3 Triumph 2
rckuhlman TR2/3/3A TR3 Castle Nut on Right Rear Axle Triumph 3
K TR2/3/3A TR3 4:11 gears in rear Diff Triumph 6
S TR2/3/3A rear brakes tr3 Triumph 1
S TR2/3/3A tr3 rear main Triumph 24
M TR2/3/3A Topping off rear shocks on TR3 Triumph 11
Kleykamp TR2/3/3A TR3 rear fender bolts Triumph 2
RickAnderson TR2/3/3A Wanted: TR3 Rear Bumper Overrider - any condition. Triumph 2
M TR2/3/3A TR3 rear axle hub gasket ???? Triumph 4
S TR2/3/3A rear fender vinyl tr3 Triumph 6
mgedit TR2/3/3A Rear capping 56 TR3 Triumph 4
M TR2/3/3A Topping off rear shocks on TR3 Triumph 13
Kleykamp TR2/3/3A TR3 rear fender needed Triumph 18
Tr3aguy TR2/3/3A Rear Lettering TR3 post 60000 Triumph 3
luke44 TR2/3/3A TR3 Rear Bumper Overriders - Upside Down? Triumph 12
T TR2/3/3A The light came on: my TR3 rear apron. Triumph 12
S TR2/3/3A tr3 rear interior panels Triumph 6
J TR2/3/3A TR3 Rear Apron Replacement Triumph 4
K TR2/3/3A TR3 Rear Overider Bracket "distance tube"? Triumph 10
J TR2/3/3A stainless steel rear spring pins for TR3 Triumph 19
O TR2/3/3A TR3 Rear Main Seal Triumph 5
A TR2/3/3A More TR3 Rear main seal problems. Please Help!! Triumph 8
J TR2/3/3A '56 TR3 Brakes and rear axle advice Triumph 7
tinman58 TR2/3/3A Rear main seal TR3 Triumph 11
O TR2/3/3A TR3 Rear Turn lights Versus Rear Stop Tail lights? Triumph 5
S TR2/3/3A tr3 brakes-Rear wheel Triumph 2
S TR2/3/3A rear brake lines tr3 Triumph 3
S TR2/3/3A rear axle grease fitting tr3 Triumph 6

Similar threads

Top