• Hey there Guest!
    If you enjoy BCF and find our forum a useful resource, if you appreciate not having ads pop up all over the place and you want to ensure we can stay online - Please consider supporting with an "optional" low-cost annual subscription.
    **Upgrade Now**
    (PS: Subscribers don't see this UGLY banner)
Tips
Tips

Outer Sill/Rocker fit problem

red57

Jedi Knight
Country flag
Offline
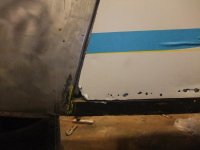
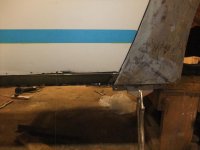
I am plodding away at this restoration project and last weekend started to fit the outer sill on the right side. I have already replaced the inner sills and was ready to fit the outer sills when I found a potential problem. On these replacement sills, the surface that will be seen after assembly is about 1/2 inch longer than the door skin that sits above it. I bought these 2 years ago along with most of the sheet metal I knew I would need, these came from Moss. I am not interested in bashing a supplier, only mention the name here in case other suppliers have different sills to offer. Has anyone had good luck with outer sills that fit well? My doors measure about 31 1/2" along the bottom & these sills would work well with a 32" long door. Does anyone have any suggestions before I start trying to move the depressed area to line up with the wings? The attached pictures are with the door, front wing, and dog leg repair piece just laying on the floor to show the issue. Any thought will be welcome.
Dave
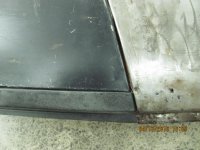
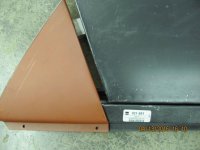
Imported Photos 00002.jpgImported Photos 00003.jpg
 

Brinkerhoff

Jedi Knight
Offline
None of these will fit perfectly. Don't fit the outer sill until the door is repaired and hung with the swage line from the front fender to the rear lined up. That's the only way you'll get the door to outer sill gap correct. The last thing is to cut and rework the rear edge of the outer sill. The Moss panel is the best one . Its an easy fix.
 

Keoke

Great Pumpkin
Country flag
Offline
Dave:

I would see if a Kilmartin part might solve the problem.
 

Brinkerhoff

Jedi Knight
Offline
Been there , sent the Kilmartin parts back to British Car Specialists. The panel wasn't even as close as this one but hey , that was 12 yrs. ago.
 
OP
red57

red57

Jedi Knight
Country flag
Offline
Thanks for the responses. Pretty much what I expected, was just hopeful there might be better ones out there. Brinkerhoff, I'm sure you're right that "it's an easy fix" - the problem for me is, there seems to be "easy fixes" everywhere I turn on this project....

Thanks again,
Dave
 

tonyk

Member
Offline
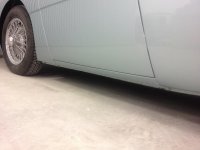
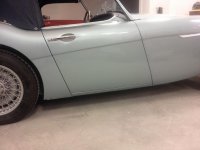
Line up the parts and patches on the car with hinges and wings (fenders) adjusted as best you can. Some pushing and pulling may be needed to line up the wings and swage lines. Perhaps the outer sills should be pop riveted in place as well.DSCF1194.jpgDSCF1193.jpg

The pics are part way through. Additional problems I had were -

Left door was about 5mm low so it wouldn't close with the outer sill in normal position (referenced by levelling and fitting the aluminium trim piece/s for position, get this right, I think this will be vitally important down the line). I think all this was an original manufacturing defect as the aluminium sill finisher was also deeper. You can also get the angle of the door shut face panel correct before final welding.

Note the rot at the door bottom, taped out for a replacement piece cut to fit the new dimensions. The door was shortened slightly to give a good door/sill gap.

Fiddling about with the sill got a reasonable set up, but needed a few mms taken off to line it up. I took off too much and you can see the rough weld lines at the rear. Doh!!

The second thing was, like you, I fitted parts of pre made patches (from AH Spares) front and back but you can see these would need fettling to get a tight fit around the sill edges - ie shorten the under surface etc.

All in all a PITA.

The right side fitted perfectly with a new sill slotting straight in.

P.S. Don't know what's happened to the photos.
 
Last edited:
Country flag
Offline
I cut out the little bit that was too long, inverted it and welded it back in, then smoothed/contoured the edges. A head-scratcher the first time, but breezed through it on the second car.
 

Rob Glasgow

Jedi Knight
Country flag
Offline
Another issue I had with the replacement rocker panels I purchased is that the manufacturer spot welded the front angle piece to the rocker with six spot welds. The instructions state you need to revove the angle piece befor trimming the rocker to fit the opening and then weld the angle piece back in place at the front of the opening. I'm fine with that approach but can't understand why they would use SIX spot welds to attach a piece that they know has to be removed as part of the insallation process. Simply tape the angle piece to the rocker would be a better solution I think.
Any one else have this thought?
I also had to 'shorten' the rocker to fit between the front and rear fenders, but I figure that was just a part of the fun of restoration...
 

Jim 58 BN6

Jedi Trainee
Country flag
Offline
I will be doing this job in the near future, and have seen references to instructions (as in the previous post), and other procedures. Where would I find some of this information? None of my books have any real practical info. Do some manufacturers send instructions with their parts?

For instance, I've seen several several references to doing the finish welding on the outer sills once the engine and transmission are back in the car, and car is sitting on its suspension. Others say that it shouldn't matter if the frame is sound.

I'm not trying to hijack this thread, but I thought this might be an appropriate place to ask this question. TIA, Jim
 
OP
red57

red57

Jedi Knight
Country flag
Offline
More great responses, thanks

@ Tony K - I will be checking the whole thing including the aluminum finishers before welding - that's one of the worst parts of the project, the number of times I have mounted and removed things, repeat ad nauseum

@ brinkerhoff - yeah, well 'relatively' is the key word, and compared to some of the other challenges, I suppose this isn't too bad. I can only hope mine come out as nice as yours.

@ Randy Forbes - that is what I figured to do - I want to make the modification prior to installing so I can clean and prime the back side.

@ Rob Glasgow - I found the spot welded piece frustrating as well, like you said it should be supplied loose. However, I guess I got lucky 'cause in mine they only used 4 spot welds....

@ Jim 58 BN6 - the ones I have came from Moss and do have an instruction page attached describing removing the angle piece, trimming the sill to fit and re-installing the angle piece. As to the "sitting on the wheels w/engine in" or not issue, I am in the camp that thinks it shouldn't matter if the frame/chassis is in good shape and strong. It's hard for me to imagine the factory waiting until the engine is in to install the outer sills, but I have not read anything definitive on this. Guess I'll find out eventually.

Anyway, Again thanks for all the responses.
Dave
 
Similar threads
Thread starter Title Forum Replies Date
tr6web Outer and inner sill [rocker] installation Triumph 5
S TR2/3/3A outer sill and fan tail Triumph 11
M BT7 Outer Sill Replacement Austin Healey 2
M Photos of my outer sill repair Spridgets 11
M TR2/3/3A TR3 outer sill replacement Triumph 15
hondo402000 TR6 TR6 outer sill replacement Triumph 2
A Outer sill replacement Triumph 2
L Outer Sill Alignment - Again with pilars Austin Healey 8
SNClocks Gap between inner and outer fenders Spridgets 0
newmexTR3 TR2/3/3A TR3 outer wishbone bushing removal Triumph 5
M TR2/3/3A Re-Assembling Rear Axle Outer Bearing and Hub Triumph 1
B TR4/4A Outer tie rods Triumph 8
69MGC MGC Replacing an Outer Wheel Well panel MG 3
dbenichou289 TR2/3/3A Headlight outer trim ring Triumph 6
red57 What is correct wire harness outer wrap Austin Healey 17
AUSMHLY BJ7-BJ8 outer weather strip for door window Austin Healey 4
F TR2/3/3A KAS-Kilmartin outer sills with bow to match door Triumph 4
Csarneson How do the outer sills [rockers] drain water? Austin Healey 7
J TR2/3/3A Outer Front Wheel Bearing Triumph 22
Lukens Outer rocker showing "rust" Restoration & Tools 11
D TR2/3/3A 7.68, outer tie rod Triumph 4
B Outer steering column connection to the steering box Austin Healey 6
H General Tech Door Glass outer seals installation Triumph 6
pkmh "Bearing Outer Race" Re-installation at Passenger Front Hub Extension Austin Healey 4
F TR4/4A TR4 inner and outer sills Triumph 2
MisterB Outer structure repair order/checklist Austin Healey 9
A Aligning New half front wing, outer sil and rear wing Austin Healey 5
T TR2/3/3A Requesting some picture of the outer Rocker panel Triumph 19
A TR2/3/3A 1959 TR3 Inner and Outer Rocker Replacement Bracing Triumph 10
T TR4/4A Outer tie rod ends - what's the trick? Triumph 7
H TR4/4A Outer door waist seal Triumph 5
britlover TR4/4A Anyone know a source for TR4-6 outer sills that actually fit? Triumph 13
S inner sills, outer sills, a post...where to start? Spridgets 28
I Sealing new outer panels on BN1 Austin Healey 10
O TR6 Outer Rockers WTB Restoration & Tools 0
O TR6 TR6 Outer Rocker Panels WTB Triumph 0
G OD of inner spring is tight to ID of outer spring Triumph 3
R TR4/4A 1966 TR4a , outer tie rod question Triumph 7
G excess wear on outer edge of front tires Austin Healey 13
Jim_Gruber Looking for DS Outer Rocker - Front 4" Spridgets 9
germanmichel Fixing outer tube in steering box Austin Healey 11
K TR2/3/3A Paging TR3Driver re: trunnion outer washers... Triumph 4
J TR6 joining the inner and outer sills on a TR6? Triumph 1
G TR2/3/3A TR3 lower outer trunnion Triumph 4
M Outer Wheel Bearing - interference fit v Quality? Triumph 2
J TR6 Replacing TR6 Outer Rocker Panels Help Triumph 1
G Plan 9 from Outer Space Triumph 3
C How does one remove the outer door chrome? Austin Healey 2
ChrisS Steering Rack Outer Tie Rod End Size Spridgets 3
tr6web TR6 Outer tie rod question - TR6 Triumph 5

Similar threads

Top