This was realy excellent article from Bill Brewer.
Replacing Triumph TR3 Floors, a technical note by Bill Brewer
Notes about the lessons:
I had been driving for 8 years with plywood thrown down for floors and was tired of the cold
winter drafts and dust blowing in. I regret waiting so long now. When I got the floors out, I
discovered that the only thing really holding the body on the car was the four bolts at the corners.
The floor mounting bolts weren't even connected to sheet metal anymore and the four bolts on
the 45's in the sides of the engine compartment were loose and missing the aluminum spacers.
Think about that next time you slide around a corner.
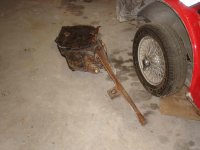
There was even less sheet metal in floor than I originally thought. Scary.
The floors really should be replaced with the body off the car, but that is another story. I did
mine on the car as part of an ongoing rolling restoration.
Do one side at a time so you can use the other as the pattern if you forget how something
goes. I had to check several things on the original side.
I found the floor job much more enjoyable that I originally anticipated and recommend that
others don't put it off. It is a good winter project. Don’t do it during the driving season or you’ll
miss out too much.
It is easier to do the job right than half-assed. Forget about pop riveting it in, using JB Weld,
sheet metal screws, gas welding or leaving any of the old floor in. Do it right. I've seen some
strange ways to put floors in that pretty much ruin the car.
I am amazed at the difference that it made in the car.
This was on a TR3 but is probably very similar to a TR4 or 6.
The passenger floor panel fit perfect. The driver’s side was a little short and the inboard holes
didn’t quite match up.
This is just how I did it. In hindsight, there is another and possibly better way that I am putting
into my PS at the end.
Times:
Plan on about 50 man/hours per side on the floors. Maybe 40 per side if you use my lessons
learned. Maybe more. This is just to get the floors in and doesn't reflect painting or putting the
interior back in.
Keep band-aids around while working around the jagged sheet metal. I tore myself up pretty
bad on the first side. Not a scratch on the second.
Some tools needed:
Air driven nibbing tool (Harbor Freight)
Air driven cut off tool (HF)
Power wire brushes
Dremel tool (Sears) with cut off wheel, various grinding bits and little wire wheels
Air impact chisel ($10 HF)
4 inch disk grinder (optional with above tools)
MIG welder (don't try gas welding)
Big can of PB Blaster
Strong putty knife.
Electric drill and bits.
Nut breaker
Body work dollies and hammers
A friend with a car lift is a Godsend (Thanks, Jon Paschke)
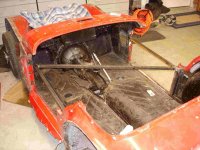
Removing old floors
Take the seats, carpets and trans tunnel out. Take the car door off on the side that you are
going to be working on. Get the car up on jack stands.
Unbolt the 6 bolts holding the floors in. Make sure to keep the inner aft bolt with its metal
grommet, they are not available from the big three. The others just keep as patterns for replacing
with stainless. The two sets of bolts that are mounted to the outriggers will be rusted beyond
belief. Mine didn't even have a flat for a wrench. I ended up using the Dremel cut off wheel to cut
�
the threaded part off underneath, using the air driven cut off wheel to cut a square head on the
top of the bolt, soaking it all with PB Blaster and working it back and forth until I got them out.
Use the nibbing tool to cut the floor out around the perimeter. You have to work the nibbing
tool over the frame by lifting up on the old floor panel for clearance. Don't cut the flanges that the
new floor will get welded to.
Save all of the hardware holding the seat rails in. If it is all frozen (and it will be), cut the floor
from around the rail bolt caged nuts for clearance, break the nuts with a nut breaker, soak it all in
PB Blaster and unscrew the bolts holding the rails on. The last I checked, the bolts were
unavailable. A moot point if you are going to replace them with stainless bolts like I ended up
doing.
Use the impact air chisel to get the sides off. It took only a few minutes working carefully. Don't
try the impact chisel on the drive shaft hump, the back or the front flanges or you'll be sorry.
To break the spot welds front & back and on the drive shaft hump, try to drill out the spot
welds. If you are good, you can drill about halfway through. Try not to go all of the way through. A
Dremel tool is handy in the tight spots. You can find the spot welds from the top or underneath. In
the front, you can find the inboard ones from looking down the top of the engine compartment.
About 3 welds will be "blind" from anywhere else. If you absolutely can't see the spot weld, try
gently pounding a thin strong putty knife between the seam until it stops. By poking around it on
three sides you can find exactly where it is to drill it out.
I have seen spot weld removal drill bits from Eastwood. They might be good, but I had no
problems just using a drill bit.
I used pliers to twist and pull the old metal off. Sometimes I pounded the putty knife gently to
separate the panels after drilling out one half of the metal.
You'll probably find some weird welds in some of the corners that you just have to gently grind
out until it is clear.
When the floors come out, look to see where the factory put the rubber strips.
Hardware:
The big three were out of body mounting hardware kits, so I ordered the rubber individually.
I replaced all the bolts with stainless from the local True Value hardware. For the long bolt in
the front I used a cadmium plated grade 8.
Derusting:
I used power wire brushes and the little wire brush on the Dremel. I tried muriatic acid (pool
acid) for some of it, but don't recommend it. You'll probably end up making patch panels for
severely rusted areas.
Patch panels:
If the driveshaft hump is seriously rusted, consider just making a new hump from scratch and
welding it in. I wish that I had. I ended up making a big patch. You could also get another hump
from a parts car, but it is probably already welded in and rusted through too.
Also, if the front or rear panels are severly rusted, pitted or deformed, consider making a
complete new patch panel to weld in about 1 inches up from the floor. If you make a flange, use
a flanging tool (Eastwood), lap weld and then grind it down carefully, it will look like original and
you’ll have good metal to weld to. It is easier than making multiple patch panels.
I lap welded my patch panels instead of butt welding them. When we tried butt welding, the
mig welder would just melt and blow away the old floor metal. Lap welding was easier. I also pop
riveted the patch panel to hold it in place. I used stainless pop rivets. If you are really into it, use
aluminum rivets, drill them out when done welding and weld in the holes.
Fitting new floor:
Straighten out all of the bent up old metal. I made a neat little dolly out of a piece of 1/4 steel
plate about 3 by 6 inches and it came in handy.
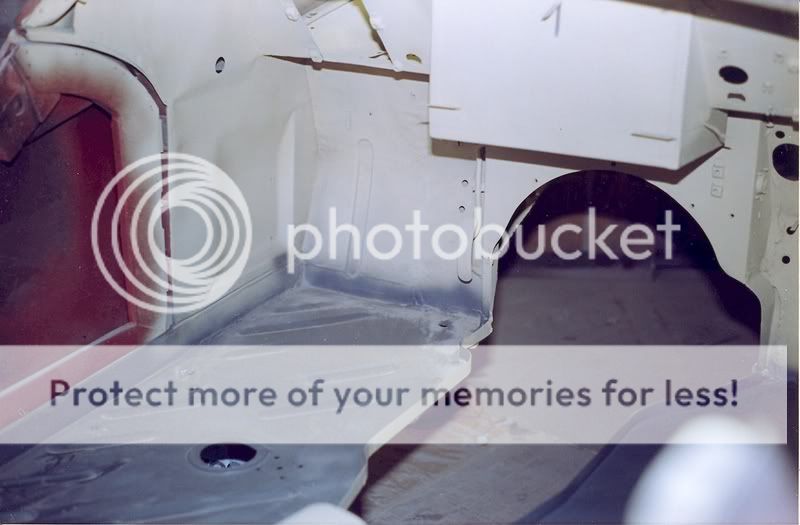
The real trick is where the floor has to fit in over the "Y" in the frame where it meets the
forward bulkhead. There is a slot where the fore and aft member behind the bulkhead fits against
it and rests on the frame. You can't slide the new floor panel into it and still get it past the lip at
�
the back panel. You can cut off this lip from underneath without hurting the car's structural
integrity, but there is another way.
Take the forward outboard corner of the floor and gently pound it over flat against the floor for
about the first 3 inches. This will allow you to slide the side rail under the forward bulkhead while
fitting the floor. I probably slid the floor in and out of the car 10 times for each side minimum.
Measure and mark where the floor slides into the slot. Cut a rectangle out of the new floor
approximately 4 across by 3 deep. This will allow you to slide the floor past this slot and then slip
the floor under the rear lip. When the floor is in, it is a simple matter of sliding in the piece that you
cut out and mig welding it in from the top. Afterward, you can easily grind the mig weld flat and
paint it.
The side where I cut off the lip looks better, in hindsight.
Before bolting and welding the new floor in, paint the bottom of the floors with the same color as
the car. It is a pain to try to do it later. I also painted the frame of the car under the floor at this
time.
Welding in new floors:
Replace the rubber strips between the floor and the frame. I used weatherstrip adhesive to
hold them in.
I measured the placement of the original spot welds. They were approximately every inch in
the front and back, every inch and half against the drive shaft tunnel and every two and a half
inches on the side rails. I drilled the new floor panel with a 1/4 drill at the proper places and then
mig welded in these holes. Afterwards, the excess weld can be ground off and it looks like the
factory spot welds.
Under the forward bulkhead, close to the transmission, I couldn't weld in the holes like I liked. I
ended up mig welding the leading edges of the metal.
Before painting around where the floor will go in, I marked through the drilled holes with a
"Sharpie" marker. I covered these marks with little round paper stickers that I bought at a
stationary store. After painting around the floor with rust resistant paint, I peeled these little
stickers off so it would be exposed for mig welding. It worked well for me.
PS. In hindsight, my front and rear flanges are about as good as they could have been, but still
don’t look all that great. I think that it would be faster, easier, better looking but scarier to do to
make a new flange front and rear that goes up about 1 inch up the bulkheads. You could take the
flange and floor to a sheet metal shop and have them spot welded together. Use a Eastwood
flanging tool, flange the orginal bulkheads to accept the new flange, pop rivet it together to hold it
tight and take it to a professional welder for tig or mig welding. Grind off the excess metal so it
looks like the original steel. Someone else try this and do a write up on the list. I’ve already
welded in my floors.
Good luck.
Bill Brewer
Tehachapi, CA
TS72747LO
 Hey there Guest!
 Hey - did you know if you click on the title of a thread it will take you to the first unread post since you last visited that thread?
 but were afraid to ask:
  STOP!! Never post your email address in open forums. Bots can "harvest" your email! If you must share your email use a Private Message or use the
  smilie in place of the real @
 Pretty Please - add it to our Events forum(s) and add to the calendar! >>


 A friendly reminder - be careful what links you click on here. If a link is posted by someone you don't know, or the URL looks fishy, DON'T CLICK. Spammers sometimes post links that lead to sites that can infect your computer, so be mindful what you click.