• Hey there Guest!
    If you enjoy BCF and find our forum a useful resource, if you appreciate not having ads pop up all over the place and you want to ensure we can stay online - Please consider supporting with an "optional" low-cost annual subscription.
    **Upgrade Now**
    (PS: Subscribers don't see this UGLY banner)
Tips
Tips

Floor and rocker replacement ?

crj7driver

Jedi Trainee
Offline
The frame was showing the effects of 30+ years of use and the trailing arms needed replacing. Well, after many months of work the frame is repaired and strengthened in as many areas I can justify (it is suprisingly straight after my onslought with the welder and grinder).

I need to replace the floors and the DPO's fiberglass rockers. The body is now sitting on the newly painted and repaired frame.

Should I re-install all of the old body shims, prior to panel replacement or just start cutting, or some other option. Also, if I do install the shims how does that work with replacing the floor that is sitting on the shims?

I have read the "how to restore a TR6 book" but do not recall it addressing the shims, just to start from the doors and align from there.

Thanks
 
G

Guest

Guest
Guest
Offline
Good question. My goal over the Christmas holiday is to cut out my floor pans and weld in new ones. I plan on leaving 20% all around the perimeter and cutting the Heritage pans to fit.
All my metal around the edges is perfect. I just have issues where the feet lay and a less-than-perfect seat setup. Interested in any websites that show specifically the TR6.
 

TR6oldtimer

Darth Vader
Offline
Before you start any panel replacement, you should have the body bolted on the frame with shims in place, and all the doors and fenders on to insure the body and door gaps are properly aligned. Be sure to measure the distance from the floor to the cowl at the "a" post, as the "a" post will move both horizontally and vertically no matter what you do.

The next step is to determine what panel to replace first. On my car the original floor and rocker needed replacing. I chose to replace the entire floor first, leaving the rocker on to provide additional support to the body. With the door openings well braced and the doors and fenders off (some people leave the doors on), I lifted the body off onto work horses. The floor was then cut from the body and the edges repaired and prepped as necessary. ( I chose to stitch weld the floor in so I did not drill the spot welds but ground them off enough to separate the seams)

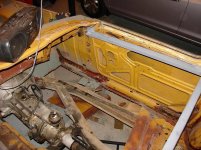
The new floor pan was then placed and loosely bolted to the frame with the original shims in place (except the rubber strips on the frame). The body was mated to the frame with all the other shims properly positioned. I attached all doors and fenders to adjust the body and door gaps to the original configuration. Clamps were used as necessary. Once proper alignment was attained (watch the "a" post which will probably need raising), the body was bolted firmly to the frame and the floor welded and tacked in as appropriate. Areas that were over rubber or not easily reached with the body on, were welded after lifting the body yet once again.

The rocker panels were next, and can be replaced with the body on the frame. My rockers required a lot of metal work to fit properly. A lot of on the car, fenders fitted and gaps checked, more metal banging, some torch work, more checks on the car and on and on. As an aside, I chose to stitch weld the top front rocker flange (forward of the "a" post) to the kick plate rather then separating the kick plate and the inner sill. The floor pans were a piece of cake compared to the work to get the rockers on in a decent fashion.

The important lesson I learned is to go slow, fit and refit, check alignments and check again. It's a lot of work, but very gratifying in the end.

On your project, if the floor pan is a partial replacement it is a lot easier as most of the work can be done on frame. If the entire floor is to be replaced, I would probably replace the fiberglass rocker first then the floor. The new rocker will help support the body when the floor comes out.

I am sure I left something out, and certain others have there own technique, but this process works for me.

Good luck
 
G

Guest

Guest
Guest
Offline
I may sound redundant here as I have spoken of this before.
Since my rockers are solid as a rock and the perimeter of both pans are just as solid, my plan for my floorpan is as follows.
My main goal is to replace the center sections of both floors where the feet rest as well as replace the entire raised channel that holds the tranny cover. Plus include the majority of the rear where the seats bolt in. Reason for replacing the seat area is my aftermarket seats were installed without the 4 original welded-in bolts. I plan on redoing the bottom of both seats with an added-on frame that will be welded to the existing seat frames (TIG) and properly bolted into the new, original nuts. (make sense?) (aftermarket seats, don't fit the original holes, will when I am finished)
This basically will entail cutting the floor board out across the front under the pedals (leaving a bit of lip to weld to), follow the inner part of the rocker panel, back across the rear of the seat bolts and follow the drive shaft tunnel back to the beginning of the raised tunnel ridge.
This all of course being done one at a time. I will use the plasma torch, Clecos, and mig in the overlapped panels. I need to repair the frame bolts that hold the center console brace (they are all stripped). These are independent of the floor pan. My big concern is the areas that the actual pans bolt to the frame. Will I have a problem cutting these areas out with the pan and using the bolt holes for the new pan? I don't think that I will be hurting the integrity of the body. The car will be on firm jack stands with the doors removed. No fuel or brake lines will be left in place. Use a body hammer and dolly to make sure all the panels are snugged up tight before Clecoing and welding.

I will be using cutting discs around the few areas that the plasma cutter won't work. Will set up jigs to run the torch down straight lines. /ubbthreads/images/graemlins/hammer.gif
 

TR6oldtimer

Darth Vader
Offline
Bill,
Before you do anything, take good pictures and measurements of the door gaps and other internal dimensions. Remember, your doors are your best reference point so I would leave the doors on, or at least refit them frequently to check the alignment and gap of the doors.

Even though you are only doing a partial floor replacement, as you remove metal the structural integrity of the body will weaken and the stresses on the body will cause it to flex. This is especially true if you remove the metal over the two outer (next to the inner sill) floor mounting points. Given you are welding the new floor over parts of the old, Unless the floor mounts are rotted, you may want to consider leaving the metal around the bolt holes in place and consider them just a big lip and weld the floor over them.
 
G

Guest

Guest
Guest
Offline
I thought about that actually. How about cutting around this part of the old floor, leaving this "tab" in with the four bolts (it is quite sound) and then just unbolting the four bolt, slipping the new pan in with this part intact, and replacing the bolts. The pan is tapered so it should fit one inside the other, welding, and sealing from the bottom as needed?
 

alphatopher

Member
Offline
I was going to do my floor exactly as you are planning, however I decided to remove the whole thing once I got started. The picture shows the tabs in place and half the floor removed. This picture also shows how I started to remove the plug welds along the sills.

I would suggest removing the whole floor, especially if you have any rot along the lower engine compartment panel. Removing all the plug welds really isn't that difficult. If you brace the car, as seen in the picture, it will move very little once you lift it off the frame with little sag.
 

Attachments

  • 286593-editfloor.JPG
    286593-editfloor.JPG
    188 KB · Views: 104

TR6oldtimer

Darth Vader
Offline
[ QUOTE ]
TR6Bill ...just unbolting the four bolt, slipping the new pan in with this part intact, and replacing the bolts

[/ QUOTE ]

I think your plan for a partial replacement of the floor is right on target. You may want to consider a 2-4 plug welds through the new floor to the old "tabs". The challenge is how to seal the new joint under the floor without lifting the body.
 
G

Guest

Guest
Guest
Offline
Alpha, I see your point but my floors are in perfect condition, save the area where the feet rest and the screw-up with 4 seat bolt-downs.

I had no desire to labor with a messy, loud, slow cutoff wheel
that requires a lot more CFM than my little 20 gallon air compressor can put out. The beauty of the plasma torch is I can whack out an approximation of the floor sized as I need, and trim down from there, with zero physical effort. After removing the gas tank, brake line and gas line, I will use a #3 foot tub under the body to capture the flash from the cutter, the same idea with the mig welder.

The biggest reason for not doing a complete floor replacement is I want to salvage my paint job! I will remove the entire interior and the convertible top then cover the body with fiberglass blankets and other protectives to keep flash off the paint. The entire floorboard will be recovered in a coating yet to be decided, but something bullet proof. Because my car is a resto-mod, the fact that much of the interior being black instead of green doesn't bother me. It will be covered by carpet anyway.
 
Similar threads
Thread starter Title Forum Replies Date
J TR6 tr6 rocker and floor replacement --?s and pictures Triumph 12
G Weld & Paint for Questions for Floor, Sill, Rocker Triumph 3
A Rocker panel or floor pan first Triumph 1
HealeyRick Perfect Healey Floor Jack Austin Healey 14
LAW75 Driver's and Passenger's Floor Carpets Austin Healey 7
B How big is the floor pan drain hole? Spridgets 0
B BE floor pan welds aren't everywhere? Spridgets 2
K For Sale TR3 front passenger side fiberglass floor panel.....$100 CAD OBO plus shipping. Triumph Classifieds 3
B Two questions about Bugeye floor panel weld drilling Spridgets 15
Healey Nut Insulating Floor Covering Austin Healey 7
B A plan to replace BE floor pans Spridgets 0
Joel Lester TR2/3/3A Any advice for new floor install on my TR3? Triumph 9
F TR2/3/3A Floor pan question Triumph 16
B TR4/4A Floor pan replacement Triumph 4
J TR2/3/3A Pads under new floor Triumph 7
F TR2/3/3A Boot floor Triumph 50
K TR2/3/3A Headlight Hi beam floor button fail? Triumph 5
B Rear shroud connection to the floor pan on a BJ7 Austin Healey 21
T For Sale Triumph TR6 pass floor pan Triumph Classifieds 0
71TR6 TR2/3/3A TR3 floor pan to firewall question Triumph 2
71TR6 TR2/3/3A Inner sill or floor pan- which to replace first? Triumph 5
A TR2/3/3A Brakes, exhaust and trunk floor Triumph 2
E BJ8 Seats, Exhaust Hanger, Heat Shield Locations in Floor Austin Healey 7
J TR2/3/3A Painting floor pans Triumph 2
R TR2/3/3A Trunk floor replacment Triumph 4
R TR2/3/3A Boot/trunk floor Triumph 5
J front cross member height from bottom to floor on BJ8 Austin Healey 5
H trunk floor pan replacement 1964 BJ8 Austin Healey 2
Rob Glasgow Garage Floor Coatings Restoration & Tools 1
S TR4/4A Floor pan mountings Triumph 8
NutmegCT Garage floor Restoration & Tools 19
Rhodyspit75 Replacing boot floor need bracing? Spridgets 2
H Uh Ohh, Oil All Over The Floor Austin Healey 33
R TR2/3/3A Welding in the floor questikns Triumph 19
T TR2/3/3A Replacement Floor and Trunk Panel Quality Triumph 14
S Restoring a bj7 floor issues Austin Healey 3
John_Mc TR6 Floor pan to frame mount question/Miata seats Triumph 2
W TR2/3/3A Why a PO cut these holes in rear floor? Also, question re dealing with captive nuts Triumph 6
C TR2/3/3A Floor Pan Crack Triumph 5
Zitch TR4/4A Floor pan replacement Triumph 18
Got_All_4 TR2/3/3A Fitting the trunk floor pad & fuel tank cover Triumph 2
T Grommet - sling hole in floor - XMSC108 Spridgets 3
H Joan Baez flat floor '61 roadster, what did the Feds sell it for at auction? Jaguar 0
R TR2/3/3A Installing floor pans Triumph 13
M Bugeye engine removal with floor jack Spridgets 14
TRMark TR4/4A Crack in floor at sill mounts Triumph 5
S TR2/3/3A On installing the floor pan Triumph 4
S TR2/3/3A remove protective covering off floor pans Triumph 6
S TR2/3/3A Triumph TR3A Boot Floor Replacement - Looking for help Triumph 13
S TR2/3/3A Floor pans. Triumph 11

Similar threads

Top