• Hi Guest!
    You can help ensure that British Car Forum (BCF) continues to provide a great place to engage in the British car hobby! If you find BCF a beneficial community, please consider supporting our efforts with a subscription.

    There are some perks with a member upgrade!
    **Upgrade Now**
    (PS: Subscribers don't see this gawd-aweful banner
Tips
Tips

Tri-Carb Project

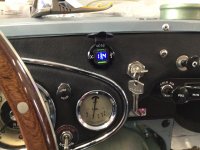
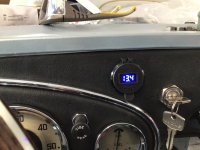
Added a modern touch to the dash.
I know I could have added a period-correct volt or ammeter. Then I would have had to add a bracket etc., etc.
This gives you dual USBs for all kinds of goodies and was an easy add, and being black it blends into the dash.
Amazon if anyone is interested.
 

Attachments

  • 41C767BB-DC45-45B0-94AA-53923EDDBBC0.jpeg
    41C767BB-DC45-45B0-94AA-53923EDDBBC0.jpeg
    1.7 MB · Views: 183
  • 564DAE1D-3C98-4D81-9FC7-F7029A67FEDA.jpeg
    564DAE1D-3C98-4D81-9FC7-F7029A67FEDA.jpeg
    1.8 MB · Views: 160
Wiring reconfigured with separate fuse panels , also inline fuse added at rear licence plate lamp .
firewall wiring cleaned up .
spare fuses available for future goodies .
 

Attachments

  • E766497E-231E-4717-B5A0-76866F09430F.jpeg
    E766497E-231E-4717-B5A0-76866F09430F.jpeg
    1.7 MB · Views: 155
  • A992ED42-6FE4-4D50-8FCC-A9F9A4023847.jpeg
    A992ED42-6FE4-4D50-8FCC-A9F9A4023847.jpeg
    1.8 MB · Views: 173
New float for centre carb installed , tried to start her up .
Managed a few spits ,farts n backfires but no running .Typical Healey after sitting a while .
Static Ignition timing bang on with test light .
More tinkering another time and a fully charged battery and try again .
will check point gap and timing once more and try again .
Getting there slowly .
Hold those celebrations for now .
 
Checked and set the points again today , gap was too big .Now .015 ā€œ
All plugs gapped .025ā€
Static ignition timing bang on with test light , rotor arm pointing to #1 rad end , valves rocking on #6 firewall end , pointer and notch on crank lined up .
It’s getting fuel , spits and backfires and those chuffs out the carbs with fuel vapour when you turn it over for long periods and it starts to flood .
Newly rebuilt carbs .
Tried with and without choke and combination of 1/2 choke and tickle the throttle .
Doesn’t want to pick up and run .
Any ideas ?
I really don’t want to try starting Fluid if I dont have to .
 
Sounds like ignition/timing. Pull the secondary lead off the coil, crank and look for spark if you hold the end close to ground (use gloves, plastic wrench, etc). If spark from coil pull a plug and same test. Try another rotor. Are you absolutely sure coil leads are going to correct plugs? Could also be fuel; check fuel level in carb jets with bowls pumped up.
 
I do have a spark at the plugs , checked the firing order 153624, I’m going to go through the valve/ignition timing check again .
How do I check the fuel level at the jets ?
 
Sat reading my Haynes manual this morning over my morning tea , I have a feeling I’m 180 out on the ignition timing .
 
How do I check the fuel level at the jets ?

Just unscrew--4 screws IIRC (my 100M has 3)--the vacuum 'dash pots' on top of the carb bodies (lift straight up so as not to spill damper oil). Fuel level in the jets should be below the top of the jets, eighth inch or so (you can fine tune when you get it running).

180 out would certainly cause your problem.
 
My suspicions were correct . I was 180 out on the ignition . She fired up almost instantly , so now the fun begins tweaking carbs and timing etc to get her running smooth .
Im still having overflow issues on my Centre carb with the new float . I don’t have air cleaners on so I can see right into the carb openings and with the ignition on the fuel spills out of the centre carb inlet .
I had it all apart checked the float cleaned the needle etc etc .
If I manually fill the bowl ,put the lid on and secure it turn on the ignition couple of clicks from the pump , no overflow . Run the car reducing float level etc , turn off the car , turn on ignition again it starts to overflow again .
Im going to try switching the needles around to see if the overflow follows the needle valve .
having had the carb lids on and off so many times the rear carb now weeps a bit .
Im just pi@#$ed that I had these carbs ā€œprofessionally rebuiltā€ and there’s issues .
Ah well the trials and tribulations of reviving an old car .
At least I know it runs , I actually ended up pulling the fuel pump fuse , start the car and install the fuse so I wasn’t spilling fuel anywhere or flooding it at start up .
Time for a beer and some more playing tomorrow .
 
Tried switching needles , still overflows centre carb . I’m thinking it’s a float issue , maybe the float is not balanced so it sits off kilter in the float chamber and gets hung up in the chamber ,possibly wouldn’t be an issue with road vibration ?
I have two more floats on order along with new float bowl gaskets and a spare float needle and seat . Having had those lids off more times than I care to think I now how leaking lids . :mad::mad:.
I did fix my oil pressure issue with the washer under the bypass valve spring trick (y). And she started right up today on first turnover(y)(y)
 

link to my Twitter feed and video of the first fire up after 20+ yrs . The rattles are the bonnet rattling as there are no grommets on the prop rod .
Needs more timing and carb tweaks but she runs .
 
So got some new parts and the correct float bowl lid for the rear carb from Joe Curto .
Replaced centre carb float with another new float , overflow solved so I think I was right in the float getting hung up inside the bowl somehow . Rear carb assembled with correct lid , float and needle etc new gaskets all good no overflows no leaks . Car now runs OK.
I do have some driveline issues with the OD not engaging and shifter issues but its all part of building an old car which was in boxes .

My tip of the day re flex fuel lines , we have all been pricked by those stainless wires on the outside of the fuel lines , and cursed trying to get all the wires inside the rubber cap .
Here’s the fix . Once you have the line cut to length get some electrical heat shrink tube and use a short piece to shrink on the end before you put the rubber cap on . It makes fitting the cap a breeze and also makes the diameter slightly larger so the pipe clamps don’t need to be tightened to the max to make it leak free . Worked like a charm . Thank me later šŸ˜šŸ‘
 
Well that sucks , zero oil pressure from the OD . SUSPECT I have the oil pump cam lobe on the wrong way round .
looks like the OD is coming out .
OH JOY !!!!!

I was right some rookie OD builder put the camlobe on backwards . Now fixed , beer time .
 

Attachments

  • CA310029-BE2C-4220-856F-0DABAB8513B3.jpeg
    CA310029-BE2C-4220-856F-0DABAB8513B3.jpeg
    2.5 MB · Views: 128
  • CFEDF149-C6C4-4E2B-BC5A-DBE565A0A1EC.jpeg
    CFEDF149-C6C4-4E2B-BC5A-DBE565A0A1EC.jpeg
    1.9 MB · Views: 135
  • 39BD711D-0BA1-4E10-AD46-A9DBB80304E7.jpeg
    39BD711D-0BA1-4E10-AD46-A9DBB80304E7.jpeg
    2.4 MB · Views: 150
Leave the side cover off with the accumulator piston spring and housing removed as well. Make sure the cam lobe is at the flattest point on the bottom where it meets the pump plunger .
get the OD back on with all the nuts started on the bolts by the first thread only , this can be a bear as the double spline has to be perfectly aligned just to get it to this point . DO NOT FORCE IT AT ANY POINT .
You should now have about 1/4ā€ between the gasket faces .
Use two skinny long blade screwdrivers to compress the plunger spring by levering on it turn by turn .
once you have it sufficiently compressed have someone give the OD a wiggle and if you have it compressed enough it will slide all the way home without any force .
Quickly tighten one nut and do a happy dance around the shop and grab a celebratory beer out of the fridge . šŸ‘šŸ‘šŸ˜šŸ˜šŸ˜Ž

If the above process and your patience fails your pulling the gearbox out to upend it to complete the OD/gearbox mating .
 
Ah, a side-shifter. Wonder if something similar would work with a top-loader?

I gave up after several hours of trying last time and took them to BCS. Dave Nock split the O/D and its gearbox adapter, pulled the pump, sat the gearbox on the ground 'face down' and had two of his mechanics pull the O/D and adapter down with large channel lock pliers while he manipulated the output shaft to get the splines lined-up. Then he re-installed the pump; of course, he had 'special' tools to do this.
 
I used the same technique on my BJ8s , it takes a lot of patience and fiddling but it can be done .
I did it alone on my BJ8s once I had the pump spring compressed I used some tie wraps to hold it in place wrapped around the side plate studs .
Removing the pump would be the simple way if only it was just an unbolt and remove it job .
 
Once you have the splined shafts lined up, you just need something to hold the pump plunger back; a bent wire or string will do. Put the low point on the cam toward the pump. Separating the transmission and O/D to turn the cam around should leave the splines aligned.
 
The
Once you have the splined shafts lined up, you just need something to hold the pump plunger back; a bent wire or string will do. Put the low point on the cam toward the pump. Separating the transmission and O/D to turn the cam around should leave the splines aligned.
The splines stayed perfectly aligned , it was just the last 1/4ā€ to get it over the lip on the pump cam that I had to get the screwdrivers busy to compress the pump spring .
 
Well I’m going to declare the engine bay done . Some minor touch ups here n there but they can wait till final finishing .
Rocker cover includes my retrofit 2ā€ BSA motorcycle Monza style flip fuel cap modification .
My focus now is to get the exterior body to 80% of filler touch ups sanding prep etc then send her back to the paint shop for her pretty Healey Blue finish .

Purists may need to avert their eyes as they may find the images disturbing šŸ˜šŸ˜ŽšŸ˜Ž
 

Attachments

  • C03AEC88-250C-4785-BD88-F2C7CE83FA42.jpeg
    C03AEC88-250C-4785-BD88-F2C7CE83FA42.jpeg
    2.5 MB · Views: 135
  • 63735262-2743-4BA4-A8D6-C02710A925D4.jpeg
    63735262-2743-4BA4-A8D6-C02710A925D4.jpeg
    2.5 MB · Views: 127
Last edited:
Back
Top