Hi all,
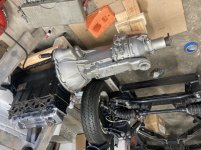
Apologies for the long delay since posting. I’ve got a new job (a wonderful change), and have lost my Internet access and lunchtime forum forum perusing! I’m posting this using my iPhone… Apologies for some of the pictures being upside down!
Updates:
1. Installed the shift fork and throwout bearing in the transmission. I added a grade 8 bolt in the center of the fork, within a nylock on the backside.
2. Installed the flywheel, using ARP fasteners.
3. Installed the clutch. (I had the fly wheel and clutch assembly balanced by local machine shop prior to install.)
4. Here comes the bride… Marriage of the engine to transmission. The OD is the heavy side of the transmission! I raised the the aft end of the transmission up on a stack of two by fours. The engine, on a rolling dolly, was pushed against the wall with a piece of foam between engine and wall. Transmission was in fourth gear, allowing the input side to quickly align on spinning the output side. It took a bit of grunting and questioning, and then suddenly the two parts click together beautifully. (Again, similarities to marriage… at least my own.

)
5. Then I hoisted the assembled engine onto the chassis. This took a bit of fiddling to get the engine level during the lift. (It is much easier to line up the engine mounts with a horizontal engine.) Once I got the lifting arrangement correct, it was quite easy.
6. Admired my work with a celebratory drink, feeling like a big kid!
7. My rockers arrived from rocker arms unlimited, I installed the push rods (with a healthy coating of assembly lube), the rocker arms, and set the clearances using feeler gauges.
8. Installed the starter and dynamo. (I’m going old school!) Sports and Classics in Connecticut was able to provide me the correct shim for the starter; TRF the bits for the generator.
9. Installed the intake and exhaust manifold. I painted the intake with rustoleum (aluminum primer plus silver topcoat). I would like to get the exhaust manifold ceramic coated, but this will not happen until after the engine has been initially tuned. Plenty of anti-seize used!
10. Installed a falcon stainless steel exhaust. This took a little bit of fiddling, but ultimately went together extremely well. The hardest part was inserting pipes to the correct depth, such that the exhaust at the end of the car lined up with its proper location. Again, lots of anti seize!
11. And finally, last night I installed the driveshaft.
A few comments:
Kudos to TRF for providing complete kits of high-quality. They provide the proper manifold and exhaust nuts (brass). They also provide Clevelok (spelling?) nuts for the propshaft, as recommended by Randall. Also, their webpage is very clear with how many bits you need. They don’t sell ARP fasteners, and when I bought them from a different supplier I didn’t get the right quantity. I know TRF is not perfect, but it sure seems like they try.
How does one torque the prop shaft? If I’m reading the manual correctly, it requires a torque of 80 to 100 ft-lbs. I can’t get a socket on the bolt heads. How do you do it?
Finally, anything I should do or check prior to putting the body back on the chassis?

 Hi Guest!

 smilie in place of the real @
 Pretty Please - add it to our Events forum(s) and add to the calendar! >>


