 Hey there Guest!
 Hey - did you know if you click on the title of a thread it will take you to the first unread post since you last visited that thread?
 but were afraid to ask:
  STOP!! Never post your email address in open forums. Bots can "harvest" your email! If you must share your email use a Private Message or use the
  smilie in place of the real @
 Pretty Please - add it to our Events forum(s) and add to the calendar! >>
Nunyas
Yoda
Offline
WARNING! Long post ahead! /bcforum/images/%%GRAEMLIN_URL%%/smile.gif
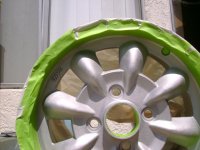
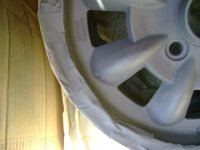
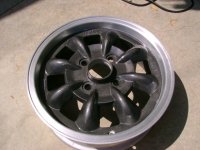
I not too long ago acquired a set of the much sought after Saab Shelby wheels. For those of you unfamiliar with these wheels they have the same bolt pattern as an MGB (4X4.5) and the car the came off of was a Saab that used the same wheel stud size as the MGB (1/2" - 20). If I'm not mistaken these wheels were a stock option on the Saab 99 which ceased production in the mid to late 80s. The wheels themselves are very light weight (~15lbs each) and are 15" x 5.5" wide, which makes for a nice "plus 1" upgrade in wheel diameter (better performance tire selections!) and reduction in unsprung weight.
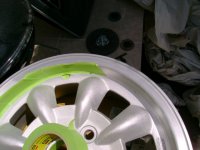
The condition of the wheels when I got them was less than ... new. That's ok though, I didn't expect 20 - 25 year old rims to be in "new" condition anyways. More tragically however, upon receipt of my wheels I discovered at least one of them had very serious "curb rash" ( 1 to 2 inch section missing for the edge of the lip ).
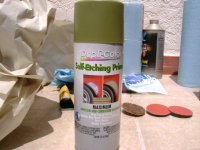
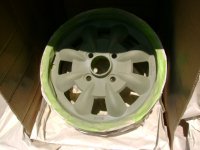
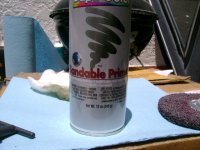
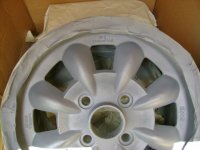
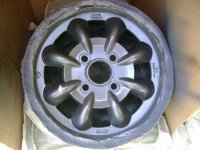
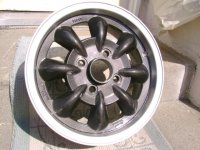
So, I sent my wheels out to have them repaired. While talking to the wheel repair shop I inquired about the price of completely reconditioning the wheels to like new status (i.e. strip all the old paint, fix all damage, paint in my desired color, and machine or polish the lip) and the quote came back at a whopping $150/wheel. That price plus the amount I'd already spent on these wheels was too rich for my bank account. I could have easily gotten a set of ~new~ high performance light weight wheels for the cost it was going to take to do what I wanted. End result, I had the wheels stripped and repaired.
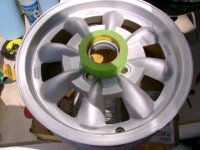
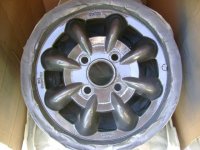
I got the wheels back and was very pleased with the repair work, and even pleased with the bead blasted appearance of the wheels. However, being the lazy car washing person that I am, I decided that leaving the wheels as raw aluminum would result in more effort than I wanted to provide in keeping them looking good.
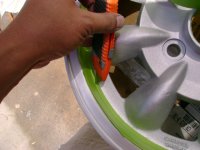
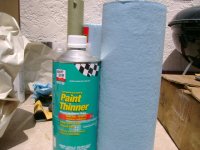
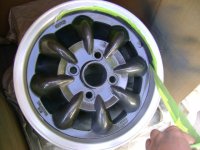
So, I had to paint them. I've only painted two so far, and at 5 hours for each wheel I feel this initial time investment to make the wheels easier to care for in the future a well worth investment.
The following is the chronology of me prepping and painting an aluminum wheel. It goes without saying (or should anyways) that many, if not all, of the techniques, theories, and ideologies also apply to painting anything (from body panels to your living room walls).
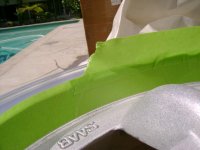
Without further ado here's the chronology with many pictures and comments thrown in throughout.
I not too long ago acquired a set of the much sought after Saab Shelby wheels. For those of you unfamiliar with these wheels they have the same bolt pattern as an MGB (4X4.5) and the car the came off of was a Saab that used the same wheel stud size as the MGB (1/2" - 20). If I'm not mistaken these wheels were a stock option on the Saab 99 which ceased production in the mid to late 80s. The wheels themselves are very light weight (~15lbs each) and are 15" x 5.5" wide, which makes for a nice "plus 1" upgrade in wheel diameter (better performance tire selections!) and reduction in unsprung weight.
The condition of the wheels when I got them was less than ... new. That's ok though, I didn't expect 20 - 25 year old rims to be in "new" condition anyways. More tragically however, upon receipt of my wheels I discovered at least one of them had very serious "curb rash" ( 1 to 2 inch section missing for the edge of the lip ).
So, I sent my wheels out to have them repaired. While talking to the wheel repair shop I inquired about the price of completely reconditioning the wheels to like new status (i.e. strip all the old paint, fix all damage, paint in my desired color, and machine or polish the lip) and the quote came back at a whopping $150/wheel. That price plus the amount I'd already spent on these wheels was too rich for my bank account. I could have easily gotten a set of ~new~ high performance light weight wheels for the cost it was going to take to do what I wanted. End result, I had the wheels stripped and repaired.
I got the wheels back and was very pleased with the repair work, and even pleased with the bead blasted appearance of the wheels. However, being the lazy car washing person that I am, I decided that leaving the wheels as raw aluminum would result in more effort than I wanted to provide in keeping them looking good.
So, I had to paint them. I've only painted two so far, and at 5 hours for each wheel I feel this initial time investment to make the wheels easier to care for in the future a well worth investment.
The following is the chronology of me prepping and painting an aluminum wheel. It goes without saying (or should anyways) that many, if not all, of the techniques, theories, and ideologies also apply to painting anything (from body panels to your living room walls).
Without further ado here's the chronology with many pictures and comments thrown in throughout.


 A friendly reminder - be careful what links you click on here. If a link is posted by someone you don't know, or the URL looks fishy, DON'T CLICK. Spammers sometimes post links that lead to sites that can infect your computer, so be mindful what you click.