
-
 Hey Guest!
British Car Forum has been supporting enthusiasts for over 25 years by providing a great place to share our love for British cars. You can support our efforts by upgrading your membership for less than the dues of most car clubs. There are some perks with a member upgrade!**Upgrade Now**
(PS: Upgraded members don't see this banner, nor will you see the Google ads that appear on the site.)

Tips
- We have a special forum called "Member Articles" where you can submit actual articles for consideration for publication. Learn More
- Don't have an Avatar? If not, your avatar will default to the 1st character in your username. Go into "Account Details" to change your Avatar.
- Some basic forum navigation info: click
 Hey - did you know if you click on the title of a thread it will take you to the first unread post since you last visited that thread?
- Hey Guest - Is your British Car Club in our Clubs database? If not, send me a PM - Basil

- Looking for a local club? Click the "Clubs" tab above and browse hundreds of clubs world-wide.
- Add Android or iPhone APP: click
- Did you know - any picture or video you add in your posts in any marque-specific forum will also get added to the Media Gallery automatically.
- A few more tips about posting and replying: click
- Hey there Guest - be sure to keep your profile page up to date with interesting info about yourself: learn more
- More tips and tricks on Posting and Replying: click
 but were afraid to ask:
  STOP!! Never post your email address in open forums. Bots can "harvest" your email! If you must share your email use a Private Message or use the
  smilie in place of the real @
- Want to mention another member in a post & get their attention? WATCH THIS

- So, you created a "Group" here at BCF and would like to invite other members to join? Watch this!
- Hey Guest - A post a day keeps Basil from visiting you in the small hours and putting a bat up your nightdress!
- Hey Guest - do you know of an upcoming British car event?
 Pretty Please - add it to our Events forum(s) and add to the calendar! >> Here's How <<
- Hey Guest - you be stylin' Change the look and feel of the forum to fit your taste. Check it out
- If you run across an inappropriate post, for example a post that breaks our rules or looks like it might be spam, you can report the post to the moderators: Learn More
- If you would like to try some different "looks" or styles for the site, scroll to the very bottom, on the left and click the Style Selector.
You are using an out of date browser. It may not display this or other websites correctly.
You should upgrade or use an alternative browser.
You should upgrade or use an alternative browser.
TR4/4A I Removed My Overdrive--TR4A
- Thread starter KVH
- Start date
TR3driver
Great Pumpkin - R.I.P
Offline
It's in the TR4 (and later) manuals; the TR3 manual doesn't talk about OD overhaul. But it hasn't been a concern for me; in fact when I replaced the clutch ring with one from another OD, it was actually too thick and I had to cut it down slightly. (The excess pressure had literally forced the circlip out of its slot, and I didn't feel confident about the damaged slot.)TR4nut said:Well that's certainly true, but there is a specification on how much play should exist between engagement/disengagement. Don't spot it now in the TR3 manual, but a friend showed me it.
Attachments

TR3driver
Great Pumpkin - R.I.P
Offline
Most common cause IMO is lack of hydraulic pressure, caused by a weak main accumulator spring.TR4nut said:I suspect that is true - in my case I'm detecting some slippage with the overdrive I have in the TR4 so while I'm in there I will be going over everything.
FWIW, I've been told that Moss now has them in stock, under part number 866-281 (not shown on the web site), for $90. Rimmers also has them, for about the same price as I recall (with shipping).
Randall, if you recall I had issues with my OD after replacing the original clutch with a "good" used one and after trying several external fixes decided that I had reversed the 8 springs. It turns out the springs were placed correctly. We switched the clutch back to my original unit and the OD worked fine. We later found that the circlip had come out of its slot. Mine was not caused by excessive pressures however and may well have been that way when I installed it and I just diidn't notice it. A lot of work caused by me missing something initially.
OP

Offline
Well, OK, now I've got more questions.
First, why does the manual say to put the OD in a vice and drop the transmission in from the top, but everyone here disagrees and says to lower OD onto the transmission main shaft?
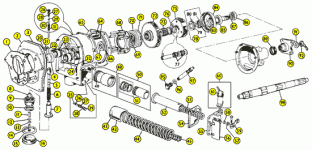
Second, I'm not seeing a part called a "cone clutch." Is that the same as the sliding clutch assembly, Part 72 below?
First, why does the manual say to put the OD in a vice and drop the transmission in from the top, but everyone here disagrees and says to lower OD onto the transmission main shaft?
Second, I'm not seeing a part called a "cone clutch." Is that the same as the sliding clutch assembly, Part 72 below?
Attachments
TR4nut
Yoda
Offline
Actually, I think a good way is to do close to what the manual says - its what my buddy showed me anyway and it worked well. Either put the od in a vice, or stabilize it on the floor say with a board attached to the output flange, etc. By having it in this orientation, the cone clutch is against the annulus and it helps keep everything aligned.
And yes, part 72 is what I've been calling the cone clutch.
And yes, part 72 is what I've been calling the cone clutch.
OP
Offline
Thanks guys! What a great resource this is. I just wish I could help others the way you all have helped me. After logging on in 2004 I've rebuilt two front ends, totally restored two interiors, rebuilt an engine, restored an IRS rear end, rebuilt a horn relay, and on and on. In other words, I'm still a rank novice.
I'm starting with some detail work tomorrow. Bearings out, end float checks, etc.
I think I know what to do, but I know I'll be right back here with questions.
I'm looking forward to bench testing my rebuilt OD in about two weeks. We'll see if I get there that quick (I already see some parts I need--like a new anti-rattle plunger for the shifter).
Thanks again.
PS My tube of Hylomar was barely used and is now all dried out. About a year old. Instead of ordering more of that costly stuff, I'm inclined to use Permatex High Tack unless someone strongly objects. Some folks swear by High Tack and I've had good luck on the timing cover and sump.
hondo402000
Darth Vader
Offline
If it were my OD I would replace all the springs and get the clutch relined if you have the extra money, In My Opinion, if you have it apart, replace the parts, do you really want to tear back into it, parts are cheap labor and time get expensive, even if you do it yourself figure your hourly rate at 60 an hour and you will see how money you have in it
Hondo
Hondo
TR3driver
Great Pumpkin - R.I.P
Offline
But it is supposed to be a hobby!hondo402000 said:figure your hourly rate at 60 an hour
Which is a Good Thing, since I couldn't afford my hourly rate :laugh:
Besides, buying new parts doesn't guarantee anything. Given how many new parts are defective right out of the box, in ways that may not be apparent (do you have a hardness tester? How many cycles before that spring breaks due to the wrong alloy or tempering? Does that new non-asbestos lining really have the same friction characteristics as the old one?) I'd rather use a "proven good" part than a "new" one.
In nearly 40 years (and several hundred thousand miles) of doing all my own work, I've only been burned a few times by old parts. And every time I learned how to avoid doing that again. With a defective new part, all you learn is "oops" since the same vendor probably won't have the same part next time (and chances are that all the other vendors are selling the same thing).
But then I know that, at least for me, a car is never "done". Even if you restore it to "new" today, 5 years from now it will still be a troublesome old British car.
OP
Offline
That didn't last long. I'm totally stuck.
I can't get the speedo gear out. I tried a thin 5/8 wrench behind the cap, and then tapping the wrench with a dead blow hammer. I doesn't move at all but I managed to sheer the tiny pin that holds the inner threaded piece in place. I assume that will mean a trip to a machine shop.
Anyway, prying with screwdrivers seems to imply that the bushing sits snugly, but in my case this is more than snugly.
I assume they all are the same? A big cylindrical brass bushing with the male speedo cap piece at the end, with ridges to pry on.
Zero luck so far.
OH, I should ask. I assume that the annulus shaft can't be removed until the speedo gear is out. Is that correct? It would damage it otherwise?
TR3driver
Great Pumpkin - R.I.P
Offline
Err, you did remove the setscrew on the side? It's not supposed to be all that tight otherwise; they just get stuck sometimes.
I've not actually tried it, but I believe it will ruin the gear (and perhaps the annulus) if you press the annulus out with the gear still in place.
I've not actually tried it, but I believe it will ruin the gear (and perhaps the annulus) if you press the annulus out with the gear still in place.
Geo Hahn
Yoda
Offline
KVH said:...I'm looking forward to bench testing my rebuilt OD in about two weeks...
I know many use an electric drill but I have this set-up if you want to borrow it -- it's a 1/3 hp washing machine motor with 2 speeds and a fitting (well, a piece of hose) to connect to the input shaft.

<div class="ubbcode-block"><div class="ubbcode-header">Quote:]PS My tube of Hylomar was barely used and is now all dried out...[/QUOTE]
FWIW, it's always on the shelf at Ernie's.
KVH said:...Should I just grab that 2 inch brass speedo bearing protrusion with good wrench and twist it for all I've got?
I know you're jesting but is there any chance of fashioning a puller on that thing? Sorry, been too long -- I can't quite visualize it -- but Harbor Freight has beaucoup pullers of all shapes & sizes.
TR3driver
Great Pumpkin - R.I.P
Offline
And don't forget that there is probably oil left inside the housing that will burn if you get it hot enough. I'm not saying not to use heat, just be sure to move it around and don't let any one area get too hot. Might not hurt to have a fire extinguisher handy, JIC.JerryVV said:Heat will work and you don't need much.
OP
Offline
When you test the OD with a motor running like in your photo, Geo, I assume you just start in 4th, then switch on the OD. Otherwise, in shifting through the gears wouldn't the motor be applying "load" therefore requiring a clutch to avoid grinding the gears on shifting?
Also, Randall, I gave up and dropped the rear OD casing off at a shop today. He pulled on it, looked at it, and said he'd probably make a cap piece tomorrow that he could pull from. He can make a threaded piece just for that purpose.
But, then he said it seemed so frozen, he'd probably also want to apply heat first, but wanted to be sure there was no nylon or plastic in that speedo unit at the gear end. I told him there is not.
He had one last issue, and that was whether the annulus shaft should first be slid to help "release" the speedo gear. I said "no," based on what the manual says.
Any other ideas or tips I should relate to the shop before all the banging starts.
TR3driver
Great Pumpkin - R.I.P
Offline
KVH said:When you test the OD with a motor running like in your photo, Geo, I assume you just start in 4th, then switch on the OD. Otherwise, in shifting through the gears wouldn't the motor be applying "load" therefore requiring a clutch to avoid grinding the gears on shifting?
Turns out that is not a problem. Normally, the output shaft is linked to the rear wheels and the synchros accelerate or decelerate the input shaft to match the output shaft (times the ratio being selected). But in this case, the output shaft is free, and so the synchros can accelerate or decelerate the output shaft to match the input shaft (time the gear ratio). It probably is a bit of a "torture test" in that the output shaft has more rotational inertia than the input plus clutch plate, but healthy synchros should have no trouble with the slight extra load.
Sorry, can't think of anything else re: removing the speedo gear. Hopefully the shop can get it out.