• Hey Guest!
    British Car Forum has been supporting enthusiasts for over 25 years by providing a great place to share our love for British cars. You can support our efforts by upgrading your membership for less than the dues of most car clubs. There are some perks with a member upgrade!

    **Upgrade Now**
    (PS: Upgraded members don't see this banner, nor will you see the Google ads that appear on the site.)
Tips
Tips

TR4/4A I Removed My Overdrive--TR4A

If my sports car mechanic--right out of England--back in '69 only knew that I'd have an online course available like this 40 years later . . . . How the world changes, but with some good things still here to enjoy.

Questions/Comments:

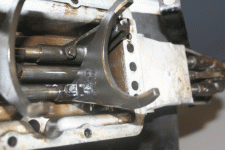
1) OK, now, when I put all this back together, do I need to blow out or somehow clean that galley that runs from the accumulator piston bore to the operating piston bores?

2) When I pulled the rear bearing I found a piece of hardened plastic of some kind, but no evidence of my shattered planet assembly bushing. I assume it dripped out in prior fluid changes.

3) That front bearing the shaft is a bear to remove. On my way to HF for a tool. I'll check end float, then yank them back out if need be. The only distance washer here is the one forward of the rear bearing.

4) The Buckeye articles show the annulus bearings being pressed in. I believe the TR manual speaks of drifting the bearings in place (but I'll have to check).

Thanks for all the patience and help guys.
 
1) I certainly would at least blow it out with some spray solvent, or solvent plus shop air if you have it.

2) Curious, but possible I guess. Wonder where the plastic came from?

3) Sounds like someone put it together wrong before. But it should come apart easily, once you get the right tool.

4) The Laycock manual mentions "driving" the front bearing onto the annulus shaft, but the TR4 workshop manual says to press it on. If you do choose to drive, be sure that whatever you use for a sleeve is only touching the inner race, not the outer. You don't want that impact being transmitted through the balls & race surfaces, as it will almost certainly damage them enough to shorten their life.
 
That was exactly what I was wondering!

I plan to press that bearing in, and I was wondering whether the pressure point should be the inner or outer shell of the bearing. You are saying the inner. That sounds perfectly correct.

As for the rear bearing, however, it seems that there would be less strain if the force in pressing it in comes at the outer ring. If I press on the inner ring, then the outer ring would flex against the bearings as the outer ring catches on the housing.

Or so it seems.

That would mean that a different approach would be used on each bearing, assuming the technique for installation doesn't entail equal pressure across both surfaces of the bearings.

By the way, both of my bearings make noise and "click" as I spin them. I assume they are shot. My guess is that when the thrust washer blew up it ground through the bearings over time.

About that plastic bit, I'm just not sure. It's like a very hard resin, and I'm thinking it's some residue of an old rear seal.

I'm very glad I took all this apart. No way I'll put it back in without testing first.
 
Yup, those are bad bearings all right.

The outer races should be a light press fit in the housing, they are much tighter against the shaft. So the balls should be able to carry the load of pressing the bearings into the housing (although I wouldn't want to beat on them). Which is a Good Thing, since that is the only way to put it together and take it back apart (to adjust the washer).

The book suggests installing the annulus with front bearing first, and then pressing the rear bearing into place; but I did it the other way around : rear bearing first then the annulus and washer with the front bearing already installed. Either way, you need to be against the inner race when it's being pressed onto the shaft.
 
ARGGH!

I guess no big deal but in pulling the annulus shaft bearing off the shaft, I marred the riding shoulder a bit. The beveled jaws of that large bearing separator didn't quite slide under the bearing as easily as it should have.

I assume the theory of the separator is that the horizontal tightening bolts lifts the bearing suitably to get a larger surface from which to pull.

When there's so little clearance, it obviously can get tricky.

I'll take a break and now make some wooden "accessories." The wooden stand for the annulus and/or transmission, and some wooden pieces to use with the press.
 
I hope everyone is enjoying the Holidays and the time off that usually comes with that. I know I am, and I can hardly wait for this next weekend to arrive!

I'm getting close to the point of reassembly. Speedo gear bushing fixed, dummy main shaft ready, all parts finally here. I even pressed a pin back into the solenoid mounting bracket--where it helps keep the spring in place. Though mine is a TR4A, the OD must be the older model since I've got the big spring and large piston with the steel rings.

I note the manual speaks of using a tool to install the small rubber rings on the OD operating pistons. Is a tool really necessary?

Also, I just finished pressing the large bearing back onto the annulus shaft. I lined it up carefully and thought I had it all straight but as the bearing went it there were a good four or five "pops." I used wooden spacers against the annulus housing, and the pops sounded wooden.

Was that the sound of my bearing going on crooked? I assume I should not have heard any such sound.

Finally, the Buckeye article says: "The annulus head bearing (or OD middle bearing) was pressed onto the annulus shaft until it was snug against the shoulder." Does it really go right up to the shoulder? Mine stopped shy by about 1/16 inch.
 
I think the tool is only for the early cast iron piston rings. The rubber ones just go on with your fingers.

Mine made some popping noises as well, which seems to be common. I assume that it's caused by a "stick-slip" condition where the static friction is higher than the moving friction. So once you get enough force on to start it moving, it keeps moving for some distance then stops until the force builds up again. Anyway, that's my story and I'm sticking to it.

The inner race of the bearing should come up against the shoulder. That leaves some room between the outer race and the annulus, though.
 
I guess I better ask. If I snap off any of those set screws holding those shift forks (all to just replace those O-Ring seals), am I in a world of hurt? Is that a common occurrence?

I know I've been warned about that, but is it a real likelihood that will happen?
 

Attachments

  • 27391.gif
    27391.gif
    100.4 KB · Views: 283
I broke quite a few, until I switched to using an 8-point socket & a T-bar.

But they weren't terribly hard to drill out (hint: use a Dremel to grind a flat spot to drill), and I was able to rob some non-locking pins from an earlier top cover, so it wasn't that big a problem for me.
 
At your advice, I have both that socket and a T-Bar.

But how do they "lock"? Why so hard to remove?

I assume you drilled right down the center and used an easy-out?

Oh, and of course more questions: What torque do you use putting them back in, and how can you dare re-use something so prone to break?

Imagine one coming loose and dropping down into the gears. I'm imagining an explosion below my hip.
 
The nose of the pin is a "locking" taper, which tends to get tighter over time. Mine weren't really all that tight, IMO it's just that the nylon insert makes them really weak. And come to think of it, I did not reuse any of the ones with the nylon insert.

IIRC (it has been quite awhile), there was no way to get an easy-out in there. So I drilled large enough to break the pin, and then used a dental pick to clean out the threads.

Sorry, I don't know how to describe the torque. Just firmly tight; and then of course the ones I used required safety wire.

I see where Moss now has the later ones listed as available; but they sure aren't cheap!

PS, I'm having a senior moment, can't think of the fellow near Tucson (I think it was) that said he had a pile of gearbox parts laying out back. Something like Bill at "Slightly Classics" or something like that. Anyway, Geo knows him (the parts are leftovers from gearbox conversions) and there might be some early taper pins in the pile. If it's still there. And if I haven't hallucinated the whole thing.
 
TR3driver said:
PS, the other option of course is to just leave the whole thing alone. Those old rock-hard seals won't leak TOO much, and if the detents were right 45 years ago, no doubt they are still fine today.

I'm liking this advice the more I read it. Why risk snapping the pins, drilling out the plugs, etc., all to rid myself of a few drops of fluid per year. After all, it's a Triumph, and if I get the rest of the OD correct, I can celebrate that one day off in the future, when boredom strikes, there may be a reason to pull the transmission yet again.

BTW, that's Bill Close in Mesa who likely has the parts you mentioned.
 
Plus of course you don't have to pull the gearbox to rework the top cover. It comes off easily with the gearbox still in the car. Just toss a sheet of cardboard or some rags over the top, to keep it clean while you work on the cover.
 
Still learning:

I pressed in the front and rear annulus shaft bearings. The bearings are new. I then torqued transmission flange to 100 lbs as recommended.

When I was done I found that the shaft doesn't seem to rotate freely--at least nothing like the free rotation of a front wheel on the suspension.

In fact, my concern is that it's actually a bit tight. I put a weight gauge on one of the 3/8" flange holes and it took 4 lbs of pull to rotate the flange and annulus shaft. If I spin it by hand, it immediately stops when I lift my hand off.

I did use assembly lube on both bearings if that is relevant. I acknowledge it's thick and gooey.

Anyway, have I done something wrong? Does this sound as if I've got the bearings loaded? I did remember the spacing washer.

Thanks.
 
Yup, sounds exactly like the bearings are loaded. It should spin freely. If you are sure the bearings are seated up against all of their respective shoulders (both on the annulus and in the housing), then the spacing washer is wrong.

Apparently it's not uncommon for new bearings to not quite be the same thickness as the originals. It used to be that they would be exactly the same, but apparently the bearing makers are slowly converting to metric or something. I suppose we should be grateful that we can still buy bearings for 50 year old equipment.
 
I can tell this is going to be a long, learning process, and already is. But it's sure fun.

I've got the annulus bearings now seated better, and they spin just fine. However, I have end float of .001, and it should be at least .005.

I think everything is seated correctly, though I can check the outer shell of the rear "tail" bearing again.

If I continue to have this little end float, my guess is that I should first try a thicker spacing washer on the annulus shaft?
 
I think I'm off and running. Those Buckeye articles and links are incredible. The "reassembly" article mentions exactly the problem I had--in two respects. First, I had failed to press the head bearing far enough onto the shoulder of the annulus, even though Randall had clearly warned me to do that. Second, I had failed to press the tail bearing all the way onto the shoulder in the rear housing. I heard snaps both ways. I assumed the flange and flange nut would have addressed the rear seating, but I was wrong.

Now I have just a hair over .004 end float. Spec is .005 to .010. I know I may be a bit dismissive about this, but for me, on a 50-year old car with new bearings and Harbor Freight tools and gauges, that has to be close enough.

I'll be back.

Happy New Year to all.
 
The bolts on my OD adapter plate have holes so I'm safety wiring per the manual.


The wires wrap around the bolt very closely, but when I measure the bridge pieces and securing nuts on the back of the cone clutch and ring gear assembly it appears that if the bridges were pushed all the way back to full contact, the bridge pieces could hit the wires. In other words I see no clearance here unless, of course, the pistons can't possibly push the bridges back that far.

If I wire the bolts so that there is no wire on the inside edges, I won't be following the recommended technique of wrapping in the "tighten" direction.

Is there an issue here or am I imagining one? Perhaps the pistons only move slightly?

Sorry to perpetuate the opera here but I'm trying not to learn solely from mistakes. thx
 
I believe you're imagining, Marc. The pistons only move by maybe .050" or so in operation. Try installing the brake ring and see if you can still find interference.
 
Back
Top