• The Roadster Factory Recovery Fund - Friends, as you may have heard, The Roadster Factory, a respected British Car Parts business in PA, suffered a total loss in a fire on Christmas Day. Read about it, discuss or ask questions >> HERE. The Triumph Register of America is sponsoring a fund raiser to help TRF get back on their feet. If you can help, vist >> their GoFundMe page.
  • Hey there Guest!
    If you enjoy BCF and find our forum a useful resource, if you appreciate not having ads pop up all over the place and you want to ensure we can stay online - Please consider supporting with an "optional" low-cost annual subscription.
    **Upgrade Now**
    (PS: Subscribers don't see this UGLY banner)
Tips
Tips

Body panel alignment

BOBBYR

Jedi Trainee
Country flag
Offline
Hi Gang, I hope you all are doing well. In the past ,I have read a lot of posts that lead me to believe , the engine and transmission should be out of the car when fitting body panels. What is your opinion ? I realize that the frame has to be in good condition and mine is in good shape. As always I appreciate your help and wish you all a great holiday season.
Bobby R
 

RAC68

Darth Vader
Offline
Hi Bobby,

I totally agree with Rick and Superwrench that the panels should be attached with the car fully loaded. Since the panels are unstressed, you want the substructure to be normally stressed with the weight of engine and transmission and sitting properly on its wheels...not jacked up in any way.

When applying the panels, I usually start with the front shroud and then attach the fenders followed by the doors. This allows you to move the doors and lower part of the fenders to make sure you have an acceptable and even door gap and an even cove line. With the doors in place, I would attach the rear shroud and apply the rear fenders. By initially applying the fenders loosely at first, you will be able to move the panels sufficiently to find the best fit. Do not expect perfection as the body panels were not perfect to begin with. However, a good body shop will be able to use a sufficient amount of fill and block sanding to come close.

Hope this helped,
Ray (64BJ8P1)
 
Last edited:

jjs64bj8

Senior Member
Offline
Just completing the reassembly of a 64 BJ8. After the bare frame/chassis was sandblasted and epoxy primed, we installed about 900lbs of concrete patio square slabs where the engine and transmission go. We tried to approximate the weight distribution as best a possible. We had made a couple of frames that spanned from the from engine mounts to the rear tranny mount on which the blocks sat. All of the initial body work and fitting/adjustments were made with the weights in the chassis. We made special mounts that attached to the suspension pickup points to simulate the the car sitting on the four tire points. The fenders/doors/shrouds were on and off the car a zillion times until we got it as close as we could withing our ability. After we were satisfied the weights were removed and the chassis was painted. Assembly is in progress.

Since the engine and tranny will be going in the next few weeks we will see how our approximations worked. The car is on the ground with suspension and wheels and tires installed. Once the engine is in then the process of refitting all the body panels begins again for final adjustment before paint.

If I had to do it all over again I would have seriously considered a new frame from Jules or Kilmartin, but our budget just did not allow it and our frame while not perfect wasn't all that bad. We will shortly see.

jjs64bj8
 

RAC68

Darth Vader
Offline
Hi JJS,

You seemed to have gone quite far to replicate the loading of engine and transmission on suspension to fit your body panels. Why didn't you just wait for all components to be installed before fitting shell panels?

Just wondering,
Ray (64BJ8P1)
 

jjs64bj8

Senior Member
Offline
RAC68

I did go quite far but I wanted to do all the frame and body work before the frame/chassis was was painted. Otherwise there would have been a mess in my little garage and having the engine/tranny and other final pieces installed would have become filthy and very difficult to clean up. Grinding/welding/block sanding etc. Now I can install a pristine engine/tranny into the painted chassis.

Also although I said my frame (rails) were not in bad shape, I did have to do some repair. So did I do a lot of extra work-probably, but hopefully in the end when we start re-fitting the body there will be minimal adjustments. Then I can go straight to having the pieces painted and the completed chassis remains nice and clean.

Thanks

jjs64bj8
 

Frameman

Senior Member
Offline
The engine and transmission should not have to be in car when fitting the panels although this is the belief of many. If the chassis sags under static loading it will certainly sag when the load changes to dynamic loading. A sound structure will not change dimensionally. You should be able to fit your panels without the weight in the car. Installing the engine is not going to fix panel fit. The chassis has to be sound for good panel fit. Installing the engine on an original chassis may appear to assist you in panel fit but once you drive the car the panels will become misaligned if the chassis is weak. We have seen this hundreds of times in our shop.
Martin
 

healeyblue

Jedi Warrior
Gold
Country flag
Offline
I agree with Martin. I did not have any components on our frame when I did the body work or panel fittings. Once everything was painted and put back together, they all still fit just like I aligned them during the mock up stages.
Jim
 

Keoke

Great Pumpkin
Country flag
Offline
I agree with Martin. I did not have any components on our frame when I did the body work or panel fittings. Once everything was painted and put back together, they all still fit just like I aligned them during the mock up stages.
Jim

Yeah but are they correct!!!
 

healeyblue

Jedi Warrior
Gold
Country flag
Offline
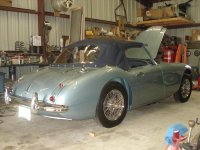
Is what correct? My panel fitment. I believe so!! If the frame rail is of good integrity doing it this way should make no difference.
 

Attachments

  • 2013-04-24 021.jpg
    2013-04-24 021.jpg
    69.6 KB · Views: 87

Healey Nut

Luke Skywalker
Country flag
Offline
Yeah but are they correct!!!

Define correct ?

Im with Martin . if the chassis flexes you have bigger things to worry about than door gaps .
 

RAC68

Darth Vader
Offline
Although I would concur with Martin if panels are to be installing on his new and other very pristine frames with very little or no flex, I contend that most Healey frames have age deterioration which is not obvious. Externally obvious deterioration is usually corrected, however, internal frame rust deterioration and/or weld-attached panels are harder to identify and can, in most cases, be overlooked. In short, the engine and transmission can stiffen and reinforce the chassis and the running gear will allow the structure to sit as it will with stress placed as in all key areas expected. Yes, when stressed when driven and pushed, additional deformation with take place, however, some of this will be supported by the panels and taken up by the initial chassis pre-load. Yes, it is possible to get a good fit with without the weight as others contend and show proof of. However, why take the risk and why not install the panels after all is in place and not have the concern of destroying or scratching the shroud trying to slide the engine, possibly with the transmission, through that small opening? Installation with all open makes it much easier ... My opinion.

Ray (64BJ8P1)
 

Keoke

Great Pumpkin
Country flag
Offline
Is what correct? My panel fitment. I believe so!! If the frame rail is of good integrity doing it this way should make no difference.

Well original frames were of the poorest quality steel available at the time in the UK. That was because DMH had no history of manufacturing / exporting cars and good steel was reserved for manufacturers with exporting track records.
 

Keoke

Great Pumpkin
Country flag
Offline
Define correct ?

Im with Martin . if the chassis flexes you have bigger things to worry about than door gaps .

"Define Correct":
true or accurate:angel2:

OH !! I'm with the leave engine and tranny in Guys TOO.----:encouragement:

RAC68 That was a good response.--Keoke
 

RDKeysor

Jedi Trainee
Bronze
Country flag
Offline
While I have no personal experience on this issue, it's a worthy topic for discussion. A local club member has a car that was not properly positioned during an major restoration. I think this included floor replacement. The result is an inability to fit the top and door latches that have been inset into the rear jam. This car, otherwise, appears to be near perfection. A relative had a Porsche 356 coupe restored several years ago in Virginia--it recently sold for almost $80,000--and I visited the shop during restoration. As I recall it was mounted on a steel frame with wheels and literally welded in place during the restoration. For sure that would have been even more critical for a convertible or Speedster. I have forgotten just how that was done, but I must say the result probably exceeded the factory's usual fine workmanship.
 

jjs64bj8

Senior Member
Offline
As I earlier posted in this thread we will find out in a few weeks if my pre-loading the chassis with simulated weights during initial body panel fitting was worth the effort when drive train goes in. I can say after we had installed new outer rockers (sills), new trunk floor, new drivers footwell, new drivers floor, etc, I measured the door gaps at the top on each side unloaded. Upon loading the chassis with almost 900 lbs the deflection (reduction of the gap) on each side measured with a micrometer was less than 1/32" at the top. Before any of the chassis repairs the door gaps before removing any body panels (doors) assembly very tight at the top so the repairs did help. The chassis repairs were done unloaded, only the body fitting adjustments were done loaded.

The same procedure will be repeated before and after the engine/tranny installation with the chassis now resting on 4 new tires and the suspension. We shall see.

I wonder what the deflection before and after engine/tranny installation is with today's new frames. From what I read here it must be zero. I also wonder what it might have been way back when with a brand new original frame. Anyone know if this was ever measured? From what I read when these cars were being built, they had a pile of fenders and doors on the assembly line to get the best fit, so things certainly were not perfect.

jjs64bj8
 

Healey Nut

Luke Skywalker
Country flag
Offline
The story I heard about panel fit was as the cars came down the line the worker had a pile of wings etc to choose from . He picked up a wing and offered it up to fit the car . If it didn't fit it was marked with a wax crayon and he would try another . Once the wings got 5 marks that's it they were going to the dealers to be used as replacements for cars that were dinged in accidents and the wings would have to be modified to fit the bent cars .. Not sure how true this but I wouldn't be surprised if it was somewhat true .
 

Frameman

Senior Member
Offline
If you believe your chassis is sound why not test it by putting the engine and transmission in, install the door and the rear fender, set your door gap up, then put a jack under the frame where the rear outrigger attaches to the chassis, then jack it up so the rear wheel and the front wheel are off the ground. Then check your door gap again and see if your door will open and close. This illustrates the effects upon the car when it travels down a road with dips.
This demonstrates the chassis being loaded and off loaded statically.
Another way of testing your car is to have 4 friends,weighing 250 lbs each, get in your car and move around like they are going down a bumpy road and see what happens. This would represent dynamic loading to the chassis. This would represent pot holes, rail road tracks and other challenges roadways offer.
We have a car in our shop today on our chassis who hit a deer at 50 mph. The chassis survived the deer did not.The door gap remained was unchanged. It should be back on the road in a few weeks. BTW the car has over 100,000 miles since the chassis transfer.

The engine and transmission do not add any rigidity to the chassis simply because it is rubber mounted.

As for the comment about the fenders being put to the side, these were in fact rear fenders as these cars were folding up on the assembly line as they were being built.

I respect the fact that we all cannot have new chassis in our cars, I just wanted to help people to understand what the car is going through and help you to get the best possible panel fit for your car.

Martin
 

RAC68

Darth Vader
Offline
Martin,

I always respect and value your inputs.

I do understand that the engine and transmission will not provide additional rigidity to a new or well aged chassis as rigid as the one your company provides, I would have thought its weight and structural positioning would provide advantageous pre-loading to an original (aged deteriorated) frame and better position the total structure to a closer proximity of how the car will sit when completed. As such, I would have thought that having the weight in the car will allow better fitting of the outer panels.

Although all panels were pre-fitted without the engine and transmission installed, I guess I was never secure enough during my restoration to consider installing the engine and transmission after the final panel fit. I still remain insecure when helping friends pull and/or replace an engine through the shroud opening on a completed car and would personally opt to taking the time to remove the shroud and fenders (I know a lot of work but much safer with an easier engine de/re-installation).

Thank you for all your contributions.

Ray (64BJ8P1)
 
Similar threads
Thread starter Title Forum Replies Date
M BJ8 Inner Body Panel Repair Austin Healey 2
Csarneson Body panel assembly order? Austin Healey 6
BOBBYR Body Panel measurements and angles Austin Healey 6
Tinkerman TR2/3/3A 1960 TR3 A More body panel assembly questions. Triumph 5
S TR2/3/3A body work on the spare tire panel Triumph 7
GTP1960 TR2/3/3A New left front wing body panel from TRF? Triumph 11
W Likely need a few Bugeye inner body panel parts Spridgets 0
J Best body panel parts Austin Healey 8
Tinkerman TR2/3/3A 1960 tr 3a body panel allignment Triumph 8
wangdango inner body panel painting/welding/etc Austin Healey 3
O TR2/3/3A TR3 Body Panel Fitting Triumph 4
P Body Panel Numbers Austin Healey 7
C Body panel beading Austin Healey 6
R BJ7 body panel reassembly- seals etc question Austin Healey 7
71tr body panel seam sealer Triumph 1
J Can a TF engine be installed in a TD body? MG 7
D Wanted Square body LCS fuel pump Austin Healey Classifieds 13
D Wanted Wanted square body fuel pump Jaguar Classifieds 0
Got_All_4 TR6 Seal To Body Mounting Bracket Welded? Triumph 7
K TR6 Goodparts Trail arm kits mounting just to the frame( no body) and shims? Triumph 9
Editor_Reid V-12 E-Type Body Number Location Jaguar 3
5 MGA Body and Chassis Separation? MG 2
Bayless How does '67 Sprite top attach to body? Spridgets 3
Rod-H TR4/4A TR4 Body Number Plate Supplier Triumph 6
1 TR2/3/3A Best Rustproofing for inside of body. Triumph 7
K TR2/3/3A The "wide body" TR3? Triumph 6
W TR2/3/3A Interior and Body Colours Triumph 14
PatPink TR6 Hello, I am new to the site and want to post some photos of my 1973 TR 6. I have done all mods to this car except body and paint. Triumph 10
Ericstammer TR4/4A TR4A body on TR4 frame Triumph 0
D Body/Paint Shop Recommendations Austin Healey 1
apbos TR5/TR250 TR250 rolling chassis and body for sale Triumph 3
T TR2/3/3A Question on TR3A front body mounting Triumph 6
T For Sale Free - Body Jig for TR3/TR3A Triumph Classifieds 6
T TR2/3/3A Body Tub Weight Triumph 8
D Wanted: Healey 3000 MkIII body and chassis Austin Healey Classifieds 0
T TR2/3/3A Should there be a body ground strap to battery on TR3 Triumph 7
J TR2/3/3A Need help with pivot and body bracket for hood Triumph 2
D TRIUMPH TR6 BODY SHELL Triumph Classifieds 1
B After bead blasting the body I noticed some interesting things… Spridgets 2
S Inner Body Alignment Austin Healey 0
B Body Reassembly Austin Healey 2
S TR2/3/3A Body Mounting Bolts. Triumph 14
F TR2/3/3A front body mounts Triumph 7
jdubois GT6 After over two years stalled at the body shop, my GT6 is starting come back to life! Triumph 5
J Wanted WTB Triumph TR6 Body/ Rolling Chassis Triumph Classifieds 0
Lotuswins Wanted TR4 H6 rear carb body Triumph Classifieds 4
nichola TR6 Recommendation for tail lamp to body gasket Triumph 16
X Production year based on body number ? TVR 3
TRclassic3 TR2/3/3A Body leans to right side Triumph 10
S For Sale Austin Healey Sprite and MG Midget Factory Body Parts Manuals - 1958 - 1974 Austin Healey Classifieds 0

Similar threads

Top