• The Roadster Factory Recovery Fund - Friends, as you may have heard, The Roadster Factory, a respected British Car Parts business in PA, suffered a total loss in a fire on Christmas Day. Read about it, discuss or ask questions >> HERE. The Triumph Register of America is sponsoring a fund raiser to help TRF get back on their feet. If you can help, vist >> their GoFundMe page.
  • Hey there Guest!
    If you enjoy BCF and find our forum a useful resource, if you appreciate not having ads pop up all over the place and you want to ensure we can stay online - Please consider supporting with an "optional" low-cost annual subscription.
    **Upgrade Now**
    (PS: Subscribers don't see this UGLY banner)
Tips
Tips

So i have the bits of the Jigsaw - How do i finish the car ?

chicken

Jedi Trainee
Country flag
Offline
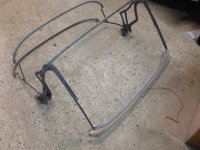
I have the BJ7 up and running and want to get the hood on so i can actually drive the car this summer to my wife's sisters wedding ! Its been a while since i last uncovered the car.
I have the hood folding frame with a wooden bow, i think i have a tonneau chrome moulding, the Ali finisher strip, seal strip

I need a new drain channel as mine is shot, the book also shows a rail trim hood rear ??

I am a bit confused as to where to start.


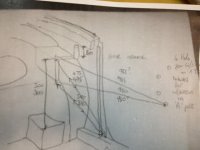
  1. i need to mount the hood brackets

fit a new drain channel

i can then get my trimmer to fit a new hood but want to understand how all the bits/finishes go together, please help so i can impress my sister in law !!


Attachments

  • hood frame.JPG
    hood frame.JPG
    143.5 KB · Views: 81
  • hood mount.jpg
    hood mount.jpg
    85.7 KB · Views: 88

DerekJ

Luke Skywalker
Country flag
Offline
Best bet is to find a club member close by with a BJ7 then go and inspect it and take some photos.

Do you have the AH Spares catalogue? Those diagrams should also help.
 
OP
chicken

chicken

Jedi Trainee
Country flag
Offline
Derek, good idea, yes have a AH spares book and others (allthough old ones)

Any BJ7 members on here from Norfolk !!
 

stevebn2bj7

Jedi Warrior
Offline
Hopefully you do not have the rear half of the body permanently attached. That drain channel needs to be attached to the rear shroud BEFORE you rivet it to the chassis. Impossible to get it in otherwise.
 
OP
chicken

chicken

Jedi Trainee
Country flag
Offline
Steven, Oh that may be a problem then, rear shroud is all fixed !!!

Any suggestions, tricks on how to fix the drain channel in situ ? shrink to the size of an ant and have many hands ?
 

stevebn2bj7

Jedi Warrior
Offline
Unfortunately no. You may not have to remove it entirely but the fenders would need to be removed if they are installed, then the two large pop rivets would need to be removed to rotate the shroud up. The lip of the drain channel needs to be behind the lip of the shroud.

The only other thing I can think of is to bend the shroud lip up, insert the drain channel and then bend the shroud lip back. But that leads to great risk of damage to the paint and body work.

Sorry for the bad news.
 

Patrick67BJ8

Obi Wan
Silver
Country flag
Offline
Hopefully you do not have the rear half of the body permanently attached. That drain channel needs to be attached to the rear shroud BEFORE you rivet it to the chassis. Impossible to get it in otherwise.
The body shop that did my Healey forgot to put the drain channel back in. Options were to undo half of the shroud, maybe including rear fenders. A call to David Nock of British Car Specialists confirmed that it is very hard, 50 50 chance, of installing the drain channel after the shroud is in place but it can be done. The body shop was(with a lot of twisting) able to install the drain channel without removing any other body parts.
 
OP
chicken

chicken

Jedi Trainee
Country flag
Offline
Steven

So it lips behind the back section of the shroud, i will investigate further, seems a shame to start dismantling the car when i'm so close to finishing !

2 steps forward 3 steps back !
 

British_Recovery

Jedi Warrior
Bronze
Country flag
Offline
If twisting and bending doesn't work to get it in place, maybe cutting it into two parts would allow it to be placed. Then reconnect with a small plate and seal. The metal strip that the top mounts to will help unify it all. Just a thought. The original construction has a welded seam near center.
Good luck,
Bob
 

stevebn2bj7

Jedi Warrior
Offline
Steven

So it lips behind the back section of the shroud, i will investigate further, seems a shame to start dismantling the car when i'm so close to finishing !

2 steps forward 3 steps back !

Unfortunately that is correct. Cutting it in two as stated here may work to get it in place but I would be concerned about it leaking at some future time.

Another common mistake I have seen on the BJ cars to try and avoid. Put the windshield, or windscreen, in place before you put the dash top pad in place. Many times I have seen that center bracket placed on top of the dash pad.
 
OP
chicken

chicken

Jedi Trainee
Country flag
Offline
Bob
Can Anyone help with this ..
Just had a quick look and think i can tuck it under the shroud, bit tight but should go. Do i then lip up behind the shroud and rivet from the front ?

Is it actually seen when the hood is on as just wondered about painting it, should it be body colour or black.

She's a bit rusty in places with lots of small holes so thinking best to weld a cover strip over the back and bottom (which i guess aren't seen) think spotting the holes will blow them open more.

Rob
 
Last edited:
Similar threads
Thread starter Title Forum Replies Date
mctriumph Morgan +4 bits Other British Cars 0
Basil Drill Bits (and other tool reviews) Restoration & Tools 9
P Spitfire Bits Triumph Classifieds 1
Sopwith_Camel bits and bobs on a xj x300 Jaguar 2
simon1966 Does taking a stock BN1 and adding M bits increase its value? Austin Healey 10
TomMull TR2/3/3A Little Bits and part numbers Triumph 3
6TTR3A TR2/3/3A Free bits Triumph 0
TomChar TR6 '74 Clutch & various broken bits Triumph 20
aeronca65t Worn clutch bits, etc Spridgets 11
C What are these rubber bits? Austin Healey 2
F Spitfire Where do these go?? [interior bits] Triumph 2
C Daimler SP 250 - Pedal Rubber/Pads + other bits Other British Cars 6
Tr3aguy TR2/3/3A Need TR3 bits for steering support!!! Triumph 18
M_and_P Wanted: A few Bits Spridgets 3
S New Owner Chronicles Part 1: Interior Bits Austin Healey 22
Scott_Hower Engine bits delivered to machinist... Triumph 7
J Datsun 5 sp bits Spridgets 4
R drill bits Austin Healey 6
J Lucas Electrical Theory and other silly bits Triumph 6
jvandyke gearbox bits Spridgets 0
RickB Recommended seller of Spridgety bits Spridgets 4
Jim_Gruber PosiDriv Bits for Door Hinge Screws Spridgets 11
Tinkerman TR2/3/3A Bits and Pieces Identification TR 3A Triumph 5
T Keith [Mallard] - any luck getting those bits on? Triumph 3
MCNX_BFF Thanks to Deutsch Brit Bits and the Guys Triumph 3
T 1973 MG Midget bits identification Spridgets 7
S MkI headed to the scrap yard....what bits to pull? Jaguar 4
PeterK TR4/4A Painting small bits on TR4A Triumph 2
T What what bits specifically are the "pumpkin" Triumph 12
G MG and Morris 10 engines, any swapping bits ? MG 5
DrEntropy Heads-up regarding electrical bits: MG 0
Tinkerman TR2/3/3A Painting Small Bits on my TR3 Triumph 16
C Wedge TR8 FI bits wanted Triumph 8
Morris Good deal on Pozidrive bits Spridgets 2
abarth69 My Engine Bits ARRIVED Spridgets 3
B Brit bits and pound vs. dollar Spridgets 17
drooartz Soon this bench will be covered in greasy bits... Spridgets 4
drooartz The weekly Tunebug Latest: painting bits Spridgets 4
eschneider more help with xke bits - tonneau? Jaguar 3
eschneider help ID'ing e-type bits? Jaguar 6
Banjo Doin little bits for my resto.. Triumph 5
rlandrum Engine to Tranny Mounting Bits Triumph 4
Z BN1 bits Austin Healey 16
vping Anyone have Used seat covers or interior bits.? MG 4
T More DPO Pedro Bits Triumph 7
O The last bits Spridgets 0
T Rear light bits arriving Triumph 27
IanF Spitfire Need '79 Spitfire wiring bits Triumph 0
drooartz Broken bits Spridgets 1
BritCarFan Mini body panels and bits British Motor Corp 4

Similar threads

Top