• Hey there Guest!
    If you enjoy BCF and find our forum a useful resource, if you appreciate not having ads pop up all over the place and you want to ensure we can stay online - Please consider supporting with an "optional" low-cost annual subscription.
    **Upgrade Now**
    (PS: Subscribers don't see this UGLY banner)
Tips
Tips

TR2/3/3A How would you de-gap these gaps?

bnw

Jedi Warrior
Country flag
Offline
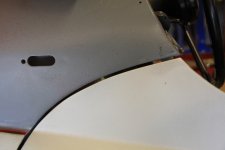
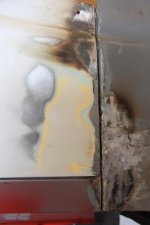
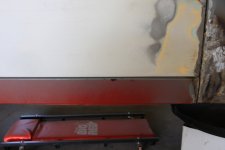
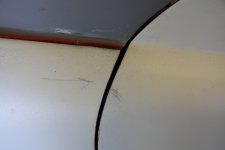
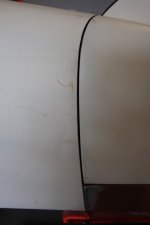
Would you grind-weld-grind? Or would you mess with the body to frame spacers? And if so, which ones? Engine compartment, front body, floor? Can you do some without the other? door gaps 001.jpgdoor gaps 004.jpgdoor gaps 005.jpgIMG_6518.jpgIMG_6519.jpg
 

bertl

Member
Offline

I assume that your outer sill is already welded into place along with the A&B posts, and you have used a straight edge along the bottom of the door from rear quarter panel to the front fender and this shows no gaps ? and you've aligned the front fender to it's best fit to door. No adjustment on the frame spacers ( outriggers and spacers on frame in engine compartment) is going to change your alignment on the door because everything is attached to the inner sill. The only option I see is - get your vertical body line on the r-quarter panel straight first, work your way forward and use a small dia rod (you can bend it to conform to the door edge) to match the door panel thickness and tack weld it along the edge of the door and grind back to get your gaps. This requires a lot of door on-off checking but if everything else is welded into place then you only have the door edges to work with.

I'm in the middle of the same problem but my situation is that I have just tack welded the A&B posts to frame while fitting the outer sill. I remove and install the door to check my alignment. I also have the lower fender patch panel to contend with in my process.
Hope this helps
Bert
 

CJD

Yoda
Country flag
Offline
You are sooo close!

The spacers will only help with the rear door gap at this point. It appears just a tad larger at the top than the bottom, so an extra shim at the rear of the body could even that. It is so close though, that it would not take much.

The lower door gap appears good across the bottom till maybe the rear 6 inches? For that, anything you do to move the door will not help. I would lean towards just a skim coat of body glaze on the rear top of the sill.

The door to scuttle looks similar to the lower door gap. It looks like good spacing, but just irregular. A skim coat of glaze on the bottom of the scuttle looks like all it would take to even it out.

Are you happy with the front door to wing gap? In the pics it's hard to tell...it really looks pretty good. If you don't like it...the hing would need to be compressed to tighten it up...which will increase the rear door gap...which means more edge welding on the door. In the pic, I don't think it looks bad the way it is.

You've come a long way...great work!
 

Jerry

Darth Vader
Gold
Country flag
Offline
looks like you have not painted yet. Depending on the color, IE: dark colors, the gap would not show as much, light colors it will, plan for paint thickness. I did not plan for enough, and had to come back and file down some areas. The opening of the door needs almost an 1/8 inch.

Jerry
 

M_Pied_Lourd

Darth Vader
Country flag
Offline
I think that they look pretty darn good as is.

Cheers
M. Pied Lourd
 
OP
B

bnw

Jedi Warrior
Country flag
Offline
WOW! Thanks for all the great words of encouragement! I like Johns idea of using the body glaze. Are you referring to the tube of polyester "icing" I have but have but have yet to use? If so, would I be building up the leading edge by "glazing" the door edge and the surrounding areas as well? And as to Bert's questions, I "farmed" out the inner, outer sills land floors to a body shop several years ago. It was probably a mistake. Even though the body was braced and the sheet metal was installed, the shop really didn't know Triumphs and I've been fighting their work for years.
 

TexasKnucklehead

Jedi Knight
Country flag
Offline
...I'm no expert, but I can tell you what I did and how it came out.

It came out looking great, but that's just my opinion, and it did take a lot of time.

The door gap where you have the pencil arrows, at the top curve of the fender, needs to have the most space. When the door opens, it has to move past the fender edge without scraping off paint. Your gaps look fine, although the door/fender edge does seem to be uneven/inconsistent. The door (skin) edge is rolled onto the door frame. If you take some masking tape (or a fine line marker), you can lay out a more consistent line/gap that you would like it to be. Then you can remove the door, and use a hammer/dolly to roll the edge where you want it (assuming you can only move it towards the back -a larger gap). You can do the same with the edge of the fender (moving it forward). If you hammer it too much, or move it too far, the sheet metal will crack or separate. Then you have to carefully weld it back together, grind and reshape it. I used some plastic tile spacers to check all the gaps (all the way around) because you can't trust your eyes -or at least I can't trust mine.

The door bottom to outer sill can be moved with a block of wood and a BFH. It helps if you use a jack, or two to support places you don't want to move. I have a pre-60K, so my sills and door bottoms are curved (top to bottom and front to back) while the post-60K are more flat (front to back). I did not try to curve the new sill, instead, I matched the door to the sill (some bending and some filler). Once again, a block of wood can be hammered into the corner at the top of the sill and significant movement is possible. When it's all done, a skim coat of filler can hide the hammer marks (assuming they are not too big).

I see something on your car that looks like mine. Take a straight edge, and lay it down the B-post, where the sill is closest to the dog-leg (where the rear edge of the door closes). You need to be sure that outside line is straight all the way to the bottom of the sill. My dog-leg repair wasn't done exactly straight, and I didn't notice it until after it was painted. (Much too late.)

I used 3M seam sealer to close the gap between the sill and the dog-leg. It's supposed to remain flexible, but can be painted. It took several coats of primer to get it to look smooth, but I like the way it turned out. Many prefer to let that gap open.

Another thing to remember about door gaps is the amount of movement they might have after everything is together. By movement, I mean the door is closed and latched, but the flexing of the tub (whilst spirited driving) will create relative door movement. You should be able to pull the door up and down as much as the hinge will allow, without the edges of the door hitting the fender, cowl or b-post. -The latch can be set to disallow most downward movement, but it should be easy to open/close even if its on an incline.
 

trrdster2000

Luke Skywalker
Country flag
Offline
I agree, unless you plan to jump into your car each time and never open the door. The only way to get a filler to stick on the edge of the door is to drill 1/16 inch holes all the down the edge and pack it in, it would work better on the pillars instead of the door itself.

Wayne
 

CJD

Yoda
Country flag
Offline
Definitely no glaze on the sharp edges of the door. It has to have a large base to adhere properly. The top of the sill and bottom of the scuttle are the only places it will work. No more than 1/16" thick, but I think all your gaps are within about 1/32" from the pics. Like I said, you are very close!
 

HealeyRick

Yoda
Silver
Country flag
Offline
Definitely no glaze on the sharp edges of the door. It has to have a large base to adhere properly. The top of the sill and bottom of the scuttle are the only places it will work. No more than 1/16" thick, but I think all your gaps are within about 1/32" from the pics. Like I said, you are very close!

Are you talking about building up this area on top of the sill with glaze?

axxn8.jpg


I just don't see that as likely to be a long-lasting repair.
 

M_Pied_Lourd

Darth Vader
Country flag
Offline
On the 3A that I am working on, the gaps were pretty bad being that it was a vintage race car for quite a few years and it recieved some bumps and bangs over the course of it's career. I ended up welding in some metal rod on the rear edge of the fender and along the top saddle piece where it meets the door.
My gaps are still not perfect but are much better than they were...
Cheers
M. Pied Lourd.
 

CJD

Yoda
Country flag
Offline
Are you talking about building up this area on top of the sill with glaze?

axxn8.jpg


I just don't see that as likely to be a long-lasting repair.

It will last as long as there is paint. It's not intended to repair...just about .03" thick to true that line.

There is an alternative. Beat the front of the sill down to straighten the line, but then the good gap will increase...so the door has to shift down, increasing the scuttle to door gap....so then youre edge welding the top of the door. Or, edge weld the door and grind it back to match the sill...and then rework the warpage you get from the heat.

This is one of those situations that you can spend 10 hours working the metal...for .03". Or add 6" of glaze that will take 10 minutes. I know what I would do!
 

CJD

Yoda
Country flag
Offline
I would love to learn lead! Be sure to post pictures. It's obvious from the bodies I've worked on that the factory used lead as a matter of course in several spots.
 

TomMull

Darth Vader
Silver
Country flag
Offline
I would love to learn lead! Be sure to post pictures. It's obvious from the bodies I've worked on that the factory used lead as a matter of course in several spots.

True enough, and the panel beaters of that period did too. It does take a bit of knowledge, skill and practice to get i right, it requires enough heat to warp things a bit, and, in my opinion, won't do anything that bondo won't do.
Having said that, I think that preserving the old skills is as important as preserving the old cars.
Tom
 
Similar threads
Thread starter Title Forum Replies Date
R T-Series Valve gap for an MGTD 1953. MG 5
SNClocks Gap between inner and outer fenders Spridgets 0
Lotuswins TR4/4A Is this normal? TR4 gap between door and cowl Triumph 10
HealeyPassion Hood scope chrome gap fix ... Austin Healey 0
K TR2/3/3A Spark Plug Gap? Triumph 4
M TR2/3/3A Another TR3 Piston Ring Gap Question Triumph 1
J TR2/3/3A Hastings Piston Ring End Gap Issue Triumph 16
S TR2/3/3A voltage regulators gap and oxidation Triumph 10
R Plug gap for 907? Lotus 4
S TR2/3/3A little more door gap Triumph 14
DornTRoriginal TR2/3/3A Tub gap between Frame Drivers side Triumph 3
A General Tech BMCNE GAP Session photos - Triumph 2
D BT-7 tri-carb ring gap Austin Healey 10
R TR6 Engine Plate Gap? Triumph 2
Tim Tucker TR6 Trailing Arm NYLATRON bushing-washer gap questions Triumph 4
B Mallory Dual Point gap Austin Healey 4
Popeye TR4/4A Steering bushing: replacing rubber with poly, do I snug to 1/8" gap or...? Triumph 3
K TR2/3/3A Street cam again and Valve gap? Triumph 6
B TR6 Spark plug gap Triumph 5
C TR2/3/3A Piston gap orientation Triumph 2
B Plug gap Austin Healey 16
K TR2/3/3A Point gap and dwell..... Triumph 12
C TR4/4A Sudden loss of points gap Triumph 10
S TR2/3/3A door fender gap Triumph 14
KVH TR4/4A Proper Ring Gap Triumph 4
R Dennis Welch Rear Crank seal conversion - Gap in back plate Austin Healey 19
K TR2/3/3A Point Gap? Triumph 3
T TR4/4A What gap on Champion L-87YC spark plugs? Triumph 3
B TR2/3/3A Theoretical door gap question Triumph 13
K TR4/4A The Gap between the Door and the B Post on the 4A? Triumph 2
Intrisk BJ8 Front suspension screwed bush housing / threaded bush housing re-assembly gap Austin Healey 1
Barryp Door gap adjuster/ spreader tool question Austin Healey 4
richie Door gap/sag Triumph 4
T TR2/3/3A TR2/TR3 spark plug gap setting?? Triumph 8
D Spark Plug Gap Austin Healey 10
K TR2/3/3A TR3A Plug Gap? Triumph 6
T TR2/3/3A TR3 door gap Triumph 12
Marvin Gruber Plug gap does make the difference Triumph 19
K Paging Martx-5...What valve gap are you using? Triumph 0
memphis Wood Bow to Window Gap Austin Healey 20
K TR2/3/3A Spark plug gap TR3? Triumph 1
J TR2/3/3A Spark Plug Gap for TR3A Triumph 3
Jim_Newman Spark Plug Gap Austin Healey 9
G Spitfire 1500 Spit ring gap spec needed please Triumph 1
K TR2/3/3A TR3 Plug gap .032 or .025? Triumph 8
B Spark plug gap Triumph 4
F Spark Plug Gap Recommendation Austin Healey 3
R incease spark plug gap with pertronix Spridgets 3
MGTF1250Dave Spark plug gap with high voltage coil Triumph 17
VelodromeRacer Spark plug gap/heat range? Racing 8

Similar threads

Top