• Hey there Guest!
    If you enjoy BCF and find our forum a useful resource, if you appreciate not having ads pop up all over the place and you want to ensure we can stay online - Please consider supporting with an "optional" low-cost annual subscription.
    **Upgrade Now**
    (PS: Subscribers don't see this UGLY banner)
Tips
Tips

TR2/3/3A TR3 Interior [mostly] Done

martx-5

Yoda
Country flag
Offline
I've got a few things to tidy up like the wiring harness and put in the glove box and door, but all the rest of the interior is done...well, I still have the doors to do, but those shouldn't present too much of a problem. At times it was a fight, but now I can go rest for the remainder of the day. :thumbsup:

Edit: Man, I got to get a better camera. The pics I post are never really sharp. They seemed to be much better when I first got it. Does that little thingie you stick in there that records the pics ever get "tired"?? Maybe I need a new one of those.
 

Attachments

  • 12582.jpg
    12582.jpg
    64 KB · Views: 166
  • 12583.jpg
    12583.jpg
    48.3 KB · Views: 163
  • 12584.jpg
    12584.jpg
    62.4 KB · Views: 163

Mickey Richaud

Moderator
Staff member
Gold
Country flag
Offline
Looks great, Art!

Reminds me of when I did mine - same shade of red with white piping, but with Pearl White (cream) body.

I know you're proud of it - rightly so!

(Those elbows behind the doors were a BEAR, weren't they?!)

Mickey
 

Don Elliott

Obi Wan
Offline
Art - SUPER ! The holes for the two shiny screws you have at the top of the interior dog-leg are for securing the hood stick assembly with painted screws.

Also turn your gas filler cap so that the flipper is pointed towards the driver's side - not straight down. If you leave it like it is you, (or someone else) will lift the trunk lid too high and that pointer will put a dent in the trunk lid. For LH drive TRs, the flick opener should be to the driver's side for his ease of opening it when filling the tank with that rich stuff we used to call gasoline.
 

angelfj1

Yoda
Country flag
Offline
Art:

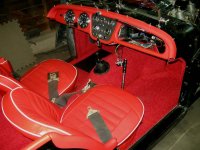
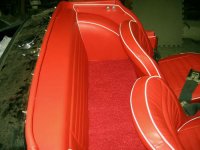
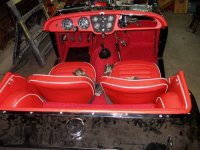
Your work looks beautiful. I know how tedious this is and the older I get the less patience I have. Actually, my wife did the interior of the TR250 back in 1985. She is so detail oriented and has the patience of Job. Maybe I can persuade her to do the 3A.

I have a few questions. I have been told that in order to cover the dash and door tops, which are leather, some people actually boil the leather to make it more pliable. Did you do this? I’m a little hesitant about doing this because I waited for several months for the trim kit to be made and shipped from England. I don't want to damage the leather!

What kind of glue or adhesive did you use? Same for leather and for the vinyl trim (dog legs)?


Concerning photography, your pics aren’t that bad. Unless you have color matched the camera, computer monitor and printer, don’t expect to get a faithful reproduction. Also lighting conditions are critical and flash can cause more problems than you would imagine. You might want to get a photo editing software to adjust your shots to look correct on your monitor. Resolution can also be critical when trying to photograph details in these cars. Let me give you an example. This first photo was shot in 1999 with a Sony Mavica , which at that time was state of the art with just under 1 million pixels, or 1 MP. I have adjusted the photo so that it is exactly 2 inches across and 72 pixels per inch. If you try to blow this up, it will just pixelate and all detail will be lost.
oilgauge1mpres.jpg

The second shot was taken today with a Sony CyberShot, 12.1MP camera. This is the same, but restored gauge and again I re-sized the photo to be 2 inches wide and 72 pixels per inch. However, now the entire frame consists of the word OIL and symbols for pounds per square inch. Also, because of the enhanced resolution you could blow this up further if necessary.
oilgauge12mpres.jpg

I'm not suggesting that you need a 12.1mp camera because you can get more than adequate results with 7 or 8mp. The 12.1 can be purchased for about $300 and the 7 mp unit is $100 less.
In 1999 the Mavica cost $999.00 for 1MP. The CyberShot was $300. and 12 times the resolution! Isn't technology wonderful.

Good luck, Frank
 
OP
martx-5

martx-5

Yoda
Country flag
Offline
Don Elliott said:
Art - SUPER ! The holes for the two shiny screws you have at the top of the interior dog-leg are for securing the hood stick assembly with painted screws...


Yeah, those are just in there for know until I reweb the hood sticks. And I'll turn the fuel filler.
 

Brosky

Great Pumpkin
Offline
Art, that is beautiful work.

There is just something about red and sports cars, especially TR-3's.

We never got that really nice red interior option for the TR6's.
 
OP
martx-5

martx-5

Yoda
Country flag
Offline
angelfj said:
...

I have a few questions. I have been told that in order to cover the dash and door tops, which are leather, some people actually boil the leather to make it more pliable. Did you do this? I’m a little hesitant about doing this because I waited for several months for the trim kit to be made and shipped from England. I don't want to damage the leather!

What kind of glue or adhesive did you use? Same for leather and for the vinyl trim (dog legs)?...

I used 3M #90 spray adhesive for a lot of the areas that I could use the spray. On the tighter areas I used Weldwood contactact adhesive. Make sure you give the Welwood enough time to dry off. The bottle says twenty minutes minimum. If you don't the stuff work adhere as well.

I used leather for the entire process. I didn't boil the leather for anything, but I did soak it in water for twenty minutes or so and used a heat gun when doing the doglegs. I used heat on some areas of the dash. Although I never worked with vinyl, I actually think the leather is more forgiving and easier to stretch and work with.

Oh, and thanks for the info on the cameras. I have a Canon PowerShot A520 that is 4.0 MegaPixels.
 

Tinkerman

Darth Vader
Offline
Art, looks great! Hope mine come out as well. think your camera did a fine job also!

Good Job, tinkerman
 

NickMorgan

Jedi Knight
Offline
Art,
Your car looks great. That looks like a nice carpet set. I think I found the interior trim the most satisfying bit of rebuilding my first TR3.
Your photos look great, too. I have often wondered if digital camera capture things wear out. I would love to know.
Nick
 
Similar threads
Thread starter Title Forum Replies Date
R TR2/3/3A TR3 interior questions Triumph 3
S TR2/3/3A interior snaps for a tr3 Triumph 8
Kleykamp TR2/3/3A Interior door pulls on TR3?? Triumph 5
mgbmedic TR2/3/3A interior kit tr3 Triumph 14
S TR2/3/3A tr3 rear interior panels Triumph 6
toysrrus TR2/3/3A TR3 Interior Question: Triumph 5
F TR2/3/3A TR3 interior mystery question- door pull handles Triumph 9
J TR2/3/3A TR3 Interior Triumph 22
toysrrus TR3 Small Mouth Interior Question Restoration & Tools 1
T TR2/3/3A TR3 interior restorarion Triumph 14
mountainman TR2/3/3A TR3 Interior Question Triumph 3
luke44 TR2/3/3A TR3 Leather Interior / Leather Seats Option Triumph 5
ekamm TR2/3/3A more tr3 interior questions Triumph 5
martx-5 TR2/3/3A TR3 Interior Question Triumph 15
CCURTISS TR2/3/3A TR3 Interior Re-Dye COMPLETE Triumph 12
Russ Austin TR2/3/3A Rare TR3 Interior Triumph 5
M TR2/3/3A TR3 photo - interior Triumph 2
M TR2/3/3A TR3 Interior questions Triumph 8
M TR2/3/3A TR3 interior Triumph 5
mctriumph For Sale front apron 57 Tr3 Triumph Classifieds 0
Rick_Thompson TR2/3/3A TR3 rack and pinion kit problem... Triumph 17
S TR2/3/3A differential hubs early tr3 and tr2 Triumph 22
S TR2/3/3A Tr2 and early tr3 differential. Triumph 10
71TR6 TR2/3/3A TR3 WIper Wheel box Triumph 2
RonC General TR TR3 Shifter on TR6 Triumph 8
jfarris TR2/3/3A Modern Temporary Donut Spare for a TR3 Triumph 1
G TR2/3/3A What color is my car? TR3 1958 Triumph 16
S TR2/3/3A Rebuilding a tr3 transmission and second gear, Triumph 57
mctriumph For Sale Odd bit for Tr3 and early 3A Triumph Classifieds 0
S TR2/3/3A turn a tr3 non-full syncro transmission into a full syncro Triumph 3
Y TR2/3/3A I cannot get my TR3 in correct timing. Triumph 7
mctriumph TR2/3/3A Safety mods every Tr3 should get Triumph 12
Editor_Reid TR2/3/3A Whitewall Tires for TR3 Triumph 11
curdy TR2/3/3A TR3 Stalling Issues Triumph 8
S TR2/3/3A Anyone cut out the spare tire compartment on a tr3? Triumph 4
S TR2/3/3A put a differential back into a tr3. Triumph 2
S TR2/3/3A tr3 breather pipe Triumph 2
2 For Sale 1957 Triumph TR3 Small Mouth Triumph Classifieds 0
Jim_Stevens TR6 Barn find of TR6 and many TR3 parts Triumph 9
J For Sale 1958 TR3 Partout Triumph Classifieds 12
R For Sale TR3 Dash Triumph Classifieds 0
D TR2/3/3A Thread and size for tr3 fuel tank vapor line fitting Triumph 0
S TR2/3/3A Aluminum door capping for tr3 Triumph 12
tinman58 TR2/3/3A TR3 at Mammoth Lakes Triumph 4
G TR2/3/3A TR3 starter disassembly rebuild early M428G bomb Triumph 6
luke44 TR2/3/3A Calling all Wiring experts TR3 Overdrive Wiring ver A or ver B or are they the same? Triumph 8
A TR2/3/3A VERY wobbly TR3 - help needed!!!! Triumph 53
vpanza TR2/3/3A EARLY TR3 hubs for wire wheel????? Triumph 5
vpanza Wanted TR3 FRONT backplates needed Triumph Classifieds 2
mctriumph For Sale Cluster gears Tr3 Triumph Classifieds 0

Similar threads

Top