• Hey Guest!
    British Car Forum has been supporting enthusiasts for over 25 years by providing a great place to share our love for British cars. You can support our efforts by upgrading your membership for less than the dues of most car clubs. There are some perks with a member upgrade!

    **Upgrade Now**
    (PS: Upgraded members don't see this banner, nor will you see the Google ads that appear on the site.)
Tips
Tips

TR4/4A I Removed My Overdrive--TR4A

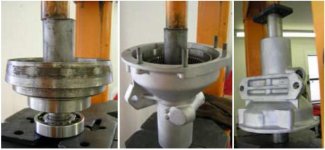
I think you're correct Randall about there being no interference, but the pistons must move more than that I would think. The brake ring is on the opposite side of the housing, and the pistons have to move that sliding cone clutch forward and off the brake ring, right?

I was guessing that's why the adapter plate has depressions that align with the nuts that hold the bridge pieces, and also why the manual suggests that the safety wire be away from those depressions.

Also, for whatever value at this point, my sun gear end float "after" installing the thrust washer in the planet gear was .019, larger than it should have been (.008 to .014). With that thrust washer missing, as it had been, my end float must have been huge.

By installing a new thrust washer in the casing, as well, I now have the end float down to .013, which can only be explained by the new casing washer being thicker. I assume wear and tear on brass made the old one thinner over time.

I also have new thrust washer I can put below the roller clutch. If I do that I assume I'll have even less end float?

Well, I'm about ready to roll! Thanks again.

PS One of the crisp new thrust washers I have is "thicker" where each oil groove has been scored. Swelling of the metal from stamping, I assume some filing is in order.
 
Sorry, I mis-remembered the spec, which is .080" - .120". That is for clutch movement, but the operating piston movement should be close to the same amount.

The pistons actually push the clutch up against the brake ring, away from the annulus. Then for direct drive, the springs push the clutch away from the brake ring, up against the annulus.

The oil grooves are where the thrust washers tend to break, so I am guessing that your new one is thicker on purpose. At any rate, I wouldn't try to thin that area.

The thrust washers do wear over time, so it's not surprising that your new ones are thicker. But IMO the sun gear end float should be closer to the bottom spec, so reducing it a bit more should not be a problem.
 
I have about 1/32 inch of play or wobble in my OD ring gear. That gear of course is pressed onto a large roller bearing, and I wouldn't think that amount of play is normal. By 1/32 I mean I can rock the ring gear a bit and see it wobble about that much. It seems academic, but since I've already asked dozens of questions, I try this one too--sorry, Randall, but there's not many of us out here.

Also, the Buckeye articles are terrific, but the description of how to press the bearing out and back in are comparatively scant, with the author (to whom we're all indebted) promising pictures at a later date.

Thanks, and a great big shucks. Work starts up again tomorrow. I'll make it go easy by thinking cars every spare moment.
 

Attachments

  • 27453.jpg
    27453.jpg
    40 KB · Views: 321
Thanks, great articles.

The TR4 Workshop Manual, an unbelievable "Gem" for any would-be mechanic, states in Italics, "do not use jointing compound" on the brake ring.

The VTR article says to use Hylomar, Silicone or a substitute.

So, my question is what Randall would do?
 
Likely nothing is required, as that joint does not seem prone to leak. But I couldn't resist using a thin film of Hylomar anyway. Jointing compound can make it hard to remove next time (the previous mechanic had used Permatex #3 and I had a devil of a time breaking it loose); and silicone is a no-no IMO. But Hylomar doesn't seem to cause a problem, and might actually help.
 
Thanks for all the help again, guys (Randall, Randy, Geo and crew)

Another question.

The "written material" says to remove the ring bearing from the OD sliding clutch ring assembly by making longer bridges, supporting those on blocks and pressing the clutch and bearing down and out.

Is that really the best way? That would mean that I'm pressing out a bearing and clutch, taking quite a bit of force, with the force being exerted on just 4 relatively small nuts and threads of a ring assembly no longer available and which appears not all that stout.

Thanks again for the guided tour!
 
Why are you doing that? Are the parts in need of replacement? That whole assembly can be inspected and cleaned as a unit and if it checks out OK then no need to disassemble.
 
I gotta run, but here's a shot of how I got mine apart:

DSCF0033_lighter.jpg


In my case I was changing the clutch and keeping the bearing, so maybe that's the difference. Anyway, the scrap of wood (chunk of leftover bamboo flooring) and 4 bolts worked perfectly.

Gotta run, so apologies if I've missed something.
 
JerryVV said:
Why are you doing that? Are the parts in need of replacement? That whole assembly can be inspected and cleaned as a unit and if it checks out OK then no need to disassemble.

I actually decided not to replace the bearing after all. I'm just going to leave it intact, though I like Randall's setup better than the alternatives I've read about.

My thrust ring bearing has some lateral play. However, it's not great, and the new bearing I bought seems to have about the same. In other words, that large bearing must be made to have some play or wobble. The size of it may account for that. It's expensive and I'll probably just return it new and unused.

The worst that can happen is that I'll pull the transmission and rebuild the OD again one day. Then I'll be able to say I'm a professional.
 
Back to my little OD and transmission project.

The consensus gasket sealer, including for the one between the OD adapter plate and the OD appears to be Hylomar. Permatex "High Tack" comes recommended, too, and I'm just curious why the preference for one over the other? Is it just easier to work with and clean up, or is there more?

Also, the MOSS OD adapter gasket is a nice uniform, somewhat heavier gasket than the one that comes with the full gasket set. The one in the set is more like a sheet of thin paper.

Any preference there? I tend to lean toward the thicker one.

BTW, I know I'm proceeding at a snail's pace, but I do now have the clutch shaft bushings in, the new shaft drilled for the extra cross bolt (with a great snug fit), the new fork pin fitting snug and proper, sun gear end float and annulus end float both within spec, OD cleaned and reassembled, and all is ready to wire the pump spring out of the way to receive the cam and to mate the OD back to the transmission.
 
Hylomar:

1) Remains flexible forever. I don't know about "high tack", but the classic "non-hardening" Permatex sets up like rock. I have literally had to use a hammer and chisel to remove it! That can't bode well for joints that have to flex a bit.

2) Comes apart easily even after many years of service. No hammering or prying as is frequently required with classic Permatex.

3) Frequently leaves the gasket in reusable condition. Just add another layer of Hylomar and put it back together. I've reused the same rocker cover gasket as much as 10 times.

4) Cannot form 'strings' to break off inside and clog critical small passages; like some RTV type sealants can.

5) Requires no "timing" for installation : you can slap the gasket right on, or save it until tomorrow, the Hylomar still works.

6) Was developed by Rolls Royce, who were fanatical about cars that didn't leak anything.

That said, I've never tried "High Tack". It might be just as good.

Yes, go with the thicker gasket. But check the adapter plate for flatness first. My original A-type plate was distorted too much to ever seal (or clean up with a file); so I went with one of John Esposito's beefed-up adapter plates.
 
Thanks for all the help, guys. I'm almost finished with this OD rebuild. Here are some pics of the progress (and some other helpers--Jeff and Ken).
 

Attachments

  • 27718.gif
    27718.gif
    97.4 KB · Views: 251
  • 27719.gif
    27719.gif
    92.9 KB · Views: 251
  • 27720.gif
    27720.gif
    84.7 KB · Views: 253
I like it! Do Jeff and Ken rent themselves out as personal spring compressors? Mating the overdrive with the gearbox was the toughest job I had!
 
They were a big help, and you're right. They pressed the transmission down, and that's how I knew nothing was binding. We hand tightened the nuts each time the transmission was pressed down.

I can't quite explain why it was that the splines matched right up. We had just a little wiggling. I guess the sun gear, planet assembly, and unidirectional clutch just sort of stay fixed once properly lined up, despite all the wiggling later to come.

The only slight issue was that eccentric pump cam that kept sliding down. There must be a trick there. Mine fell right down. I finally got it lined up by using small awl with a 90 degree bend. I was able to just keep rotating it 'till it lined back up.

I'll my staff you may be calling.
 
TR3driver said:
Removing those square headed taper pins can be tricky, too. . . . They break easily (due to the largish nylon insert in the side), and new ones are nearly $20 each. If you can find them, the early ones were stronger (but need to be safety-wired in place as they don't have the locking insert).

Randall, I ordered spare pins but don't see any nylon insert or "locking" insert. But I did snap one off after resolving I'd leave well enough alone (and didn't).

Are you saying there's a pin made with nylon actually incorporated into the pin? Or that there is a nylon insert for the shaft the pin protrudes into as the pin is tightened?
 
Possibly the inserts were only used on later gearboxes than the one you have. Mine is from a later TR6 and I don't remember them being in the TR4 box. But yes, there was a cavity in the threaded part of the pin, filled with nylon. Kind of like the inserts in "Nyloc" nuts, but male instead of female. And IIRC, something like 4 out of 6 of mine (from two different covers) broke right through the cavity.
 
My machine shop guy is highly skilled and has been around for a long, long time, as has his old man.

Even he is having fits with that pin I sheared. He says he has no choice but to remove all so he can remove the shafts.

He removed the broken pin from one of the shifting forks, but the rest of the pin is still rammed tight into the shaft.

Randall, you may be one of the few guys anywhere who has been through this. Is there anything helpful I can relate to the shop?
 
Well, as usual, I don't understand the problem. I just mounted the entire cover on the drill press with the shaft clamped so the pin was vertical, then drilled through the center of the pin in increasing sizes until it broke loose. Used a center drill to start the hole, to try to keep it on-center. I can't remember for sure now, but it seems like it broke loose from the shaft first (when the hole through the pin touched the hole in the shaft) and then the threaded portion in the fork basically crumbled. Both the fork & shaft were reusable (except the forks that were worn out).

These joints are a little strange, in that the smooth part of the pin (in the shaft) is what locks, rather than the threads as with the usual rusty bolt. Once the head is twisted off, you have to drill through the pin inside the shaft to get it to release.
 
Back
Top