• Hi Guest!
    You can help ensure that British Car Forum (BCF) continues to provide a great place to engage in the British car hobby! If you find BCF a beneficial community, please consider supporting our efforts with a subscription.

    There are some perks with a member upgrade!
    **Upgrade Now**
    (PS: Subscribers don't see this gawd-aweful banner
Tips
Tips

Tri-Carb Project

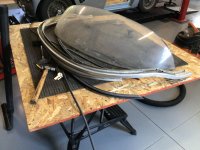
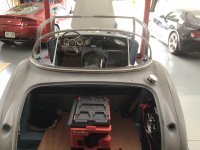
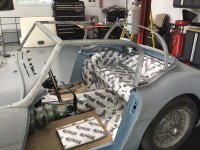
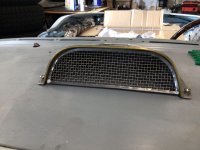
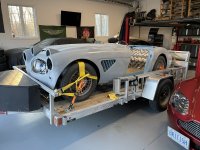
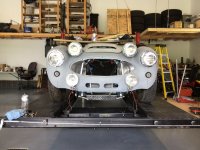
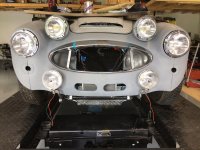
Lighting mock-ups all completed. Rally sump guard done. Grille surround test fitted, ready for rechrome along with my custom-made-by-me trim rings for the upper rally lights.

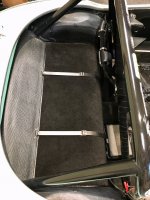
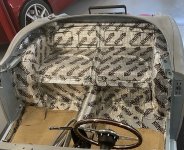
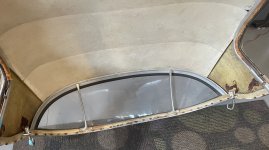
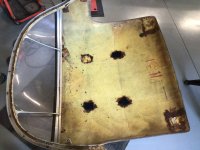
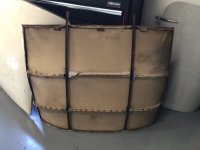
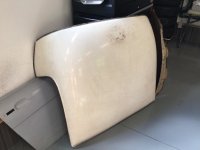
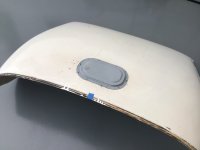
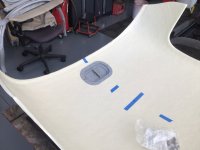
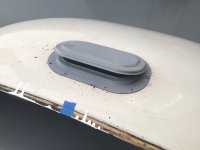
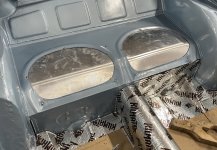
Next is the rear seat blank-off plates, then she's off for exterior paint once my place in the queue comes up.
 

Attachments

  • 5A358C45-816C-4218-BAB7-C17334A74EB9.jpeg
    5A358C45-816C-4218-BAB7-C17334A74EB9.jpeg
    1.7 MB · Views: 237
  • 702B1D8F-31A2-414E-9988-F095D0E6616A.jpeg
    702B1D8F-31A2-414E-9988-F095D0E6616A.jpeg
    1.9 MB · Views: 202
Seat blanks , done.
they just need some seam sealer around the edge then it will all get covered with Kilmat.
 

Attachments

  • 62FB7C90-50B8-4D5B-A61C-E64F561C575C.jpeg
    62FB7C90-50B8-4D5B-A61C-E64F561C575C.jpeg
    2.9 MB · Views: 191
Nice work on the seat blanks. I love the looks of the rear seats delete...;)
 

Attachments

  • Jump Seat Delete 2.jpeg
    Jump Seat Delete 2.jpeg
    951.6 KB · Views: 180
Well that’s all the Kilmat taken care of , when I find my roller I will roll it down some more .
On to my next project while I wait for the car to go to paint .
Original as sold with the car (serial number on BMHIT cert) hardtop , it looks untouched but will be getting a full makeover complete with rally vent . Can’t have a little rally car without a rally vent can we .
Oh and before anyone asks ITS NOT FOR SALE . sorry .
I have a whole box of parts from Cape with new headliner , crash pad material , quarter panels , badges , window , seals etc but it’s all got to get stripped first and cut for the rally vent .
Does anyone have a measurement of how far the vent should be from the top of the rear window ?
It will probably be determined by the position of the headliner frame members as well .
 

Attachments

  • B472AE0B-2F62-48D0-903A-B08A0F2C46F4.jpeg
    B472AE0B-2F62-48D0-903A-B08A0F2C46F4.jpeg
    2.9 MB · Views: 155
  • E7C6A173-A71A-4EF9-957F-438CF335FC51.jpeg
    E7C6A173-A71A-4EF9-957F-438CF335FC51.jpeg
    1.6 MB · Views: 144
  • 19D562DB-C417-4F94-BCCB-72C7B0A0646F.jpeg
    19D562DB-C417-4F94-BCCB-72C7B0A0646F.jpeg
    2.1 MB · Views: 146
  • A0B9FB8C-D305-4D78-B80F-B93BFB1B42DF.jpeg
    A0B9FB8C-D305-4D78-B80F-B93BFB1B42DF.jpeg
    3.6 MB · Views: 152
The vent should indeed be positioned based on the headliner frame. I also recommend you put some of that foil based insulation on the inside of the fiberglass above the headliner, I have a dark top and I can feel the heat radiating down. Then again, I don't have any insulation on the top of my head.
 
The vent should indeed be positioned based on the headliner frame. I also recommend you put some of that foil based insulation on the inside of the fiberglass above the headliner, I have a dark top and I can feel the heat radiating down. Then again, I don't have any insulation on the top of my head.
Same here John , all my insulation has long since gone , the top of my head is as bare and smooth as the outside of the hardtop .
Good idea on the foil insulation , I do have some left over anyways . 👍👍
 
I remember reading somewhere about someone spraying the inside of their hardtop with “Lizard Skin”.
Anyone with experience of this product ?
Did they apply it themselves and can you still refit all the headliner etc once it’s sprayed on ?
 
I have used Lizard Skin. I like it a lot. But since I have never attached a hard top headliner I don’t know the implication.
I sprayed Lizard skin over the complete cockpit area of my Healey after i restored the body. Lizard Skin has 2 products, one is a sound insulation and the other is a ceramic heat insulation. It’s been a long time ago so I don’t remember the sequence but they are both very watery when sprayed. You need a large nozzle spray gun to move the fluid. I remember when I sprayed it I thought ‘my god that stuff will never dry.’ But by the next day it was quite dry with no problems. It sets up very firm and is watertight. I also believe the insulation quality is very good because I don’t feel that my Healey gets excessively hot in the interior.
 
The headliner for the roadsters has a metal frame, so there’s a gap between the headliner and fiberglass top. The headliner for the convertibles is a foam layer glued to the inside of the fiberglass (I think).

The reason for using foil insulation is the heat transfer is by radiation more than conduction.
 
A successful afternoon in the shop , got the top all apart . Had to zip wheel most of the heads of screws etc .
So it’s a pile of parts now the fun begins cleaning sand blasting fixing straightening painting dry fitting etc etc .
The black sealant they used to help hold/seal the aluminum extrusions to the shell was very difficult to break loose , lots of twisting and some cursing but I won in the end .
Anyone have any input on the writing marks inside the shell ?
 

Attachments

  • C499CED7-58E1-4644-A09D-449CF472E117.jpeg
    C499CED7-58E1-4644-A09D-449CF472E117.jpeg
    1.9 MB · Views: 135
  • 6D6E2D3A-333F-495E-A28A-AA4B61CC19EE.jpeg
    6D6E2D3A-333F-495E-A28A-AA4B61CC19EE.jpeg
    1.3 MB · Views: 130
  • 8F4C29DC-9031-4023-A04A-CD54B83B0FB1.jpeg
    8F4C29DC-9031-4023-A04A-CD54B83B0FB1.jpeg
    1.8 MB · Views: 130
  • BB3C2074-4A4E-4660-9F49-B9DA1A293F61.jpeg
    BB3C2074-4A4E-4660-9F49-B9DA1A293F61.jpeg
    1.1 MB · Views: 128
  • 1D5D1722-9D3D-4F2A-9838-2CBE4F3D81DB.jpeg
    1D5D1722-9D3D-4F2A-9838-2CBE4F3D81DB.jpeg
    1.4 MB · Views: 133
  • FFF0FC80-DBC2-41E0-B988-85A41DD571A1.jpeg
    FFF0FC80-DBC2-41E0-B988-85A41DD571A1.jpeg
    1.8 MB · Views: 138
Work on the top continues .I painted the interior to seal the raw fibreglass , then I measured marked measured and measured and measured again before cutting the hole for the rally vent . Just used a zip wheel then die grinder with small drum sander to round the corners using the trim ring as a template .
Rally vent has now been sandblasted removing at least 6 coats of paint and primed and had its catch and hinge tweaked to perfection .
Kilmat done except for rollering in .(still need to find my roller )
The aluminum frame parts are going to need some work , dents , gouges , questionable modifications etc all need attention before I decide on refinishing them
There’s no one remotely close to have them Re anodized and shipping them would be horrendous so they will either get painted or possibly powder coated prior to assembly .
 

Attachments

  • 95A19F1C-32EC-4C43-8180-EADDA448B338.jpeg
    95A19F1C-32EC-4C43-8180-EADDA448B338.jpeg
    1.1 MB · Views: 131
  • 7DC6CA68-D147-4702-9B56-B26C8B7B9D11.jpeg
    7DC6CA68-D147-4702-9B56-B26C8B7B9D11.jpeg
    1.2 MB · Views: 130
  • A847A02F-16D7-4289-B764-1DFD27A0D528.jpeg
    A847A02F-16D7-4289-B764-1DFD27A0D528.jpeg
    2.1 MB · Views: 127
  • 0967CD79-AAB3-43D7-8DCF-D1D9B8A19D7C.jpeg
    0967CD79-AAB3-43D7-8DCF-D1D9B8A19D7C.jpeg
    1.1 MB · Views: 136
So after lots of tweaking ,twisting, straightening ,dolleying and other associated cursing the hard top frame has been dry assembled and test fitted .The rear lower rail on the shroud was significantly bent and took a lot of work to get it reshaped to sit nicely flat on the shroud .Whoever used to store it didn’t do it correctly probably sitting it vertically on the lower rail .
It can now come apart for some final fettling and tidying up prior to being prepped and painted/clearcoated . The amount of metal that is actually visible once assembled is minor and once the top is on it’s staying on so that’s why I’m painting them .Also the parts are not in good enough condition to re anodize them , gouges , pitting etc which will require some minor filling and prep for paint .
 

Attachments

  • F7D63078-D042-4213-AD79-FC916C311176.jpeg
    F7D63078-D042-4213-AD79-FC916C311176.jpeg
    1.5 MB · Views: 134
  • F142B364-BA7A-4EEE-93A7-1B7AAA6AEAA7.jpeg
    F142B364-BA7A-4EEE-93A7-1B7AAA6AEAA7.jpeg
    2 MB · Views: 141
Such fun. Now you need to get the fiberglass to fit the metal frame.
That’s the easy bit, the shell is very flexible without its rigid frame and it all fit together kinda sorta before I stripped it all apart.
 
Sssssshhhhhhhhh, don’t tell the wife, but I borrowed / commandeered some of her stained glass supplies to fabricate a frame for the grille on my scuttle scoop. Needs some dressing / tidying up and fixing to the scoop now.
 

Attachments

  • FDD33B8D-30F6-4B64-A407-984F25B7A554.jpeg
    FDD33B8D-30F6-4B64-A407-984F25B7A554.jpeg
    1.6 MB · Views: 136
Happy days , my number came up she’s loaded and ready to go to the paint shop tomorrow . 👍👍😁😁
 

Attachments

  • B1F60DCA-6779-4A7F-83F8-B376BF1D49D6.jpeg
    B1F60DCA-6779-4A7F-83F8-B376BF1D49D6.jpeg
    3.4 MB · Views: 121
  • 375D59F1-5707-4A66-8D54-52B648A61592.jpeg
    375D59F1-5707-4A66-8D54-52B648A61592.jpeg
    3.8 MB · Views: 119
It’s like Christmas .
dropped the car off today at the painters , get home and I have parcels . My custom stainless steel knobs for hardtop retainers and side screens .
Larger ones for the hardtop
Small through hole for front side screen
Small blind hole for the triangular rear door plate side screen mount .
 

Attachments

  • 3C0D9E7B-7745-434E-BF6E-7F7127058013.jpeg
    3C0D9E7B-7745-434E-BF6E-7F7127058013.jpeg
    2.5 MB · Views: 110
Back
Top