
-
 Hey Guest!
British Car Forum has been supporting enthusiasts for over 25 years by providing a great place to share our love for British cars. You can support our efforts by upgrading your membership for less than the dues of most car clubs. There are some perks with a member upgrade!**Upgrade Now**
(PS: Upgraded members don't see this banner, nor will you see the Google ads that appear on the site.)

Tips
- We have a special forum called "Member Articles" where you can submit actual articles for consideration for publication. Learn More
- Don't have an Avatar? If not, your avatar will default to the 1st character in your username. Go into "Account Details" to change your Avatar.
- Some basic forum navigation info: click
 Hey - did you know if you click on the title of a thread it will take you to the first unread post since you last visited that thread?
- Hey Guest - Is your British Car Club in our Clubs database? If not, send me a PM - Basil

- Looking for a local club? Click the "Clubs" tab above and browse hundreds of clubs world-wide.
- Add Android or iPhone APP: click
- Did you know - any picture or video you add in your posts in any marque-specific forum will also get added to the Media Gallery automatically.
- A few more tips about posting and replying: click
- Hey there Guest - be sure to keep your profile page up to date with interesting info about yourself: learn more
- More tips and tricks on Posting and Replying: click
 but were afraid to ask:
  STOP!! Never post your email address in open forums. Bots can "harvest" your email! If you must share your email use a Private Message or use the
  smilie in place of the real @
- Want to mention another member in a post & get their attention? WATCH THIS

- So, you created a "Group" here at BCF and would like to invite other members to join? Watch this!
- Hey Guest - A post a day keeps Basil from visiting you in the small hours and putting a bat up your nightdress!
- Hey Guest - do you know of an upcoming British car event?
 Pretty Please - add it to our Events forum(s) and add to the calendar! >> Here's How <<
- Hey Guest - you be stylin' Change the look and feel of the forum to fit your taste. Check it out
- If you run across an inappropriate post, for example a post that breaks our rules or looks like it might be spam, you can report the post to the moderators: Learn More
- If you would like to try some different "looks" or styles for the site, scroll to the very bottom, on the left and click the Style Selector.
You are using an out of date browser. It may not display this or other websites correctly.
You should upgrade or use an alternative browser.
You should upgrade or use an alternative browser.
TR2/3/3A TR3A Inner Sill Repair Question/Advice
- Thread starter M_Pied_Lourd
- Start date
OP
M_Pied_Lourd
Darth Vader
Offline
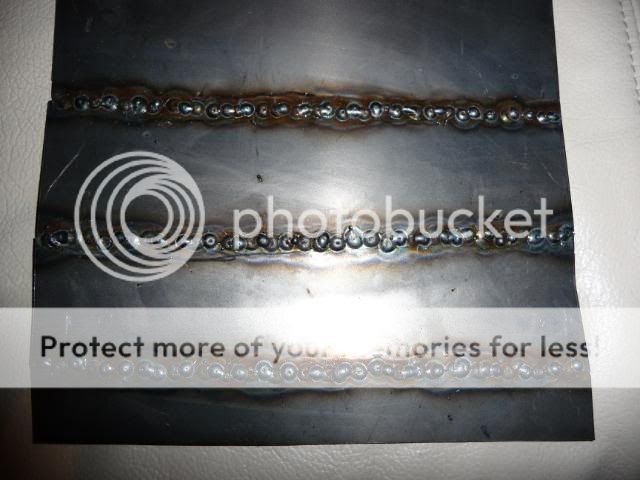
Bit more practicing welding this morning.
I think that it is starting to look a little better. This is 20 Guage Metal.
Top
Bottom
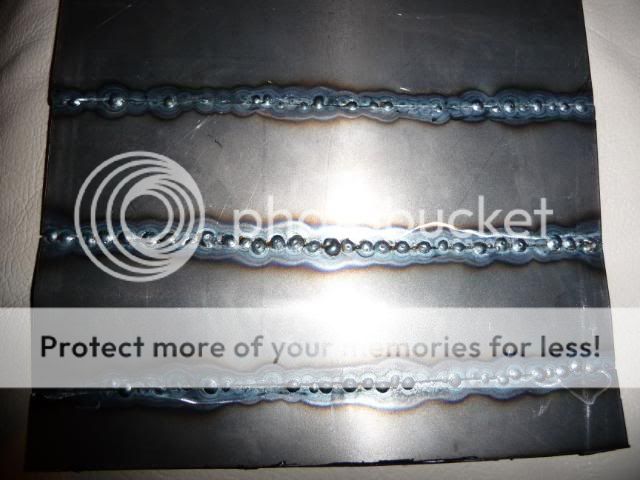
The center one is the best and has the best penetration as you can see in the photos.
Looking better?
Cheers,
M. Pied Lourd
I think that it is starting to look a little better. This is 20 Guage Metal.
Top
Bottom
The center one is the best and has the best penetration as you can see in the photos.
Looking better?
Cheers,
M. Pied Lourd
Don Elliott
Obi Wan
Offline
I don't want to sound like a "spoil sport" but may I suggest that you cut a scrap piece off your parts car where the old panel may be a bit thinner because of some surface rust, then sand off the paint and surface rust, then put a new piece of 20 gauge sheetmetal edge-to-edge and practice some more welding. The old rusty piece will spit and crackle where there is still a bit of oxide (rust) even if you can't see it, and where the older bit has become a bit thinner, it may burn through. This will more realistic and it would be better to try this on the bench before you get surprised when you do the final work on your TR.
Don Elliott
Obi Wan
Offline
Dave - You mentioned very early about plug welding. Well, if you have a hole to weld closed, or if you accidentally burn a hole through, let it cool and come back later. Bit by bit you can add thickness all around the hole, then you can "puddle" the wire rod into liquid in towards the center of the hole till it's all closed. After letting it cool, you can grind and sand it smooth and it can look perfect.
OP
M_Pied_Lourd
Darth Vader
Offline
Thanks Everyone,
Will definately keep practicing before I try it out on the car. Good Ideas/suggestions from all and I will put them into action.
Cheers,
Dave
Will definately keep practicing before I try it out on the car. Good Ideas/suggestions from all and I will put them into action.
Cheers,
Dave
OP
M_Pied_Lourd
Darth Vader
Offline
Morning Skip,
Have one panel made that fits quite well. Will be making one more small one today.
Started stripping the paint off the body yesterday to get down to bare metal so I can have a look at everything. So far so good.
Will post some pics later.
PS, recieved first of two packages to fix my compressor.....I really miss not having one. Almost bought another smaller one yesterday that I saw on sale for 1/2 price but resisted the urge....
Cheers,
M. Pied Lourd
Getting close Tush, getting close. Can you post a picture of the patch panel in place? How are you planning on securing it while you do the tack welds?
I totally understand on the compressor - the airplane shop across the way at the hanger has a full tilt boogie blasting set up that I used on the brake backing plates for the TR6 and wow, I'm screwed now. It was so fast and easy to handle - totally addictive.
I totally understand on the compressor - the airplane shop across the way at the hanger has a full tilt boogie blasting set up that I used on the brake backing plates for the TR6 and wow, I'm screwed now. It was so fast and easy to handle - totally addictive.
PatGalvin
Jedi Warrior
Offline
Pop rivets or magnets work great to fit and hold patch panels during tack welding. I bought a box of cheap magnets on eBay for about $10 and they are super strong. Great for butt welds.
pop rivets let you trial fit panels. I've use a bunch of those too
and then there are Cleco Fasteners which I can't live without for panel replacement
pop rivets let you trial fit panels. I've use a bunch of those too
and then there are Cleco Fasteners which I can't live without for panel replacement
OP
M_Pied_Lourd
Darth Vader
Offline
Hi Pat,
Been using welding magnets and they do work great...have them in various sizes as well.
Thanks for the tips.
Cheers,
M. Pied Lourd
Been using welding magnets and they do work great...have them in various sizes as well.
Thanks for the tips.
Cheers,
M. Pied Lourd

Offline
I was taught the pulse weld technique by a friend who owns a body shop and does alot of restoration work. I was working for him on rustbucket Mustang. There is a video on this page that illustrates the technique. this There is alot of good info if you look around the site, including a fair amount about restorations.
rlwhitetr3b
Jedi Knight
Offline
PatGalvin said:Pop rivets or magnets work great to fit and hold patch panels during tack welding. I bought a box of cheap magnets on eBay for about $10 and they are super strong. Great for butt welds.
pop rivets let you trial fit panels. I've use a bunch of those too
and then there are Cleco Fasteners which I can't live without for panel replacement
How do you use pop rivets and Cleco Fasteners on butt welds?
Isn't a butt weld when the two pieces just touch?
Wouldn't these require a overlapping joint?
I'm asking to gain knowledge not to question your knowledge.
TR4nut
Yoda
Offline
TRMark said:I was taught the pulse weld technique by a friend who owns a body shop and does alot of restoration work. I was working for him on rustbucket Mustang. There is a video on this page that illustrates the technique. this There is alot of good info if you look around the site, including a fair amount about restorations.
Mark-
Thanks for bringing that link to life again- I had seen it before but had lost track of it. It is excellent. I'm quietly watching Pied's work here as I'll need to tackle similar issues later this year.
Randy
OP
M_Pied_Lourd
Darth Vader
Offline
Hi Eric,
It is supposed to do a couple of things.
1. Supposed to help in conductivity during welding (High in Zinc)....also supposed to reduce distortion and welding splatter (although I have heard the opposite)
2. I am using it to mainly help prevent future rust and corrosion in and behind the areas where I am welding.
Cheers,
M. Pied Lourd