-
 Hey Guest!
British Car Forum has been supporting enthusiasts for over 25 years by providing a great place to share our love for British cars. You can support our efforts by upgrading your membership for less than the dues of most car clubs. There are some perks with a member upgrade!**Upgrade Now**
(PS: Upgraded members don't see this banner, nor will you see the Google ads that appear on the site.)

Tips
- We have a special forum called "Member Articles" where you can submit actual articles for consideration for publication. Learn More
- Don't have an Avatar? If not, your avatar will default to the 1st character in your username. Go into "Account Details" to change your Avatar.
- Some basic forum navigation info: click
 Hey - did you know if you click on the title of a thread it will take you to the first unread post since you last visited that thread?
- Hey Guest - Is your British Car Club in our Clubs database? If not, send me a PM - Basil

- Looking for a local club? Click the "Clubs" tab above and browse hundreds of clubs world-wide.
- Add Android or iPhone APP: click
- Did you know - any picture or video you add in your posts in any marque-specific forum will also get added to the Media Gallery automatically.
- A few more tips about posting and replying: click
- Hey there Guest - be sure to keep your profile page up to date with interesting info about yourself: learn more
- More tips and tricks on Posting and Replying: click
 but were afraid to ask:
  STOP!! Never post your email address in open forums. Bots can "harvest" your email! If you must share your email use a Private Message or use the
  smilie in place of the real @
- Want to mention another member in a post & get their attention? WATCH THIS

- So, you created a "Group" here at BCF and would like to invite other members to join? Watch this!
- Hey Guest - A post a day keeps Basil from visiting you in the small hours and putting a bat up your nightdress!
- Hey Guest - do you know of an upcoming British car event?
 Pretty Please - add it to our Events forum(s) and add to the calendar! >> Here's How <<
- Hey Guest - you be stylin' Change the look and feel of the forum to fit your taste. Check it out
- If you run across an inappropriate post, for example a post that breaks our rules or looks like it might be spam, you can report the post to the moderators: Learn More
- If you would like to try some different "looks" or styles for the site, scroll to the very bottom, on the left and click the Style Selector.
You are using an out of date browser. It may not display this or other websites correctly.
You should upgrade or use an alternative browser.
You should upgrade or use an alternative browser.
TR2/3/3A TR3A Inner Sill Repair Question/Advice
- Thread starter M_Pied_Lourd
- Start date
OP
M_Pied_Lourd
Darth Vader
Offline
Nope, not at all. Actually, I appreciate it.
Thanks for the support.
Cheers,
Dave
Thanks for the support.
Cheers,
Dave
hondo402000
Darth Vader
Offline
if you do short stitch welds, if you pull your weld puddle instead of push it, the weld is a little cooler and you tend not to burn thru.
looks good just keep practicing
looks good just keep practicing
ekamm
Jedi Warrior
Offline
Looks like I am jumping into the same pool. I haven't the resources to do a full resto and am only sprucing her up and driving. On the whole I have very little rust on the car but yesterday as a part of new interior installation I pulled the kick panels off and surprise. Looks like I'm going to do some sheet metal work.
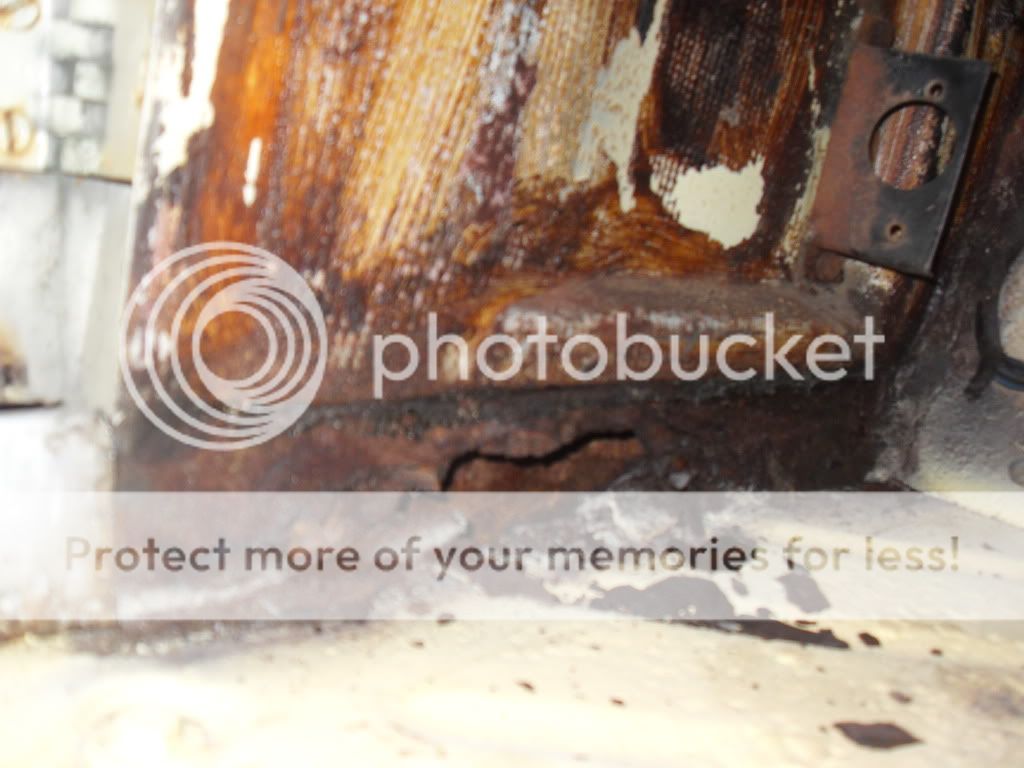
Matching pairs, the driver side is a little worse but the floor is in fair shape and dealt with the scale on it some time ago.
Matching pairs, the driver side is a little worse but the floor is in fair shape and dealt with the scale on it some time ago.
PatGalvin
Jedi Warrior
Offline
Let us know how you like the weld thru primer. I have bought two different brands of this and have rejected each. When I use this stuff, my MIG wells pop and spit and the puddle blows out. I'll never use it again. I don't know what I might be doing wrong. I've gone through about 8 lbs of MIG wire on my TR3 (floor pans, inner and outer sills, quarter panels, some rear floor replacement, rear wheel wells patch back, trunk floor replace, rear apron R&R with substantial rust repair, and more. Good luck with your repair. For a first timer, your welds look great. For areas covered with carpet or sealer, don't make the mistake of trying to grind them completely flush as you'll likely thin the metal unacceptably.
Here is a link to several of my favorite rust repairs. It took me almost 18 months to remove and replace rusty panels, in my spare time.
https://s987.photobucket.com/albums/ae352/PatGalvin_bucket/
Pat


Pat
Here is a link to several of my favorite rust repairs. It took me almost 18 months to remove and replace rusty panels, in my spare time.
https://s987.photobucket.com/albums/ae352/PatGalvin_bucket/
Pat
Pat
OP
M_Pied_Lourd
Darth Vader
Offline
Hi Eric,
Yep, looks familiar. Mine were covered with fiberglass though. I thought about leaving it but just couldn't do it even if you can't see it there, I would know it was there....
I haven't looked at my drivers side yet, but I am assuming that it will be just as bad. I will take some before pics of the drivers side before I start tearing it apart.
Pat, thanks for the photos. Great work and inspiring. Will let you know how the SEM weld through primer works.
Cheers,
M. Pied Lourd
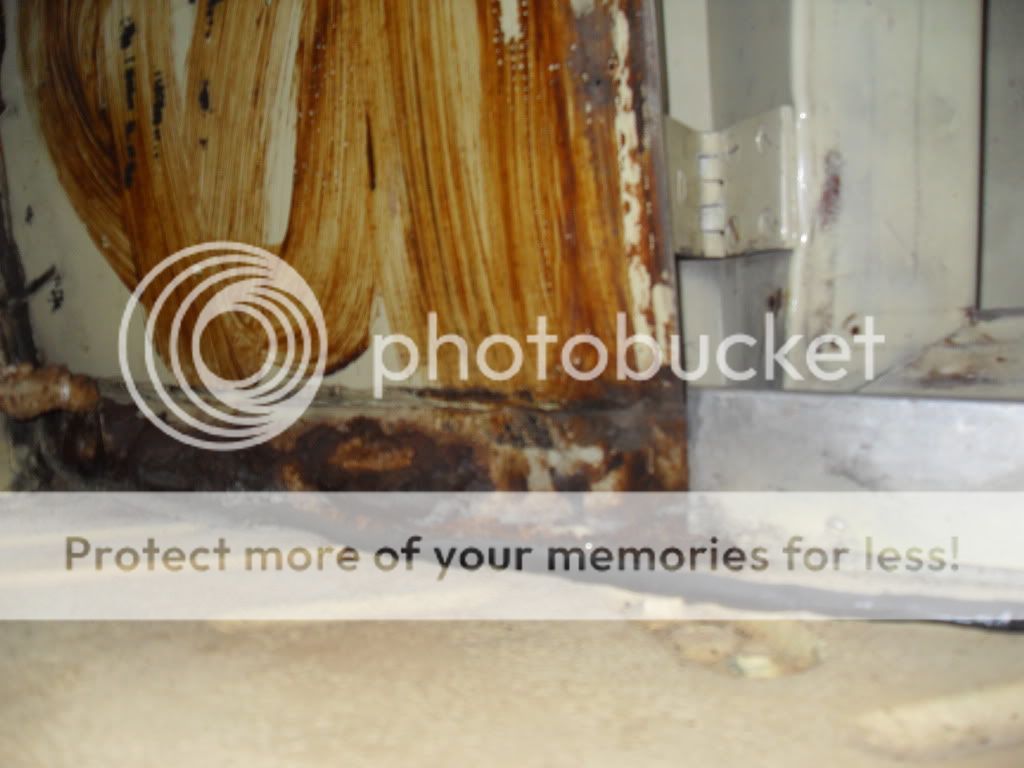
That is getting to be some serious structural rust,and should be put back in a manner that restores strength.The inner sill that is eaten through is the major support member of the body tub.Poor repairs here lead to scuttle shake and poor panel fit.I would suggest getting the outer rocker off and seeing if the sill assembly is even worth repair at all before you proceed.
MD(mad dog)
MD(mad dog)
ekamm
Jedi Warrior
Offline
TDSKIP, Yes I have a welder and any tools needed at my disposal. I just haven't done any sheet metal, especially on any thing as Important as my baby. Usually welding up a mower or something like that at the golf course that I am superintendent of.
Dave has decided to plug the piece that he has fabricated to replace the inner sill. I am looking at the punch and flange tool to make it easier,stronger and look better. If I make a flange why not just make a complete bead down the repair( a little at a time and cooling of course)? my other question is after cleaning and then using a cutoff to remove the area to be replaced will I need to make a 90 at the floor to overlap. and if so on top of the existing floor or under? And one more, Sealer after welding and before paint?
Dave has decided to plug the piece that he has fabricated to replace the inner sill. I am looking at the punch and flange tool to make it easier,stronger and look better. If I make a flange why not just make a complete bead down the repair( a little at a time and cooling of course)? my other question is after cleaning and then using a cutoff to remove the area to be replaced will I need to make a 90 at the floor to overlap. and if so on top of the existing floor or under? And one more, Sealer after welding and before paint?
GregW
Yoda
Offline
Hi Dave,M_Pied_Lourd said:
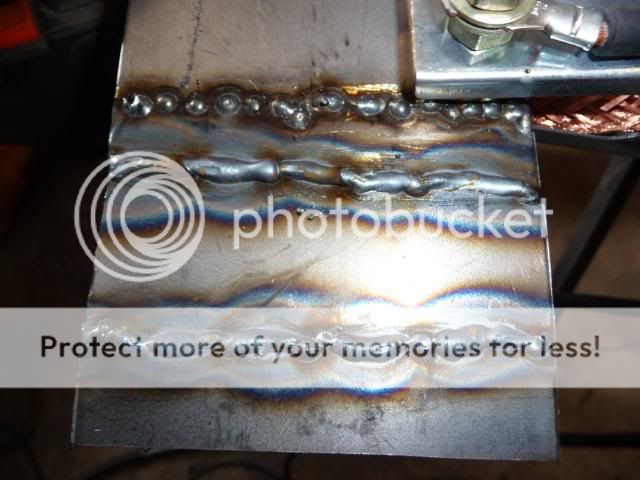
Looking at that photo, I would suggest turning the wire feed down a bit and moving the tip in a side to side motion as you progress down the weld. Almost like your sewing the two pieces together. The side to side only needs to be a about 3/16". This will do a couple things for you: The bead will lay flatter, you'll get better penetration and you have better control heating both pieces of metal. The last part really helps when you are welding two pieces with a different thickness. You want the wire heating the thicker piece for a longer period. When you slow the wire feed down, also move the tip slower.
When I do plug welds, I start on the side of the hole closest to the edge of the metal. Doing that heats the base metal faster. If you end the weld closest to the edge, the chance of blowing through becomes greater.
OP
M_Pied_Lourd
Darth Vader
Offline
Hi Eric,
Have you had your wings off your car? Just wondering if you have had a chance to inspect the outer sills at some time. I did a thorough inspection and cleaning of the outer sill and the bottom as well. I wanted to make sure that these areas were structurally sound before even bothering with the inner sill repair.
If you wanted to do a quick patch, no I don't think that you would need to remove the wings. Only thing that I would recommend is to remove the doors for easier access down into the footwells. The way I look at it, even if you were to do a quick repair that included some rust conversion/rust prevention on the inner sill at the same time, it would be better than what you have there now.
Cheers,
Dave
ekamm
Jedi Warrior
Offline
The car was dad's since '63 as far as I know it has been repainted once (poorly in my opinion) As far as I can see the wings were not removed,but I'm not sure. So not wanting to open that can of worms at this time, I believe that the bandaid treatment makes more sense at this time. And every thing that I've seen on the car that has even looked like rust has be treated with a rust converter and primed and then painted. I know at some point I will tear it apart but until then I want to do what I can to stop any regression.
On another note where are you getting the sheet metal that you are using? My FLAPS didn't have any thing.
On another note where are you getting the sheet metal that you are using? My FLAPS didn't have any thing.
Eric - most cities or regional centers will have places that sell sheet metal. Give "sheet metal supply" in Google a try.
Getting rust converter on the interior of any panels that aren't coming off isn't a bad idea, just know that you'll have to strip anything off if the panels it's been sprayed on if it needs welding. I'd do it still if you have reason to believe there that rot is a risk.
Getting rust converter on the interior of any panels that aren't coming off isn't a bad idea, just know that you'll have to strip anything off if the panels it's been sprayed on if it needs welding. I'd do it still if you have reason to believe there that rot is a risk.
OP
M_Pied_Lourd
Darth Vader
Offline
Eric,
Well, I have two options for my metal.
I have a parts car...a whole spare body that I can scavange if need be. I figure if I need an oddly shaped piece or radius piece I can grab it off the old tub.
I was able to find metal at a few places around me. I live up in Canada north of Toronto and we have a store up here called Canadian Tire....they carry patch panels.
However, I noticed that home depot also has some sheet metal for body repairs as well. Maybe you want to check there.
Cheers,
Dave
PatGalvin
Jedi Warrior
Offline
I have found cold rolled steel on EBay that worked great for patch panels. Even with shipping, the 24" by 24" pieces of 18 gauge, 19 gauge, and 20 gauge were very economical.
I have also found sheet metal supply shops near scrap yards and auto recyclers in NorCal.
Pat
I have also found sheet metal supply shops near scrap yards and auto recyclers in NorCal.
Pat
M_Pied_Lourd said:I have a parts car...a whole spare body that I can scavange if need be. I figure if I need an oddly shaped piece or radius piece I can grab it off the old tub.
[soapbox]
If you can find a car that is terminal but had some usable metal I'd highly recommend grabbing what ever panels you can. The factory stampings will fit better than any reproduction panel (even with some of them being very-very good today) not to mention likely being cheaper.
I actually got this tip from reading a Practical Classics article that was published years ago, and it makes just as much sense today as when written.
There was a TR3 and separately a TR4 that was going to great scrap yard in the sky and I grabbed a bunch of panels for about $350 total. The time and aggravation savings in just using some of the panels will be worth it, plus they'll make the finished job that much better.
[/soapbox]
Don Elliott
Obi Wan
Offline
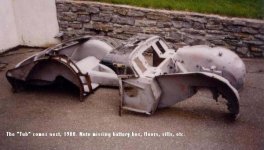
I also agree that the original panels fit better than the repros. When I was doung my 1958 TR3A from 1987 to 1990, I found that the bottoms of both front fenders were rotted through as well as all four fenders hardly having any flanges still on them - the flanges where the fenders get bolted to the tub. Also most of those captive boxes and the flanges they hide behind were non-existant.
With my MIG welder, I repaired all those areas and the car still looks terrific after 20 summers and 102,000 miles.
Below you can see that my tub in 1988 was in two pieces - the front clip is separate from the rear clip.
With my MIG welder, I repaired all those areas and the car still looks terrific after 20 summers and 102,000 miles.
Below you can see that my tub in 1988 was in two pieces - the front clip is separate from the rear clip.
Attachments
Don Elliott
Obi Wan
Offline