• Hi Guest!
    You can help ensure that British Car Forum (BCF) continues to provide a great place to engage in the British car hobby! If you find BCF a beneficial community, please consider supporting our efforts with a subscription.

    There are some perks with a member upgrade!
    **Upgrade Now**
    (PS: Subscribers don't see this gawd-aweful banner
Tips
Tips

TR2/3/3A Rear tail light cutouts

And then there were two!

IMG_1305.jpg


IMG_1306.jpg

IMG_1307.jpg
 
Finally attached my english wheel, shrinker stretcher and bead roller to the floor. Up until now they have been freestanding and liked to wander a bit when used. Amazing how much easier it is to use them when they don't move away from you when you apply a bit of pressure.

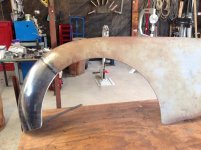
Now to look at a front left hand mudguard.
 
Hello Lionel

That looks much better than you could have got from any parts house.

How much of your car are you going to have to make from scratch?

David
 
Hi David,
i bought two floor panels, rear boot floor, two door skins and battery box.

So far I have made the rear panel, two inner rear fenders, two rear fenders, side closing panels for the boot, the mid floor panel between the boot and the front floor panels, petrol tank, left and right firewalls, left and right kick panels and dash. I also had new profiles bent and refabricated several sections of the chassis including completely remaking the cruciform section.

I have yet to make the closing panels under the rear panel, the spare wheel carrier and the left front fender.

I have done major repair sections in the right inner front fender,transmission tunnel and the scuttle.

I still have to rebuild the left inner fender, left and right doglegs both inner and outer, the doors, boot, bonnet and front section.

The door for the spare wheel compartment is in good condition!
 
Was your car one of the ones Richard King had parked under the trees in his back padock,sounds like there wasnt a lot left of it.

Graham
 
Hi Graham,
not sure where Richard kept the car but I think it suffered a lot of damage long before he got it. Definitely wasn't regularly garaged before I got it. Hasn't been out of a garage since. I have been conserving the rust! Redeeming feature is I got a dash with a full set of instruments.

David, an exciting day today. I took down two left mudguards that were hanging on my wall and one of them looks recoverable. Will have to remake the front quarter, the lower quarter and the rear edge but I have the lower repair section I bought from Kilmartion Auto Sheetmetal. Happy days.
Lionel
 
Sounds like it will be a New TR3 when you are done.

You must have an artistic eye to be able to visualize where the metal has to go and then get it to go there.

Keep us along for the ride.

David
 
Got stuck into the left front mudguard this week. Decided to do the front section first so once it is finished the rest would be easier.
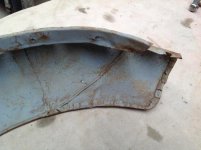
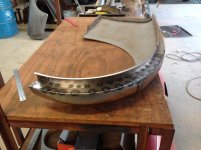
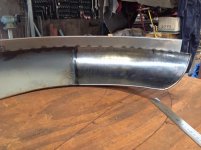
Previously the car had suffered damage to the front mudguard and someone had rough a repair section and fitted it. They did not wire the edge and simply cut and bent over the edge achieving the curves with multiple slices taken from the metal. The gutter along this section was badly damaged so I replaced it as well. I took a pattern from the. Good right guard to cut out a repair blank.

IMG_1313.jpg
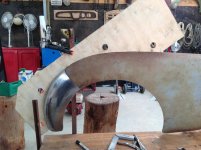
I took a pattern from the good right side mudguard with several reference points on the guard and used it to locate the new section on the guard being repaired. This allowed me to accurately scribe the cut off line for the weld.
IMG_1318.jpg
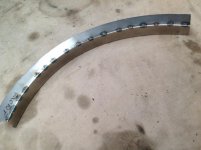
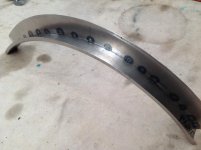
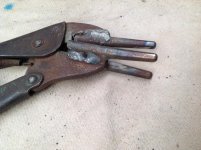
Eastwood make a pair of vice grips to hold two sheets together and make a spot weld with the tig. I decided to modify my homemade tuck pliers to hold the sheetmetal and allow the cup of my tig between the tongs. Clamping and using about 125 amps for two - three seconds gives a near perfect spot weld. I used it to make the gutter section for the mudguard.
IMG_1321.jpgIMG_1320.jpgIMG_1322.jpg
My spot weld tongs don't have reach to allow me to spot weld the gutter assembly to the guard so I just did small welds along the seam to attach it.
IMG_1324.jpgIMG_1325.jpgIMG_1326.jpg

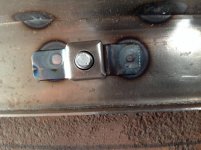
Will leave holes and cage nuts until I can match the quard against the inner mudguard when it is on the car.

Next I will do the lower repair section, finishing with the rear edge and the flange that attaches the rear to the scuttle.
 
Lionel,
I'm absolutely staggered at the work you're doing. I can only hope I can get close to your level of skill when I get into the body work for my TR4. It doesn't need the rust repair you're doing, but getting all the panels to fit better than factory will be a chore.
Again, amazing work. Keep posting pics and I wish you would do a youtube channel and post video of your fabrication process.

Robby
 
David, I think I have a three dimensional brain. I can visualise finished objects from plans relatively well. I also used to do a bit of wood carving. Have always liked to render things in three dimensions. Not overly creative, I tend to copy and modify a lot which suits my purpose in working on cars.
Robby, I had enough trouble working out how to get pictures from my ipad up the right way when I post them without trying to play with videos. All I do is watch guys like Lazze and Ron Covell etc on you tube and then copy as best I can what they do.
Thank you both for your positive feedback.
 
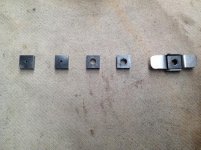
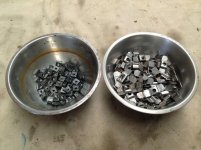
I would like to give a big vote of thanks to fellow forum member Vince and his son Seth for their skills, time and equipment. Vince offered their services to help me cut the square nuts for the cage nuts I have been making. Seth set up their CNC laser cutter and in no time had sliced out 98 half inch square nuts with centre position hole for me. The first trial was slightly too small so the size was adjusted and personally fitted to the cages I hand made. Nothing quite like a personalised fitting service!

I drilled a pilot hole through the centre mark, sized the hole for a quarter inch tap and then threaded them with a UNF tap in my battery drill.
Results as below. The left one is as they came from the laser cutter. I thought the heat from the cutter may have hardened the surrounds of the hole too much but some cutting oil and the pilot bit went through no problems. Able to line up eight at a time in my vice for the press drill so effectively a mini production line.

IMG_1332.jpg
Many thanks guys! Now I can start spot welding a few to the panels that need them.
 
Hello Lionel

They look like they fit better than the ones you get from the Big 3. Have you done the long slot cages for the rear wings?

David
 
David, I have only done one of the long cages as a test run. Will do more when I am ready to use them. Too many other things to distract me at the moment.

Thanks to Vince, I have now completed roughly one hundred cages and nuts. Rebuilding both inner and outer front fenders requires some of them to allow me to test fit them together.

IMG_1333.jpg


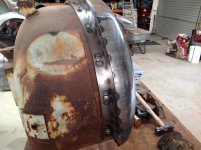
See below a test fitting of the left fender partially repaired on the as yet not repaired inner fender.
Check out the home made cage nuts, on the home made repair panel, spot welded with my home made spot welding clamp. Very happy with the results which are very strong welds.

IMG_1338.jpgIMG_1340.jpg
 
Lionel thats looking good,your thread is headed Rear Tail light cutouts and i just came upon this photo from my rebuild which may be of interest.

Graham
P1010098.jpg
 
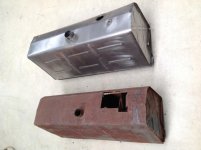
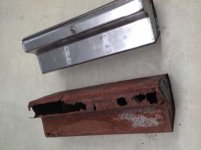
Hi Lionel, I started my restoration of my 1960 TR3A about a year ago. I am welder so that part was easy but I have not progressed as much as you have as to the metal forming. I would like to make a tank for my car as it did not come with one. I am planning on making it out of stainless steel. roughly how long did it take you to make your tank? Thank you for the photos and keep up the excellent work.
Frank
 
Yes Lionel’s work is amazing. He has got me thinking that I should be able to cut off the bottom inch of one of my old pre60k gas tanks and braze a new bottom on the tank and would use my old drain and outlet hole. I have a good buddie with sheet metal break. This would not be stainless just tin. Would brazing be better or soldering? I say this because the gas tanks out there are pretty much rotted out and the new ones are pricy and ugly. Maybe TRF has some nice ones and maybe the other 2 venders, but the new evilbay stuff is ugly, but they might last because they are made with thicker tin.
 
Hi Frank. I'm not sure how long it took to make the tank as I did it last year some time. I guess a couple of days including pressure testing and turning the pipe / plug fittings.

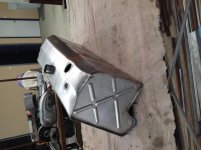
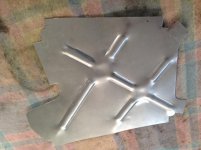
The baffles are the same pattern as the end plates except they have cut-aways on the corners to allow flow of fuel back and forth. Baffles were a bit of a pain to weld in as I was working inside the tank and welding is not a forte of mine.
I hand bent the flanges on the end panels and turned a set of rollers for my bead roller on the lathe to do the pressings in the panels. I made a punch to round the end of the rolled sections. Not as neat as the original but does the job. My wife helped roll the beads in the outer body of the tank as the overall sheet was fairly large for one person to handle. I then did the bends in this sheet around some one inch galvanised pipe. I got this a little wrong and when you see the photos you will see that one bend on the tank is a little skewed. I didn't get too upset over this as it will be hidden away in the car.

I forgot the breather pipe until I was just about to weld in the last end plate, just in time. Was able to cut the necessary hole and get the pipe and fitting in place.

I made the drain plug, fuel pipe, and fuel gauge fittings on the lather and tigged them into place.
Lionel

IMG_1042.jpgIMG_1041.jpgIMG_1029.jpgIMG_0956.jpg
 
I need to go to Australia and drink some of that water. It did not occur to me you TIG welded the tank. Perhaps one day I will learn that skill; many years ago working on the pipe line pumping stations, I work as a carpenter building scaffolding for pipe fitters that would TIG weld. Once and a while, I would try it but never with any success. Plus those guys were in high demand.
 
Yep, Lionell has all the good toys. I have been pricing TIG units for 20 years. I've been waiting that long, to no avail, for the perfect project to warrant the purchase.
 
Back
Top