• Hey there Guest!
    If you enjoy BCF and find our forum a useful resource, if you appreciate not having ads pop up all over the place and you want to ensure we can stay online - Please consider supporting with an "optional" low-cost annual subscription.
    **Upgrade Now**
    (PS: Subscribers don't see this UGLY banner)
Tips
Tips

TR2/3/3A Rear tail light cutouts

sp53

Yoda
Country flag
Offline
Lionel I figured it out, really. No one ever told you cannot that, so you just keep doing impossible stuff. Perhaps you will invent a double-sided, turbo, trunnion powered with an inverted engine, and the car will fly. If or I should say when that happens, swing by and pick me up!
steve
 
OP
L

LionelJrudd

Jedi Trainee
Country flag
Offline
Speaking of trunnions Steve, I have been sorting out bent front suspension gear and pressing shafts out of dud trunnions and into less dud trunions. In the whole process it never occurred to me to add a turbo! Food for thought.

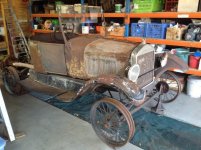
Been a bit distracted lately with vintage motorcycle rallys and swapping a Honda M/C for a 1927 T model Ford. Next thirty year project so not much done on the TR.

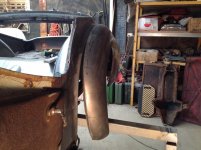
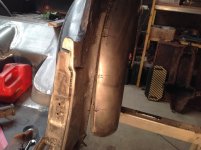
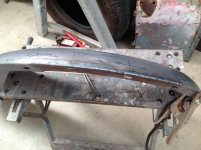
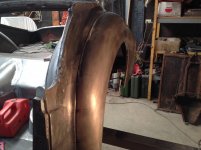
Finally got back to fitting the rear mudguards. Right hand side wasn't too bad but the left which appeared Ok when I finished it presented a twist when fitted to the car. Didn't pay enough attention to the slight variation in the curve of the body line as well as working with a template from the right hand side.

IMG_1814.jpg
After lots of thinking, I decided I could do:
1. Reposition the flange where the guard attaches to the body to reallign the guard.... problem with this is the slots for the panel bolts would then be in the wrong position.
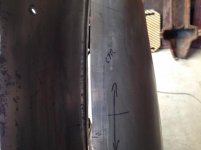
2. Cut along the flange to relieve the pressure, straighten the guard and reattach it. Decided to go this path!

Any other options required stretching or shrinking over large areas which then created untold other problems.
1. Slotted guard
IMG_1842.jpg
2. Weld tacked in place
IMG_1844.jpg
3. Final weld
IMG_1845.jpg
4. Refitted
IMG_1847.jpg
Next project. (Is this allowed?)
IMG_1770.jpg
 

Graham H

Jedi Warrior
Country flag
Offline
Lionel, I see in your first photo you have the sump off the T, brings back memories for me the first vehicle registered in my name was a 1927 T Ford light truck with a two-speed diff given to me by my Grandfather. I was going to make my fortune carting firewood managed two loads to our house and gave it a miss finished up selling the old girl to a farmer for 15 pounds

Graham
 

sp53

Yoda
Country flag
Offline
Yes the people who worked out the radiuses and compounded cures on these cars were not intimidated by any ability not to be able to form something. The work is true craftsman’s ship; they must have been competing with each other to see who could not only create a difficult design, but could replicate it and sell it for a profit, amazing.
steve
 

Frank Canale

Jedi Warrior
Silver
Country flag
Offline
Nice recovery Lionel. I know exactly what you mean about pressing pins out of trunnions. I am working on upgrading the front suspension to a TR4A suspension. Had a nice visit to see Marvin after his suggestion to do the up grade. Beefier suspension arms and vertical link. Still disassembling suspension to clean and check the vertical links for runout. Hope to get back to sheetmetal soon. Frank
 
OP
L

LionelJrudd

Jedi Trainee
Country flag
Offline
Merry Christmas everyone.
I got a little bored with doing panel work earlier this year and so I started rebuilding the engine, gearbox and differential for the TR. I haven't posted anything related to those activities because there are a number of comprehensive rebuild threads on the forum. Likewise, I rebuilt the door frames which were rusted out completely in the bottom third and reskinned them but didn't document it as it has been done by several others in detail. Many thanks to them for guiding the way.
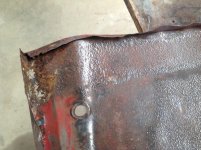
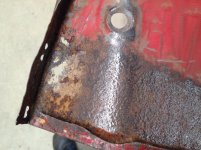
In August, I started again on the body panels, in particular the bonnet. The sample I have is a post 60k with raised hinge plinths. The body does not have plinths. I removed the front and rear strengthening frames to reveal the rust underneath. The rear frame had additional thickening piece which goes in the raised plinth. I cut these off and used the hammer and dolly to flatten the plinth back into the main bonnet metal.
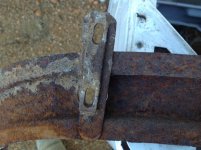
IMG_2077.jpg
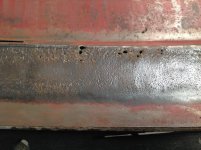
Rusted section at rear.
IMG_2080.jpgIMG_2081.jpg
Rusted section at the front.
IMG_2082.jpgIMG_2083.jpg
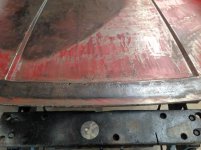
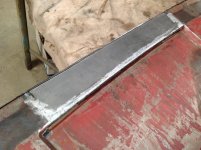
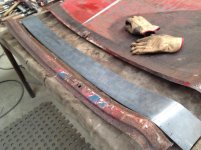
I decided to replace the front five inches of metal and about the same at the middle of the rear. The rear was quite straight forward, with simply a small flange on the rear edge, using the removed section as the pattern. I deliberately cut this flush with the raised section in the middle of the bonnet so I would be welding along the bend in the metal, which would assist in minimising warping of the sheet.
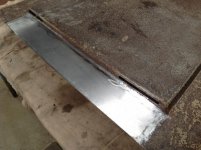
IMG_2090.jpgIMG_2092.jpg
The front edge is more difficult because although it is a straight line when you look down on it, the curvature necessitates a pattern to ensure the resulting edge is straight. When laid out on the flat, this edge curves and hence the lip which bends under and clips on the strengthening frame has to be carefully bent along its length. Ie it can't be bent over a straight edge. The left photo below shows the flange being worked over a bit at a time. The right photo shows the result of doing it wrong. Made the mistake of starting with a straight line bend and then curving the piece to match the flow of the bonnet with a resulting incorrect leading edge. We learn by our mistakes!
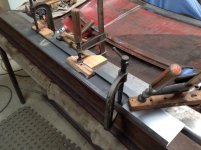
IMG_2086.jpgIMG_2087.jpg
 

sp53

Yoda
Country flag
Offline
Looking good Lionel; it is nice to see your progress. To get more photos you need to go to a section on your personal page and delete some of your older stuff. It is easy, but I cannot explain it right now, but poke around and you will find it.
 

windsor

Freshman Member
Country flag
Offline
What an amazing thread . Thank you for sharing . --Just curious as to what gauge of metal you are using for the new panels ?
 
OP
L

LionelJrudd

Jedi Trainee
Country flag
Offline
Hi Windsor. Sorry for the delay in responding.
The sheet I use for body panels is 0.95 mm which equates closely to 19 gauge. Other parts such as body mounting brackets are much thicker and I find what I can to match the individual pieces. If you haven't already done so, you must check out John's series of threads on his TR2 restoration. That's where I started.

John, I load my images directly to the forum so I guess that is why I am out of space. I tend not to upload to the cloud as such.
 

windsor

Freshman Member
Country flag
Offline
Thank you for the reply Lionel . Ive been playing with pieces of 18 and 20 gauge on my english wheel .( total newby to metal fabrication ) ive found the 18 gauge pretty stiff , and the 20 a bit light . But Ive heard that gauge sizes vary considerably depending on country and sytem of measure .Ill try talking to my metal guy in mm . Yes I,ve read Johns TR2 thread several times , both of you are great inspirations . I hope that the fires arent too close to you ? My prayers are with you .
 

CJD

Yoda
Country flag
Offline
I may have got your guys started, but the metalwork you're now doing is WAY past my level. I very much enjoy following along!
 
Similar threads
Thread starter Title Forum Replies Date
bigjones TR2/3/3A Rear tail light not budging Triumph 5
N Wanted Early rear tail light lens Triumph Classifieds 0
bigbadbluetr6 TR6 Rear tail lights not working. Triumph 17
O TR2/3/3A TR3 Rear Turn lights Versus Rear Stop Tail lights? Triumph 5
wkilleffer Trouble with tail lights and rear sidemarkers MG 18
petnatcar Rear View Mirror Relocation Austin Healey 0
Carlbanan56 MGB Rear axel torque? MG 4
petnatcar Rear View Mirror Relocation Austin Healey 0
trbby2 TR4/4A TR4A Intermittent rear wheel locking? Triumph 19
Carlbanan56 MGB Rear wheelbearing clicking MG 8
Carlbanan56 MGB MGB rear break rebuild MG 6
B BJ8 Rear Backrest Hinges Austin Healey 4
F For Sale E Type Series II front and rear bumpers good condition Jaguar Classifieds 0
5 Wanted Wanted 1966 mgb banjo type axle rear hub MG Classifieds 0
scottkilpatrick TR4/4A TR4 Rear Brake Drum Removal - Basic Question Triumph 16
J TR2/3/3A TR2 Fitting/mounting rear wing Triumph 11
Michael Oritt Rear Crank Seal Kit Austin Healey 7
BT7 Owner Rear Crankshaft Bearing Cap Austin Healey 4
O Jaguar rear window trim repair Jaguar 1
Joel Lester TR2/3/3A Is "later" style rear view mirror taller than the "early" style? Triumph 6
S Leaking HD6 Rear Carb Austin Healey 10
B Rear Brake Cylinders Austin Healey 4
WHT BJ8 Rear Seat Surround Drain Tube Grommets Austin Healey 0
Joel Lester TR2/3/3A Do rear leaf springs wear out? Triumph 11
J TR2/3/3A Rear Fuel Line Clips Triumph 3
apbos New long term project. Sprite powered rear engined race car. Spridgets 9
60BN7 Rear Wheel Opening Austin Healey 9
glemon TR5/TR250 Answering My Own Question Rear Tube Shock Conversion Numbers TR4a-TR6 Triumph 0
S TR2/3/3A rear wheel cylinder Triumph 1
K TR2/3/3A Rear tire pressure when there is an anti roll bar at the front of the car? Triumph 1
T Rear/Differential "Clunk" Austin Healey 2
AUSMHLY BJ8 Rear Seat Squab Austin Healey 0
jfarris For Sale TR3 Rear Sway Bar Triumph Classifieds 0
J 3000 Rear Seats Austin Healey 6
KVH General TR Rear Brake Shoe Orientation Triumph 12
Popeye TR4/4A Rear fender attachment: wing to lamp housing clip? Triumph 7
KVH General Tech Rear Brakes and Solid Axle Triumph 2
P Rear Springs Austin Healey 2
K TR2/3/3A Rear leaf spring brass and Delrin bushings ? Triumph 4
KVH General Tech Jacking Up The Rear of TR4 Triumph 5
J Rear Main Seal Kit Austin Healey 1
af3683 TR2/3/3A TR-2 / TR-3 Rear Bumper Wrap Around Fender Guards Identification Triumph 0
Patrick67BJ8 BJ8 Factory Hardtop Rear Window Austin Healey 6
T Looking for "BillMs rear transmission mount" Spridgets 2
R Wanted Looking For A Rear Glass For A Bugeye Hardtop Spridgets Classified 0
K Usual 1275 rear main oil leak question Spridgets 0
BN6_L1232 Rear Disc Brake Installation Instructions Austin Healey 3
Ed Foster T-Series MG-TD leaf rear leaf spring. MG 0
drooartz Bugeye jack points to remove rear axle Spridgets 18
bighealeysource Burning Smell from Left Rear Wheel Austin Healey 14

Similar threads

Top