Hey Guest!
OP
kennypinkerton
Yoda
Offline
Re: My Toyota - Parts here!!
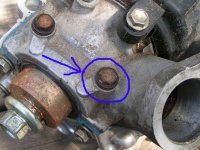
The points were rounded before I tried and made it worse... What's a Sprag?
The points were rounded before I tried and made it worse... What's a Sprag?