• Hi Guest!
    You can help ensure that British Car Forum (BCF) continues to provide a great place to engage in the British car hobby! If you find BCF a beneficial community, please consider supporting our efforts with a subscription.

    There are some perks with a member upgrade!
    **Upgrade Now**
    (PS: Subscribers don't see this gawd-aweful banner
Tips
Tips

Making Progress

Hi,

I've been using the grinder and wire brush, but been looking for a less messy and "elbow greasy" method to remove the undercoating.

Looks like you've gotten a lot done on your car. I've been working on a rebuild of my 6 for almost 2 years and haven't gotten any where near the point where you are. Good Work!

Cheers
 
Hi Guys,

Well, been quite a while since the last update. Back to working on the project now that the other TR's are stored away for the winter.

First thing I did was take all the body panels back off that I had put on just to remember what the car looked like. I then took the body off the chassis for what must be the 50th time. Flipped it over to begin work again on finishing where I left off on the rear valence.

I last stopped working on the car at a point of frustration. I realized that I needed to take apart the bottom closing piece of the bottom of my newly installed valence. Nothing I hate worse than having to drill/cut into a new piece of sheet metal. I had to take out the bottom horizontal closing piece so that I could have access to weld in the verticle close in panel directly to the bottom of the trunk floor.

I was also having a tough time trying to figure out the verticle close out panel fitment. Lets just say it needs a few modifications including reversing the direction of the bottom flange one either side of the spare tire pan....

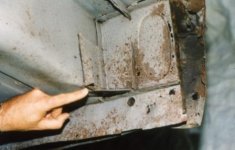
So I got a start on it and understand now how it goes back together a little better...I didn't have much to work with to go off of...here is a reminder of what I had to work with....

P1080317.jpg


So, first task was to remove that bottom horizontal closing piece on the bottom of the valence.

img_1417.jpg


img_1419.jpg


img_1423.jpg


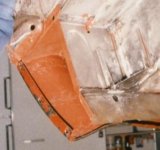
Here is the mod to the bottom verticle close out panel


img_1431.jpg


img_1432.jpg


Old vs New

img_1436.jpg


Welded in the verticle close out panel and proceeded to figure out the rear mount and close out panel arrangement.

img_1439.jpg


Spot welder came in handy to mount the body mounting bracket to the close out panel.

img_1445.jpg


img_1448.jpg


img_1451.jpg


So before I go any further, I need to put the body back on the frame and check the orientation of the body mount to make sure it line up where it needs to be.

Will do some more this week.

Cheers,
M. Pied Lourd
 
Dave,

I finally had a couple hours to go through this entire build thread. You are a saint sticking with it through so many patches! I am very impressed. You are on the home stretch now, so keep with it!

John
 
I've just been through all this on mine, which I think might have been rather worse!

5114848806_d273bef713_b.jpg


5102365052_603c0a1afe_z.jpg


5078338896_7c62893775_z.jpg


Here it is now having been on the road for a thousand miles or so. i love it, it's great fun and goes rather better than I expect.

6291665929_5b1ccfeb30_z.jpg


I really wish you well with the work, which you're doing really well. I hope the car is as much a success for you as mine is for me.

Ash
 
Hi Ash,

Was following your thread on the Register as well. Your car turned out fantastic and is certainly an inspiration. I hope to get all my body work done over the winter and will then get it into paint hopefully in the early Spring when it gets a little warmer.

Cheers,
M. Pied Lourd
 
Dave - I visited Ash when I was un England driving TS2 for 23 days. It truly is a nice car. You and Ash had to go through exactly what I did from 1987 to 1990 on my 1958 TR3A.

Welcome to this forum Ash.

Cheers - Don
 

Attachments

  • 27039.jpg
    27039.jpg
    29.3 KB · Views: 384
MP your making great progress and doing some fine work. Keep pluging away, or should I say spot welding away.
 
Bit more progress today. Tacked in the rear body mount and put the body back on the car.

img_1457.jpg


img_1458.jpg


So, mounts do seem to line up with the holes on the frame...curious though as they seem to be a little far back. If anyone could take some pics of theirs for comparison it would be greatly appreciated.

Here is what mine looks like.

img_1468.jpg


Left the mounts for now and started to work on the driver side rear wheel arch where there are some rusty bits and missing cage nuts.

img_1482.jpg


img_1489.jpg


img_1491.jpg


Cheers,
M. Pied Lourd
 
Dave your an inspiration to me at least.
Can cook and melt metal :winner1:
 
Actually, just looked back at Ash's photos and looks like his mount is in approximately that same position as mine..

Cheers,

M.Pied Lourd
 
M Pied,
It is looking great...I wish I had the talent. I will be trailing the car to a shop Friday. I need to get back on track and the welding in my one car garage is not a viable option right now. We will see how much they want to get the base solid. I hope it is within my budget.....and maybe by the time it is done I will have more confidence with welding.

I have most of the metal so just need to pay for the labor....
 
Hi Don,

Thanks for the pics. I have been using another one of your you posted earlier in a different thread as my main reference points. Thank goodness for pictures (especially when mine looked so bad to begin with).

What I was more interested is when the body is mounted on the car, where the rear bracket sits on top of the frame. Just wanted to see some examples of the relative position of the bracket. The holes line up on mine (the one on the my frame is slotted and the mount is a single round hole) so that is not issue. It just looks to the eye that tha body mouting bracket it sitting a little more to the rear than it should. Have a look at Ash's photo where the mount sits and have a look at mine. Hope that I am making sence....

Cheers,
Tush
 
Well, I went out to take pictures...and discovered how tight the area around the rear mount is. Of course, none of the 2000 pics I took while the wing was off showed the mount!?! This is the best I could do...

rearmount.jpg


_DSC7300.jpg
 
Those a perfect pics. Thanks very much. Looks very close to mine. Now I can weld mine up :smile:

Cheers,
Tush
 
Moving around a little bit on the car and thought that I would finish up the driver side rear wheel arch that had some suspect previous repairs and missing cage nuts and rusty metal being held in with pop rivets.

Not one of my prettier repairs but it is much better than it was and all the cage nuts are present and functioning as they should.

img_1494.jpg


img_1500.jpg


img_1501.jpg


img_1520.jpg


Also grabbed a repair section from my parts car to close off the bottom of my doglegs where I repaired my inner sills.

img_1508.jpg


img_1515.jpg


img_1513.jpg


My next repair will be this passenger side footwell hole that was covered with layers of fiberglass. What a pain in the A$$ to get this area clean. I gave up on it for now...can't get the carpet clamps off either just to make things a little more interesting.

img_1525.jpg


img_1528.jpg


Cheers,
M. Pied Lourd
 
Back
Top