• Hi Guest!
    You can help ensure that British Car Forum (BCF) continues to provide a great place to engage in the British car hobby! If you find BCF a beneficial community, please consider supporting our efforts with a subscription.

    There are some perks with a member upgrade!
    **Upgrade Now**
    (PS: Subscribers don't see this gawd-aweful banner
Tips
Tips

Making Progress

Whadda ya know....

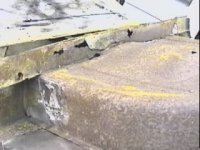
Rear valence showed up today....

Looks ok. Haven`t been out to the car to hold it up and compare what is on there now....

P1090015.jpg


Somehow, the bottom flange doesn`t look right to me....I think that the bottom finishing piece might be welded on the wrong way round (upside down).

At least it gives me something to work with. Will post more pics when I get a chance to look at it a little better...long day today and am kinda tired and can`t be bothered to go out to the garage....

Cheers,
David
 
Hi All,

Had a bit of time to play today so thought I would take a look at the rear valence issue.

I was intially thinking of just replacing the bottom half of each side of the valence while leaving the top part attached.

Here is where I started.
P1090031.jpg


You can see I left a section of the bottom piece in the middle attached as well but I decided to remove that after I removed the other side 1/4.

P1090049.jpg


P1090050.jpg


Here is what the drivers side 1/4 looked like on the inside

P1090046.jpg


I then started to look at the top piece of the valence that was left. I found some rust through holes at the top inner fender where the valence side tabs attach to. To fix these holes, I was going to have to remove the tabs. I found a few other small areas of concern so I ended up removing the whole rear valence so I can fix it properly. Here is what it looks like now.

P1090056.jpg


P1090063.jpg


Tomorrow I am going to see how the new piece fits and do some cleaning of the area and replace some of the rust through areas on the side panels.

Cheers,
David
 
Dave - You still have to weld in the vertical piece that has the flanges all around. The flange that mates to the outside bottom of your spare wheel well should have the flange hammered with a curve in it (symm. about the centerline) so the fllor of your wheel well will be curved down when you look inside from the rear. This is needed to permit the wheel to slide into whe well.

Normally this flange should be about 5/8" wide but wityh the looks of your wheel well (looking cut too short), you may have to make that flange a bit wider to overlap.
 

Attachments

  • 24520.jpg
    24520.jpg
    74 KB · Views: 525
This is how it looked on Frank's late TR3A before I cut it off and replaced it. You can see the curve. I had these two closing pieces made by a sheetmetal shop where they specialize in cutting and bending parts that are hard to find. I believe these are available now from Roadster Factory and other suppliers.
 

Attachments

  • 24521.jpg
    24521.jpg
    19.5 KB · Views: 517
Hi Don,

Thanks for the heads up. I do have that verticle piece that fits the contour of the spare tire floor. As you can see in the picture, I also bought the bottom closing piece for the valence as well (with the drain holes on the end corners) but it is allready attached to the new valence so it looks like I will have that as a spare.

P1080309.jpg


Cheers,
David
 
DAve- Your doing such a nice job. Does it seem like your making progress?
 
Hi Don,

Not really.

At this point, as soon as I start looking at a particular area, I find something else to repair...this has been the case with most of the areas on this car....sometimes it feels like I am going backwards!

I have a bunch of areas that are "partially" repaired as I seem to be jumping to different problem areas of the car and then waiting for parts/sheetmetal/welding materials to complete.

I have had the garage doors closed (winterized) for over 4 months now and it is beginning to get a little "stuffy" and dark in there. I am looking forward to Spring when I can get the garage doors open to let some light and air into the space.

I need to bring the TR6 home in about 6 weeks time so I need to make some more progress on the 3 body before them so I can get it back on the chassis.

Cheers,
Tush
 
Tush - I'd respectfully differ. :laugh:

Figuring out what is wrong and what you have to work with is progress! Assembling the correct parts and coming up with a plan of attack is progress, after all how could you proceed without that. Right?

This is why I dread picking up an angle grinder sometimes and actually confirming what I suspect is under the paint, but it is necessary, <span style="text-decoration: underline">unavoidable</span>, and ultimately represents a step forward.

Hang in there.
 
Been a long time since I updated this thread. Haven't had too much time to work on the car unfortunately as of late...real work just gets in the way. Been picking at little bits here and there but haven't done anything really significant for a little while.....

Raining again today. Hurts me to push the TR6 out in the rain as I have done so quite a bit as of late but it is the only way that I can work on the TR3A....here she is this morning....

P1090195.jpg


Been such a rotten spring here combined with my work schedule, I have only had it out 3 times since I brought her out of storage in April.

The TR250 is acting like a shelf for TR3A parts...I did this intentionally so as to not be tempted to start working on the 250 before the 3A is completed.

img_1077.jpg


Started working on getting the rear valence back on the car. First needed to fill in the areas where I drilled out the old spot welds.

P1090197.jpg


P1090198.jpg


P1090200.jpg


Test Fit the Rear Valence and tacked it in a few places.

P1090205.jpg


Going to check the spare tire door fit and the fender fitment before I weld it in.

I did buy a used spot welder and have been playing around with it a little bit. Wish that I had purchased it a little earlier in the project. Would have been great for the inner and outer rocker replacement.

Cheers,
Tush
 
The TR6 looks great. -even sitting in the rain. I don't know about anyone else, but my breath rate changes when I see the pictures of how that TR3 is coming along. I like to think I'm making (forward) progress, but it's fun to see others who definitely are.

Keep up the good work.
 
David:
Nice work on the TR3A but it was your TR6 that really piqued my interest. Mine is white also but not Old English White, much to my dismay but my fault for not going back to OE White for the respray in 2005. I went with the brighter white that the DPO had put on the car. While surfing a few months ago I saved a bunch of pics of TR6 colors that I liked in anticipation of a repaint to some other brighter color or back to Old English White. Attached is one of the pics that I really liked and saved as an example for my color choice portfolio; your TR6. [img:center]https://C:\Documents and Settings\Bob\My Documents\My Pictures[/img] That is one great looking TR6, the color is great and the hardtop and aftermarket wheels really compliment the clean lines of the car. Nice job!
Cheers,
Bob
 
Durned pics did not attach. Trying again with pic of David's TR6. Beautiful!
Bob
 

Attachments

  • 25332.jpg
    25332.jpg
    55.2 KB · Views: 378
And the other pic. Very smart looking car!
Bob
 

Attachments

  • 25333.jpg
    25333.jpg
    56 KB · Views: 433
Thanks for the complimentS Bob and Tex.

Bob,

When I restored the car, I found that it had the original crash pad on it and it had never been removed. I found that this is the best place to find the actual factory color of the car in unfaded, untouched condition. I buffed this area a little bit and then had the paint shop that painted my car take a digital sample of it. The color was matched from that digital sample.

Cheers,
Tush
 
Still playing with the rear valence. Loosely bolted on the rear wings and dug out the boot lid. I can tell you that it is one big pain in the butt trying to get everything to line up. I am going to have to resort to doing some cutting and grinding I am afraid to get the gaps evened out.

I was going back and forth on weather to use the old channel that was on the old valence or go with the new one that was supplied. I decided to go with the old one as it seemed to be of better quality and I figured I could weld it back to where I cut it off as a reference point.

Here is the old channel being seperated from the old valence. The new valence didn't come with the center stiffener piece as well as the tab for the boot lock.

P1090210.jpg

P1090211.jpg

P1090212.jpg


I have fit issues on each corner...

P1090217.jpg

P1090219.jpg

P1090220.jpg

P1090223.jpg

P1090225.jpg


Will keep playing.....

Cheers,
Tush
 
Tush,

How did it line up against the old Valence before you removed it? Just wondering about the value of saving the original top 1/2 of the rear valence (in situ) and just replacing the lower 1/2 ala Don Elliott? It would reduce the number of changes in the reference points? This is in my future as well....

Mike
 
Back
Top