
-
 Hey Guest!
British Car Forum has been supporting enthusiasts for over 25 years by providing a great place to share our love for British cars. You can support our efforts by upgrading your membership for less than the dues of most car clubs. There are some perks with a member upgrade!**Upgrade Now**
(PS: Upgraded members don't see this banner, nor will you see the Google ads that appear on the site.)

Tips
- We have a special forum called "Member Articles" where you can submit actual articles for consideration for publication. Learn More
- Don't have an Avatar? If not, your avatar will default to the 1st character in your username. Go into "Account Details" to change your Avatar.
- Some basic forum navigation info: click
 Hey - did you know if you click on the title of a thread it will take you to the first unread post since you last visited that thread?
- Hey Guest - Is your British Car Club in our Clubs database? If not, send me a PM - Basil

- Looking for a local club? Click the "Clubs" tab above and browse hundreds of clubs world-wide.
- Add Android or iPhone APP: click
- Did you know - any picture or video you add in your posts in any marque-specific forum will also get added to the Media Gallery automatically.
- A few more tips about posting and replying: click
- Hey there Guest - be sure to keep your profile page up to date with interesting info about yourself: learn more
- More tips and tricks on Posting and Replying: click
 but were afraid to ask:
  STOP!! Never post your email address in open forums. Bots can "harvest" your email! If you must share your email use a Private Message or use the
  smilie in place of the real @
- Want to mention another member in a post & get their attention? WATCH THIS

- So, you created a "Group" here at BCF and would like to invite other members to join? Watch this!
- Hey Guest - A post a day keeps Basil from visiting you in the small hours and putting a bat up your nightdress!
- Hey Guest - do you know of an upcoming British car event?
 Pretty Please - add it to our Events forum(s) and add to the calendar! >> Here's How <<
- Hey Guest - you be stylin' Change the look and feel of the forum to fit your taste. Check it out
- If you run across an inappropriate post, for example a post that breaks our rules or looks like it might be spam, you can report the post to the moderators: Learn More
- If you would like to try some different "looks" or styles for the site, scroll to the very bottom, on the left and click the Style Selector.
You are using an out of date browser. It may not display this or other websites correctly.
You should upgrade or use an alternative browser.
You should upgrade or use an alternative browser.
TR4/4A Making a '65 TR4 Run Awesome. Misfire, Ignition Tune Up, Carb Rebuilds. Help?
- Thread starter jeep937
- Start date

Offline
The larger one may be a seal for the black plastic dashpot cap on top of your carb, not sure about the other one, but washers like that are usually not big wear items, I wouldn't worry about it too much, I don't prep the gaskets with anything before installation on the carbs.
Oh yeah! Crap, already prepped the float gasket with oil. Oh wells.. Gonna have to run the cracked floats. They don't sink and my carbs didn't over flow out the vents. So hopefully I'll be able to tune them. Also got all the capasitor, points, cap and rotor on. When transfering my wires over two of them wouldn't ohm out no matter what I did. I broke out my MSD extra's box but the 8.5mm's wouldn't go in the hole's on the cap. So I attempted to score some local wires. No go. Parts store guys are idiots. So I got some Chevy small block wires cause I knew they would be long. They were 8mm as opposed to the Lucas 7mm's but I was able to make them work with some careful trimming. All Ohmed out good cept one was like 14 when the rest were like 8-9. Made in USA too!
Set points gap to 15 and wired everything up. Installed some new plugs and now I just have to finish the other carb and put them in and tune them. My friend was putting in the interior while I was doing that and it looks awesome. Posted on FB today about someone to buff out the beat old single stage and my body shop buddy let me borrow his buffer and gave me some compound and a demo. Ready to rock for the english car show this sat! Only if I can get that tune dialed in!
Set points gap to 15 and wired everything up. Installed some new plugs and now I just have to finish the other carb and put them in and tune them. My friend was putting in the interior while I was doing that and it looks awesome. Posted on FB today about someone to buff out the beat old single stage and my body shop buddy let me borrow his buffer and gave me some compound and a demo. Ready to rock for the english car show this sat! Only if I can get that tune dialed in!
Geo Hahn
Yoda
Offline
They usually give you a few aluminum(?) washers of varying thicknesses with the needle & seat -- use the one that gets you closest to the spec for float height, that way you minimize the need to bend the ear on the float.
If you get new floats I suggest the new & improved solid floats -- I think they are available for the TR4, definitely available for the E-Type. That style should never leak.
Sorry I can't answer about the other 2 parts, one looks familiar the other doesn't and I can't place either.
If you get new floats I suggest the new & improved solid floats -- I think they are available for the TR4, definitely available for the E-Type. That style should never leak.
Sorry I can't answer about the other 2 parts, one looks familiar the other doesn't and I can't place either.
Geo Hahn
Yoda
Offline
...So I attempted to score some local wires. No go. Parts store guys are idiots. So I got some Chevy small block wires cause I knew they would be long...
If you are using the original style side-entry distributor cap you may find the best results with copper core wires -- these usually connect better with those pointy-screws that pierce the wire from inside the distributor cap.
Perhaps you got copper core wires (don't know what a Chevy would use) but I have always been able to fine them in a 'universal' kit from CARQUEST. All kits were priced the same so I got the universal for an 8-cylinder which is about a lifetime supply for a 4-cylinder TR driver.
Offline
I don't think oiling the gasket would hurt anything, wouldn't worry about it. I think the early stromberg floats are a solid foam material of some kind, but they can deteriorate over time, the later ones were plastic and hollow like the later SUs. But anyway, since they are solid a crack isn't necessarily fatal like it would be on a hollow float.
Alright, here's where I am. I busted my ass all last week to get the carbs rebuilt, ignition tuned with new parts, tired single stage paint buffed and the interior put back in on top of tuning the carbs and timing. This was to make a huge local British car show that I only heard about the Sunday before. I got the carbs rebuilt, the floats are cracked but don't seem to be sinking. I'm ordering them this week anyway. I put on the new points, condenser, cap and made some 8mm chevy sbc wires work in the Lucas cap. I installed a new Gold Lucas coil to replace the old Lucas Gold one. I decided to not install the new fuel pump as there was not one single piece of debris in the carbs. I also hadn't yet taken the valve cover off to do the gasket. Turns out I should have. My wire placement was off and I thought I paid enough attention to the tags on the wires but I guess not
Tired to start it with the rear exhaust pulled out from banging it on the trailer. It ran with some wire changes of position and popped and bangs and shot fire at me. I finally found a quick timing guide and got it all worked out. I got it started for two seconds and the distributor blew up, twisted in it's clamp and ceased the motor. When it spun around it took the top off the new coil. No British car show for the TR4.
https://www.britishcarforum.com/bcf/showthread.php?97746-Quick-Dist-question-TR3-4-vs-Heralod
After that I broke out the buffer and tried to make myself feel better by putting a shine on that old oxidized paint job. Next day I went to the show and a buddy hooked me up with a 25D distributor. Sunday I went to bought a build Jag motor for the e type and also picked up a Buick 215 for a buck and a quarter. That made me feel pretty good.
Today I clean up the dist and build it with the best parts in the two piles. I initial timed the motor properly and fired it up. The rear pipe was still off so it was loud. I decided it fired easy enough so I moved on the fixing the slipped pipe and buffing some more panels.
During this time my buddy put the factory interior back in and it's pretty much done save for a few minor items.
This week I'll work on getting the tune and drivablity dialed in and finishing the buff out job. I gotta get some minor small things ordered and worked out.
Question, where do I get the proper sized nuts for the back of the guages. I have a giant nut and bolt bin on top of going to every fastener shop in town and nothing fits. Some are close but not enough to twist on and make work. Plus there was a broken nut insert in the door where the inside door pull bolts to. This nut insert goes behind the panel and fits in a small square hole in the metal inner door frame.
trrdster2000
Luke Skywalker
Offline
Jeep, here is a one time shot at the door nut. Get a star washer and nut that fits the chrome screw and use hot glue to stick it on the inside of the door, making sure the placement is right. Thread the bolt in several times after the glue has set up to make sure it will be a no restriction until tight thing. Just thick gloves to install. Now your pull is stable and good until the next time. Getting the panel off is no problem, just keep a little pressure on the panel.
Wayne
Wayne
Got the new (used) floats today. Gonna try and get these carbs built and tuned. The old floats were full of gas after sitting in the full bowls for a week. Guess it's good I got them. Now how do I get this **** jet centered?
https://www.howacarworks.com/fuel-systems/adjusting-a-stromberg-carburettor
Also finished the buff job

https://www.howacarworks.com/fuel-systems/adjusting-a-stromberg-carburettor
Also finished the buff job
trrdster2000
Luke Skywalker
Offline
Nice job and will be good to go for a long time. The jets will be a trial and error and getting them centered will the jet all the way up will be close to impossible, run the bottom adjustment screw down about 3/4's of a turn and they will be much easier and still not be dragging and cause any problem. The setting is 1 and 1/2 down to begin with. I have found that almost 2 turns on a used engine is best over all.
Wayne
Wayne
Well I got them centered by putting the bowls on all the way with the jet housing and brass jet thingy out. I pushed the end of a sharpie in the tip where the oil goes and this put the end of the needle at the bottom or "top" of the jet with the carb upside down. I centered the jet then took the jet adjuster housing with the adjuster screwed half way at 2.5 turns and turned in into the upsidedown carb checking every 1/8th turn for the click by flipping the carb over and raising the piston and dropping it listening for the click. The carbs are money in the bank. They are synced and dialed as much as I can with out reading the plugs. The car fires up great. I pushed the bypass things and the engine ran up in RPM then after a sec went down. After a while the thing starts to run real crappy. I take if for a drive and it's horrible under load then it won't start. I put another dist in after blowing mine up with a new low side lead and condenser, points and everything. I static timed it on the money. I'm thinking my cracked cap from over tightening the chevy wires on the one and having to used the old Lucas Gold coil might be jacked me around. Ordering a new cap, wires, coil again, tomorrow. This bitch better run like a top cause it ran **** good before I did all this.
Today I got the new cap, wires and coil. Now I can't get the car to fire at all. Pulled the plugs and they are all fouled bad. I wire wheeled them off and cranked it over a few times and they fouled again. I'm going to wire wheel them off again crank the motor with the plugs out to blow out any fuel or oil and start again. Static time it, advance it a few degrees and turn lean out the carbs. Any ideas?
Geo Hahn
Yoda
Offline
Have you confirmed that you are getting good spark?
If the new cap is the correct sort that pierces the ignition wires with a pointy screw then are the wire copper-core? The commonly sold silicone wires do not always make good contact when using that type of cap.
Oh, and at the risk of asking the obvious -- are the plug wires connected in the correct order [1-3-4-2]?
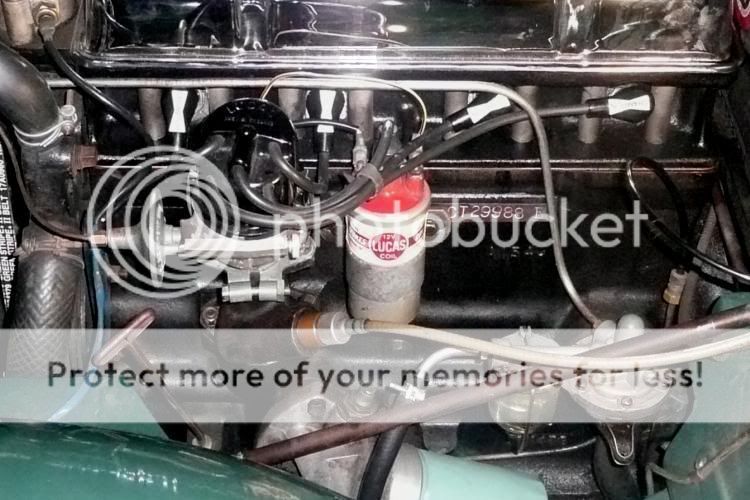
Yes the cap and wires are from Moss and they are correctly hooked up starting with #1 via the static timing procedure. I even had the valve cover off when I check for #1 on the compression stroke. Both valves are closed and the dot on the crank pulley is correctly lined up via visual inspection with flash light showing the piston at top dwell center. When static timing I'm getting a good spark from the points and the light comes on. I also have the plus side of the coil going to the dist and the dash side going to 12v. I have 12v at the dash side via a test light.
Geo Hahn
Yoda
Offline
...When static timing I'm getting a good spark from the points and the light comes on...
These engines will usually start & run (albeit poorly) with the timing pretty far off and the carbs way out of adjustment, they'll even run on just one carb -- so if you have not already done so I would see if you are getting spark at the plugs.
I have a English car guy coming over tomorrow evening. He's bringing out a 40 year old condenser which he says is 10 times better than a new one made over seas by a child. He says he's also going to bring over a petronix to try. Also mentioned that the floats need to be more than just eye balled like I did because they can be set too low and cause lean condition which we don't think is happening due to the fouled plugs.