• Hi Guest!
    You can help ensure that British Car Forum (BCF) continues to provide a great place to engage in the British car hobby! If you find BCF a beneficial community, please consider supporting our efforts with a subscription.

    There are some perks with a member upgrade!
    **Upgrade Now**
    (PS: Subscribers don't see this gawd-aweful banner
Tips
Tips

I've lost second gear!!

I spent another couple hours before work today, to separate tranny from engine.
The first thing to do is take the bellhousing off. This is really straightforward: take the starter out, and about 10 bolts around the circumference...
IMAGE_01289.jpg

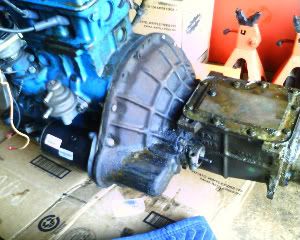
...and then pull it straight out. I didn't know what to expect, so I was surprised at how easy this part was.
IMAGE_01290.jpg

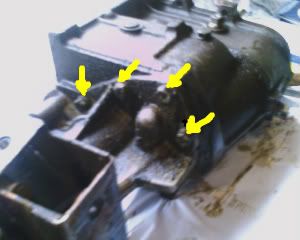
Hmm. Looks like some wear around the clutch fingers. New clutch is a good idea, it seems.
IMAGE_01291.jpg

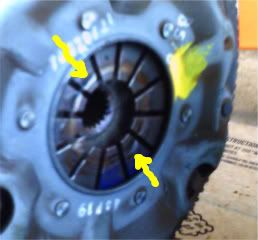
Peeking at the clutch face shows some thickness. I don't know how much there's <span style="font-style: italic">supposed</span> to be, but the finger wear is hinting to me that it's time for new stuff anyhow.
IMAGE_01292.jpg

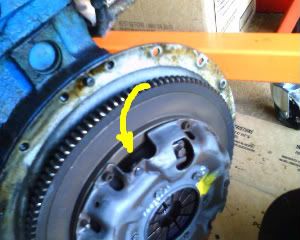
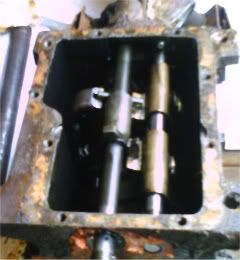
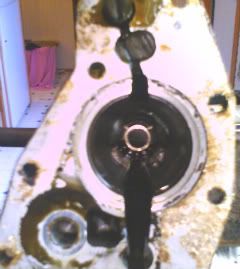
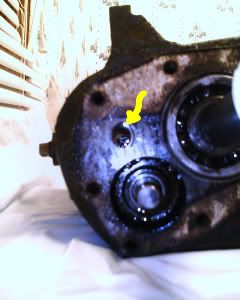
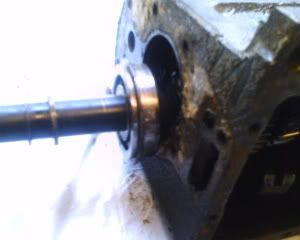
Inside the bellhousing, showing the five bolts that hold it onto the transmission. Apparently, I have a roller release bearing?
IMAGE_01293.jpg

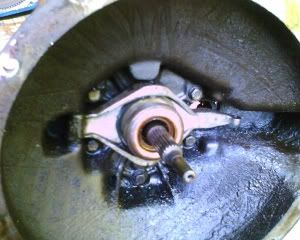
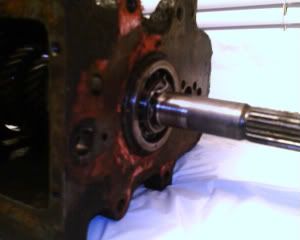
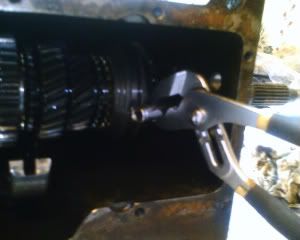
The bellhousing did <span style="font-style: italic">not</span> want to come loose. Resting it upright on its input shaft and tapping the bellhousing helped, (although I was very uneasy about doing it.) Expect an oily mess if you do this. :laugh:
IMAGE_01294.jpg

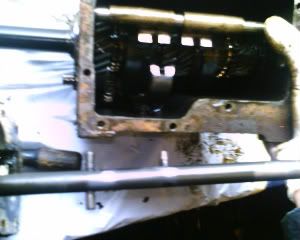
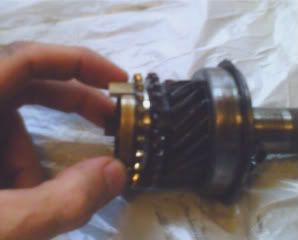
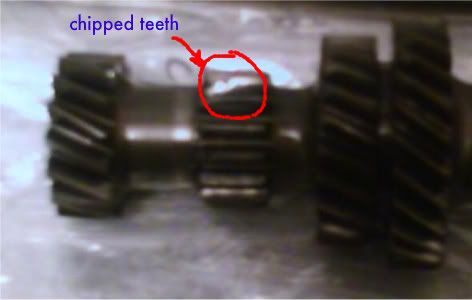
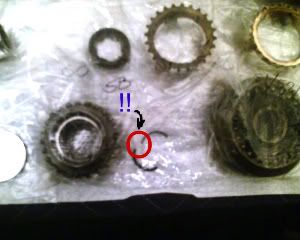
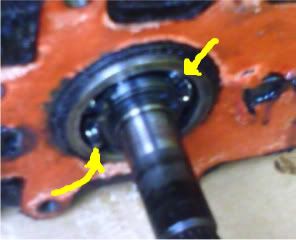
Ooooh, a bad sign. Mangled bearing race.
IMAGE_01295.jpg

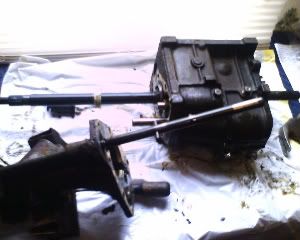
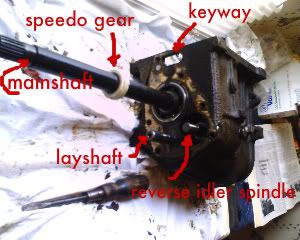
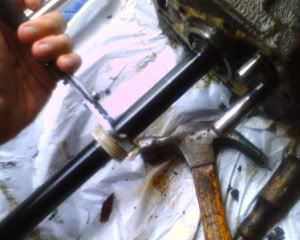
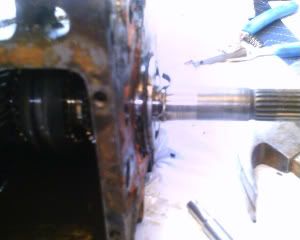
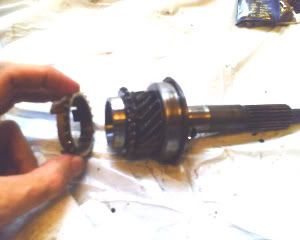
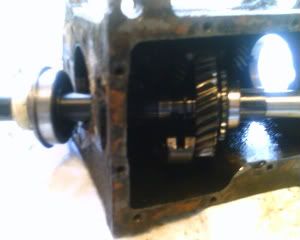
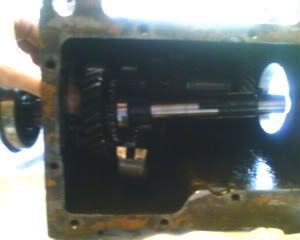
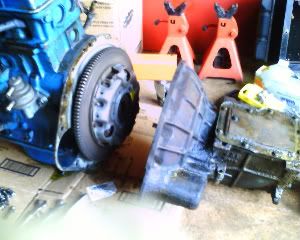
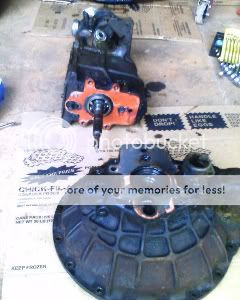
The gearbox is <span style="font-style: italic">literally</span> as big as my hand. Everything about these cars are <span style="font-style: italic">cute</span>--even the grimy bits.
IMAGE_01296.jpg


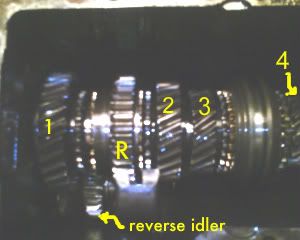
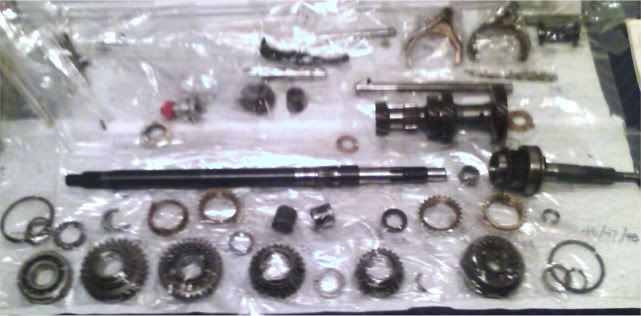
And that's all I had time for today. The transmission is sitting in my trunk right now, waiting for a leisurely inspection.
 
Thanks for the update Bill - you are making good progress there. Seems like now would be the time for a clutch if you need one.
 
tdskip said:
Thanks for the update Bill - you are making good progress there. Seems like now would be the time for a clutch if you need one.

need it or not, change it !!!! At a minimum change the disc but I'd do C,PP & TB.


Why have to go through all of this trouble again for a clutch ?!?!?!?!

This is one time that "while I'm at it" is approved.

That being said......I'd change the real main seal and seal plate gasket. ( I ALWAYS change those on ANY clutch job I do).

DON'T GO ANY FURTHER !!!!!

(I wish someone would have said that to me SEVERAL times)
 
You're right. The Usual Sources usually have good deals on the clutch bits when bought as a set. Good idea on the rear main seal too. The only other thing I'd do "while I'm at it" is the thrust bearing; just for peace of mind.

...although one day, the engine <span style="font-style: italic">is</span> coming out again. I will not rest until I have my overdrive, darn it!
grin.gif
 
Well, the past couple of days has seen a flurry of activity in the hours before work. Okay, not a 'flurry', exactly, but at least I made <span style="font-style: italic">some</span> headway. Using the Haynes manual, things went great at first, until I came to the big 15/16th nut that holds the driveshaft flange onto the output shaft. "Holding the flange, remove the nut, and tap the flange from the end of the driveshaft..." HA! An insanely large Rube-Goldbergian array of breaker bars, wrenches, and pipe, used to no avail, brought a frustrating end to <span style="font-style: italic">that</span> morning. I ended up just soaking the whole thing in PB Blaster and leaving it for the next day.

The next morning, the stuff did its work, and I was finally able to get that nut off. I was so intent on my mission, I forgot to take any pics of the process. (oops.) The next optimistically-phrased instruction was to remove the eight bolts that hold the rear extention to the gearbox, and "draw the extention rearwards."
Here are the bolts...
IMAGE_01303.jpg

But the tricky bit they gloss over, is threading the shift lever through the interlock spool when you slide it out. When you remove the cover, you get a good view of just how ingenious the shift rod mechanism is.
IMAGE_01301.jpg

Back and forth, and rotating a bit, various pegs in the shaft engage a slider, which pushes a synchromesh gear over a neighboring gear, while locking out the other sliders. It's a simple and elegant system, and I spent about half an hour just shifting stuff around and seeing how everything worked together. The problem is, getting the shaft, with those little pegs, threaded around those little notches in the sliders, and out through a little keyway in the back face of the gearbox. If you were any good at those old 'iron link' brainteasers, this is a similar problem.
I finally got it out, but I'm betting it'll be a bigger challenge getting it back in!!
IMAGE_01305.jpg

Anyway, here are the two bits as they look separated.
IMAGE_01304.jpg

Looking down the front extention, there's really nothing there but a hollow tube for the mainshaft. It's a vast empty space that would, in a more perfect world, be taken up by a Laycock J-type overdrive unit.
grin.gif

IMAGE_01306.jpg

Here's what the back end of the gearbox looks like. There's really not a lot to it. You can see the keyway that the shift rod goes through. The input shaft is in line with the mainshaft, and the layshaft is below that. Simplistically, (because that's as far as I understand it right now--) the input shaft has a gear that turns the laygear, which is a solid cluster of four gears of different sizes, which run on needle bearings over the layshaft (which doesn't turn.) The laygear is in mesh with the drive gears, which are on, but not connected to, the mainshaft. So when the input shaft turns, the drive gears are all turning at different speeds all the time. The synchromesh gears are between the drive gears, and <span style="font-style: italic">are</span> connected to the mainshaft. When you select a gear, the synchro gear can slide over a drive gear, locking the two together, and turning the mainshaft at that particular ratio. The reverse idler is a little 'extra' gear that gets slid in to turn the mainshaft in the opposite direction.
IMAGE_01308.jpg

And that, is the Progress o' the Day!
 
bthompson said:
You're right. The Usual Sources usually have good deals on the clutch bits when bought as a set. Good idea on the rear main seal too. The only other thing I'd do "while I'm at it" is the thrust bearing; just for peace of mind.

...although one day, the engine <span style="font-style: italic">is</span> coming out again. I will not rest until I have my overdrive, darn it!
grin.gif

Carefull carefull, you're dangeriously close to the edge of the slippery slope !!!!

"......while I'm changing the thrust bearing, might as well do rod and mains as well, I'm right here and they are cheap !!! Oh, oil pump too."

"I could probably slip the top mains in, but since the motor is already out of the car and right in front of me I'll pull the crank"

"......hmmmmm, timing chain looks alittle stretched, might as well change that too, it's already off and I can't see putting used stuff back in. Need to get new gears too.

".......ya know, just a few more bolts and the head comes right off, the rods are already broken loose, so why not change the rings while I'm here, they're cheap and it would be a shame to not take advantage of this. I could always use a few more PSI of compression"

"well, there is a little more cylinder ledge than I'd like. Maybe a bit too much piston wear as well. Ya know, now would be a REALLY good time to put 9-1 pistons in and get rid of these crappy 7.5-1 slugs. I can just buy a set of STD ones and slip them in."

" It would be such a shame to put BRAND NEW pistons in old, worn out holes. The motor is out and disassembled, might as well have it bored to fit my new slugs."

" It wouldn't make sense to do everything and leave the head alone, gotta send that off too. I'm going to the machine shop anyway, and I wouldn't want to loose any of my new compression due to worn valve seats. Besides, it "recommended"".

" I should bring the crank too and have it checked, you never know...."

" cam bearings are just a few dollars, might as well while it's here....."

"oh, cam and lifters look worn. I can't see spending all of this time and effort and not put in a new cam. Hey, since I have nice new holes with "high" compression pistons, might as well get a mild performance cam and pep it up a bit"

" roller rockers are cheaper for the 1500 then the A series and they'd got great with my new cam.......I'd actually be saving money by having a 1500."


" If I don't already have Weber, now's a good time for an upgrade."


" o.k, got my $2500 "thrust bearing change" motor back from the machine shop and MAN does it look sweet !!!! Time to put it back in.......hmmmm, I don't like the way this water pump looks. I hate for it to start leaking and run my new motor hot. Gotta change that and get new hoses too... ALL OF THEM..."


"Starter looks iffy, alternator too........."

" before I put my pretty new motor in, I might as well clean up the engine bay"


" it's clean now, but still doesn't "match" my pretty new engtine."

" I'll run down the the body shop supply and get just enough of my favorite color, I'm going to eventually paint that car one day anyway,. Might as well do this now so I don't have to pull the engine later when I paint. I might take a chance of scratchin my new paint job when putting it back in. I should do this now before I have the whole car painted..."

" engine bay all painted up. Man does that look great !!! The rest of the car looks like crap now. It would be a shame to have the bay painted and not the rest of the car. I'll at least do the door jams and trunk while I've got the gun wet."

" I can't see the engine bay while I'm driving OR when it's parked. I really like my new paint, the motor is out, I can't drive it anyway. Ya know, the car is REALLY small, I bet I could paint it in a weeek end or two......"

Next comes new interior, top, windshield, rubbers, diff rebuild......

Total end game time, about 5 years, + or - 2.


I've had this convesation with myself NUMERIOUS TIMES !!!!

This is why I fix whatever is keeping the car from being driveable at the moment.

If this fix is as simple as adding more oil every so often instead of a seal repair, THEN SO BE IT !!!
 
What ever you do, make sure you put in a new front transmission seal while it's apart! That's the voice of experience speaking! Very disheartening when the car is all done and after a couple weeks of driving, you notice some oil on the garage floor that gets worse with time, all because you forgot to replace that seal.
icon501.gif
 
Make sure you use a bearing splitter and a puller to remove the speedometer gear that is on the output shaft. You have to pull on the inner metal sleeve or you will destroy the plastic gear part and have to purchase a new assembly. Good progress so far.
 
About the speedo gear: is it necessary to remove it from the shaft at all? Or is there a "cheater" way to remove the shaft while keeping the speedo gear in place? From what I can see, it looks possible to (after removing the input shaft) take the snap-ring off the rear bearing, and tap it forward into the gearbox, and remove the shaft that way. Will this get me into trouble fitting the bearing later, or is it worth the effort to just pull the speedo gear now?

<span style="font-weight: bold"><span style="color: #CC0000">EDIT:</span> </span> I've answered my own question. Read on!
 
It's been a productive Sunday afternoon at the Thompson's kitchen table...here's what's going on today.

With the shift lever and slider forks removed, you have a good clear view of the gearset.
I've labelled the gears. Fourth "gear" is actually the input shaft itself, and its gear drives the laygear, so selecting 4 really just ties the two shafts directly together. You can clearly see the synchro between 3 and 4, with the synchro teeth on either side. Moving the shifter twixt 3 and 4 slides the synchro back or forth, engaging that gear. The synchro between 1 and 2 has the reverse gear built onto it, but it works the same way as the 3-4 synchro. Under it is the reverse gear on the laygear. Below and to the left you can just make out the reverse idler. When you select reverse, it slides that gear between the other two reverse gears and connects them, which makes the mainshaft turn in the opposite direction from the input shaft. Neat, huh?
IMAGE_01316.jpg

First, I've got to figure out what to do about the speedo gear. Being far too cheap to use the correct tool, :laugh: I try keeping a wrench flat to the face and whanging away for awhile, but no joy. That sucker's <span style="font-style: italic">tight</span>.
IMAGE_01309.jpg

So I skip that step. I'll come back to it and figure something out. Next thing is to remove the input shaft. To do that, the laygear has to fall out of the way. Tapping out the layshaft was easy, and sure enough, the laygear goes <span style="font-style: italic">clunk</span> to the bottom of the gearbox, (amidst a shower of needle bearings. Oh well...can't be helped.)
IMAGE_01312.jpg

The front bearing has to come out from the inside. There's a snap-ring on the outside that holds the bearing against the face of the gearbox...
IMAGE_01315.jpg

But there's a handy notch on the inside front face, just enough space to use a socket as a drift to pound it out...
IMAGE_01317.jpg

Then you can get a prybar behind the snap-ring and get the bearing and shaft out from the front.
IMAGE_01318.jpg

So here is what all the fuss is about: Synchromesh. You can see on the left side of the helical input shaft gear, there's a little ring of pointed teeth, and to the left of that, a shiny, slightly conical surface. The synchro ring is conical on the inside, but grooved, with a matching set of pointing teeth around its edge. This sets into the synchro hub. (With another matching ring on the other side, facing 3rd gear.)
IMAGE_01319.jpg

When you step on the clutch to engage a gear, the input shaft, layshaft, and drive gears are not turning, but the synchro is turning with the mainshaft and rear wheels. When you push the lever into gear, the conical surfaces meet first, slip a little, and get the drive gear (and laygear and input shaft) turning at the same speed as the synchro. Then, the synchro hub slides over both sets of teeth, and everything is locked together. The synchro teeth have to be sharply pointed on one end, because there's no guarantee that both sets of synchro teeth will be perfectly lined up for the hub. If they aren't, the hub sliding over the chisel point of the teeth will line everything up. Apparently, something about this process isn't working with my 2nd gear.
IMAGE_01320.jpg

Now, getting the back bearing out isn't as easy, since 1st gear is right up against the inside of the box, and there isn't room for a drift. So judicious use of the BFH is needed to tap the shaft rearwards just enough to get a prybar under the snap-ring and pry out the bearing. Unlike the front bearing, which comes out with the shaft, the rear one has to come off the shaft AND out of its bore. Slow going, but eventually it'll pop out.
IMAGE_01324.jpg

And pushing the bearing back to the (still attached!) speedo gear gives just enough--<span style="font-style: italic">just</span> enough--space to swing the mainshaft out.
IMAGE_01326.jpg

Of course, if the speedo gear were off, the bearing and all would be off the end of the shaft, and I could pull the whole thing out. As it is, the gears will feed off the shaft with it in place, and I should be able to draw it out rearwards.
More updates to follow!
 
An unforseen snafu! All the gears, washers, spacers, and bits slid right off the end of the shaft, and into their myriad little labelled baggies--
Except first gear. The gear on the very end, has to feed off of the <span style="font-style: italic">back</span> of the shaft. It won't pass over the splines that the 1-2 synchro uses. So I'm at something of an impasse. I can't feed the shaft backward <span style="font-style: italic">or</span> forward...
IMAGE_01327.jpg

I start to wonder if I really needed to go any further at all, or if I could leave it there. Then I realized the layshaft was sitting loose amongst all those needle bearings...it would <span style="font-style: italic">have</span> to come out, which meant the mainshaft has to come out too.
So I re-visit my first idea; taking off the rear bearing snap-ring and pushing the bearing all the way through to the inside, and removing the shaft. But no! As mentioned, the shaft <span style="font-style: italic">just</span> clears the box. With the 1st gear pushed as far forward as it will go, and the shaft as far forward as it <span style="font-style: italic">can</span> go and still withdraw, there isn't enough space inside the box for the bearing too...
IMAGE_01328.jpg

But then the stroke of inspiration hit! The shaft <span style="font-style: italic">can</span> slide <span style="font-style: italic">forward</span>, all the way until the bearing, washer, and circlip are sitting up <span style="font-style: italic">against the speedo gear</span>. See where I'm going with this..?
IMAGE_01329.jpg

That's right! Use the BFH on the tail end of the mainshaft, re-seat the bearing, and keep on a-poundin' until that nice, flat, square bearing surface pops the speedo gear loose. And it worked like a charm! The shaft slid forward, while 1st gear stayed behind and slid off. The rear bearing was now free to be tapped free from the inside of the box, no prybar required.

So now, with everthing in a million or so little numbered baggies, Inspection of Parts may now begin!
 
KG, I just keep repeating to myself , "<span style="font-style: italic">just</span> as far as the thrust bearing..." I might just do a <span style="font-style: italic">really</span> good check of the crankshaft endplay and leave it at that...I just know once I have the bottom end of the engine off, there are too many tasty options. At least, with the engine in place, having the oil pan off is uncomfortable enough to deter me from going too far!

Speaking of tasty, here's the smorgasbord of parts, all wrapped up to go.
IMAGE_01330.jpg

Looking everything over cursorially, (I think that's the word--) I didn't find anything glaringly wrong with the 2nd synchro teeth. A little rounded off, but no more than the rest of 'em. Much more shocking was the state of the reverse teeth on the laygear. Some serious chipping there. But laygears are not cheap, and I'm debating saving a few hundred bucks to live with the occasional grind into reverse...
IMAGE_01332.jpg

Star, I believe you mentioned something about a <span style="font-weight: bold"><span style="font-style: italic">broken circlip</span></span>??
IMAGE_01331.jpg
 
I had that conversation with myself again today. I have a bottom end rattle on start up and it sounded like it was comming in again at 70 MPH. I have been pushing it a little harder than ususal latley so I got a little concerned. Seems "o.k" for now, but I'm gonna have to do something.

Problem is, I don't know if the motor has been built before and don't want to order parts till I know what's in there, and I don't want to tear it down till I have the parts ready to go back in.

I might go ahead and build the motor, the head has already been done but I probably will get a 3 angle valve job "while I'm there".

I don't mind the $$$, it's the down time that bothers me. Plus, when weather is too bad to drive it, I don't feel like working on it.

I really need to get my shop built first (old one is wife's pottery studio) but I really would rather drive the car then get the shop finished.

I could always build it in my freight trailer I bought for storage. That's sounding better all the time.

You might be a redneck if......

(although I live in south MS, I'm not from here and by no means am I a redneck. (no offense to the civicly challenged.))
 
Well Bubba (OK I made that up)

get an AAA membership, drive it till it breaks and get it towed home. Tis the season down there to be driving and you might as well enjoy it. Get on the shop get it air conditioned and 6 months from now rebuild the engine.

Now is time to have fun! :driving: :banana:
 
Thanks for taking the time to document this Bill, I'm thinking of tearing into my "old" gearbox this winter to see what there is to see and this will help tremendously. I'm not conviniced I have the experience to ID which part is bad (suddenly fell out of and refused to go back into 4th-sometimes would with ALOT of effort, PO had let box go dry, found some metally bits in the drainage I'm thinking one of those cage bearing guys disintegrated.....).
 
Wow, Bill!! "Where angels fear to tread"!!!

Good on ya!

And is there anyplace BUT th' kitchen table in order that you maintain "hospital cleanliness" for this task?!?! :thumbsup:

Now, about that layshaft... Have a GOOD look inside the thing, where the needle bearings live. It'd be my recommendation you bite th' bullet and get another one. If the layshaft shows any amount of wear it'll be likely the I.D. of the gearset is also gnarly.

And a shameless plug for a short story: The "Transmissive" Tale.

:savewave:
 
JPSmit said:
Well Bubba (OK I made that up)


Now is time to have fun! :driving: :banana:


I forgot to add that and wanted too, thanks for catching it.
 
I took a closer look at the parts today, and there's good news and bad news.

<span style="color: #009900">The Good News:</span>

It looks to me like the tranny has had an overhaul fairly recently. All the commonly replaceable bits (i.e., VB's overhaul kit) look good.
The layshaft doesn't show any appreciable wear at all.
The laygear thrust bearings, and the reverse idler bushing, look very new too.
The needle bearings, and the caged needle roller bearing, are in good shape with no galling, scoring, or other futzy stuff.
The big shaft bearings, (except for the front one with the mangled race, of course,) look good.
The synchro rings are in fine shape. The teeth are a little rounded off, but not nearly as much as the synchro teeth on the drive gears.
The synchro hubs look good. Their teeth aren't bad, a little worn. The balls and springs all work. All the lands and grooves on the mainshaft and in the hubs are sharp and clean, with no rounding, chipping, or wear.
All of the helical gears, (both drive and laygear,) look nearly perfect. No chipping, no evidence of things not lining up, not even any unusual wear. All the teeth are crisp and sharp. I suppose that's because all the gears are always in mesh all the time, so there's no opportunity for "user error."

<span style="color: #FF0000">The Bad News:</span>

All the drive gears have worn synchro teeth. Not down to the nubs, but definately not the sharp chisels they should be. (Second gear isn't any more worn than the rest of them.)
All three of the straight-cut reverse gears are worn and chipped. They show the most wear by far of any other component in there.

<span style="color: #993399">The Seems-Like-Bad-News-But-It-Might-Actually-Be-Good News:</span>

That broken circlip. If I understand its function right, it holds second and third gears in place on their bushings. Without it, 2nd and 3rd are free to wander around a bit on the shaft. This seems like it would result in not being able to shift into 2nd, as the synchro would push 2nd forward along the shaft instead of engaging it; and a hard shift out of third, as the synchro would pull 3rd behind it instead of disengaging cleanly. And THAT is just what my symptoms were...I'll have to re-assemble the shaft and test this theory later.

p.s. Dr.E...great story!
 
Back
Top