
-
 Hey Guest!
British Car Forum has been supporting enthusiasts for over 25 years by providing a great place to share our love for British cars. You can support our efforts by upgrading your membership for less than the dues of most car clubs. There are some perks with a member upgrade!**Upgrade Now**
(PS: Upgraded members don't see this banner, nor will you see the Google ads that appear on the site.)

Tips
- We have a special forum called "Member Articles" where you can submit actual articles for consideration for publication. Learn More
- Don't have an Avatar? If not, your avatar will default to the 1st character in your username. Go into "Account Details" to change your Avatar.
- Some basic forum navigation info: click
 Hey - did you know if you click on the title of a thread it will take you to the first unread post since you last visited that thread?
- Hey Guest - Is your British Car Club in our Clubs database? If not, send me a PM - Basil

- Looking for a local club? Click the "Clubs" tab above and browse hundreds of clubs world-wide.
- Add Android or iPhone APP: click
- Did you know - any picture or video you add in your posts in any marque-specific forum will also get added to the Media Gallery automatically.
- A few more tips about posting and replying: click
- Hey there Guest - be sure to keep your profile page up to date with interesting info about yourself: learn more
- More tips and tricks on Posting and Replying: click
 but were afraid to ask:
  STOP!! Never post your email address in open forums. Bots can "harvest" your email! If you must share your email use a Private Message or use the
  smilie in place of the real @
- Want to mention another member in a post & get their attention? WATCH THIS

- So, you created a "Group" here at BCF and would like to invite other members to join? Watch this!
- Hey Guest - A post a day keeps Basil from visiting you in the small hours and putting a bat up your nightdress!
- Hey Guest - do you know of an upcoming British car event?
 Pretty Please - add it to our Events forum(s) and add to the calendar! >> Here's How <<
- Hey Guest - you be stylin' Change the look and feel of the forum to fit your taste. Check it out
- If you run across an inappropriate post, for example a post that breaks our rules or looks like it might be spam, you can report the post to the moderators: Learn More
- If you would like to try some different "looks" or styles for the site, scroll to the very bottom, on the left and click the Style Selector.
You are using an out of date browser. It may not display this or other websites correctly.
You should upgrade or use an alternative browser.
You should upgrade or use an alternative browser.
I've lost second gear!!
- Thread starter bthompson
- Start date

OP
bthompson
Jedi Warrior
Offline
More work this morning...the shafts and all the spinny bits got installed in the box.
Unfortunately, my camera phone has decided it doesn't want to communicate right now. Lots of pics and no way to get them here. (yet)
When I can get the pics to load, I'll go back and edit this post with the goodies.
<span style="color: #FF0000"><edit></span>
Next morning...all the slidey bits are installed, and the tranny is all buttoned up. Loads more pics, and a few tricks I learned too. But, the camera is still uncooperative, so those pics will have to wait for now.
OP
bthompson
Jedi Warrior
Offline
Well, it's the day after, and even though it's reeeally cold, it's not raining. Good enough to make some progress. Got the engine and trans bolted together, and the engine in the car. Yay! Everything underneath is hooked up, so tomorrow (another cold and clear day) everything up top gets plugged in. Hopefully on the road by Tuesday.
It looks like my pics of the last few days are trapped in my phone. (My Pocket MSN is not loading anymore, probably a result of MSN updating their homepage...so I can't email them out)
I didn't take any pics of the installation process, feeling it was a waste of time with no way to get the pics here. I really wanted to do a step-by-step of the intallation, but it'll haveta wait 'till the next time the engine comes out.
bugimike
Yoda
Offline
jvandyke said:Wow, you don't play around do you? I have my ribcase sitting by the door waiting to be taken downstairs. Maybe I'll do a step by step photo deal with that like you did.
Step by step of it being taken downstairs?? Sounds pretty boring!

Offline
bugimike said:jvandyke said:Wow, you don't play around do you? I have my ribcase sitting by the door waiting to be taken downstairs. Maybe I'll do a step by step photo deal with that like you did.
Step by step of it being taken downstairs?? Sounds pretty boring!
Unless he trips

jvandyke
Luke Skywalker
Offline
JPSmit said:bugimike said:jvandyke said:Wow, you don't play around do you? I have my ribcase sitting by the door waiting to be taken downstairs. Maybe I'll do a step by step photo deal with that like you did.
Step by step of it being taken downstairs?? Sounds pretty boring!
Unless he trips
Or the wife catches me or both.
OP
bthompson
Jedi Warrior
Offline
Well, this odyssey is just about at an end. Put the carpet and seats back in this morning before it started raining, and cranked 'er over. Wouldn't idle or rev, and seemed to be choking out and backfiring. I bet I knocked the distributor a little getting the engine out, and the spark is too retarded. I'll push the spark up and see if that fixes it tomorrow when the rain lets up. It's supposed to be sunny and in the 60's here tomorrow...with luck I'll be driving top-down to work!
OP
bthompson
Jedi Warrior
Offline
Yep, the dizzy got knocked. Running sweetly now. And the tranny sounds much more solid and smooth. None of that ball-bearings-in-a-soup-can sound that was being caused by that mangled front bearing.
In other news...
Hooray! I finally got a way to connect my phone to the internet, so I can upload pics. I really felt like this little project was missing a sense of closure without posting anything. Besides, I learned some really helpful tricks to re-assembly, that apparently aren't in the books.
Continuing where we left off...
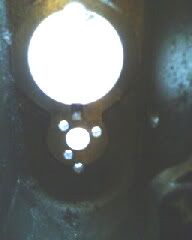
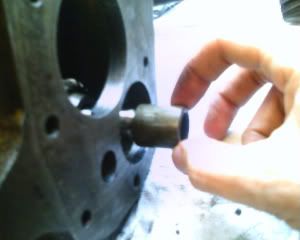
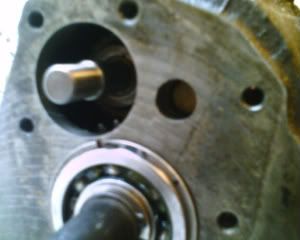
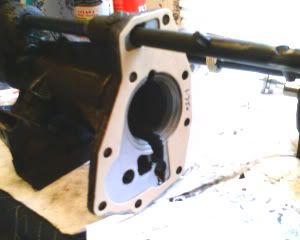
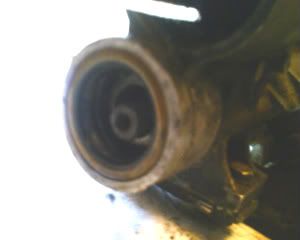
Looking through the empty box to the front end. The big hole is for the input shaft bearing, the hole below it is for the layshaft. The three smaller holes are for the preload springs, which go in from the outside, and the small hole at the bottom is where the belhousing bolt goes through. (That's the bolt with the brass washer.)
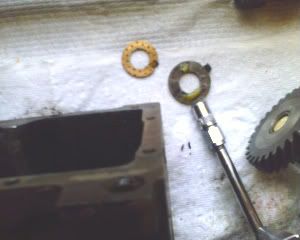
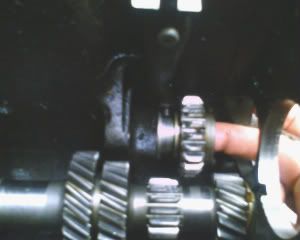
These are the brass laygear thrust washers. Notice they have a little tab to hold them in place. (The larger one goes at the front.) Use a little squirt of multi-purpose grease to stick 'em in place.
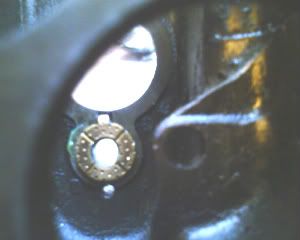
Looking through the reverse idler gear hole to the front washer, stuck in place with its tab in the corresponding notch at the 12:00 position.
Carefully lower the laygear to the bottom of the box.
The reverse idler fork sits on a pin that sticks through the side of the box. It just presses on.
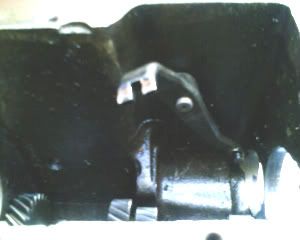
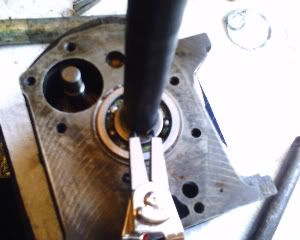
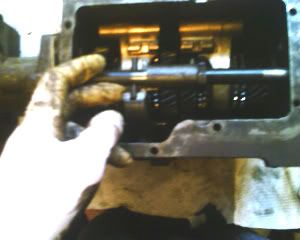
Hold the reverse idler in position with the fork in the groove...then slide its shaft in from the outside. (My finger is taking the place of the shaft in this pic)
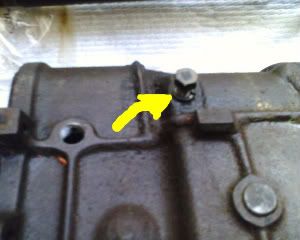
There's a hole in one end of the idler shaft. A bolt comes in from the side of the box to hold the shaft in position. (It's advantagous to peek thru the hole and twist the shaft til the holes line up.)
There's a spacer that fits on the end of the shaft that keeps the gear in position. Don't put it on yet! It'll just fall out. Wait til just before you bolt the rear extension on to slip it in place.
That's everything in the bottom half...next, the mainshaft.
In other news...
Hooray! I finally got a way to connect my phone to the internet, so I can upload pics. I really felt like this little project was missing a sense of closure without posting anything. Besides, I learned some really helpful tricks to re-assembly, that apparently aren't in the books.
Continuing where we left off...
Looking through the empty box to the front end. The big hole is for the input shaft bearing, the hole below it is for the layshaft. The three smaller holes are for the preload springs, which go in from the outside, and the small hole at the bottom is where the belhousing bolt goes through. (That's the bolt with the brass washer.)
These are the brass laygear thrust washers. Notice they have a little tab to hold them in place. (The larger one goes at the front.) Use a little squirt of multi-purpose grease to stick 'em in place.
Looking through the reverse idler gear hole to the front washer, stuck in place with its tab in the corresponding notch at the 12:00 position.
Carefully lower the laygear to the bottom of the box.
The reverse idler fork sits on a pin that sticks through the side of the box. It just presses on.
Hold the reverse idler in position with the fork in the groove...then slide its shaft in from the outside. (My finger is taking the place of the shaft in this pic)
There's a hole in one end of the idler shaft. A bolt comes in from the side of the box to hold the shaft in position. (It's advantagous to peek thru the hole and twist the shaft til the holes line up.)
There's a spacer that fits on the end of the shaft that keeps the gear in position. Don't put it on yet! It'll just fall out. Wait til just before you bolt the rear extension on to slip it in place.
That's everything in the bottom half...next, the mainshaft.
OP
bthompson
Jedi Warrior
Offline
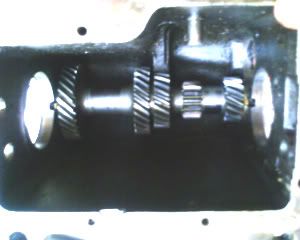
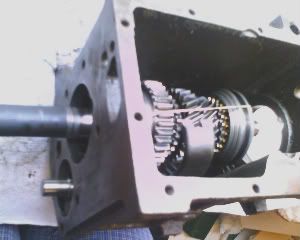
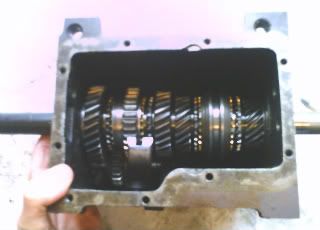
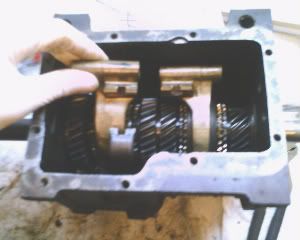
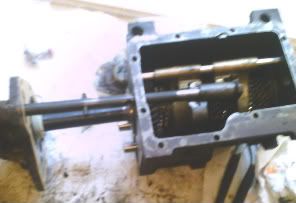
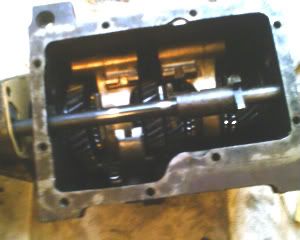
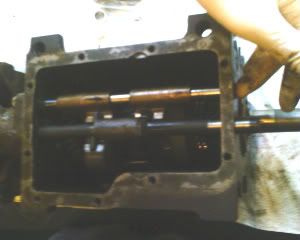
Set the mainshaft in place. Note the rubber band to hold the gears together.
Put the snap ring on the rear bearing. If it has a 'set,' put it on so the edge angles out like shown. (It'll make it easier to wedge the prybar in there next time it has to come out.)
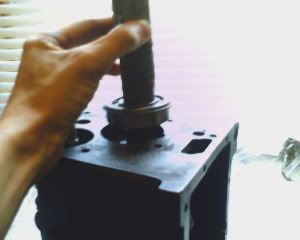
To put the bearing on, set the box upright on its front end. Rest the end of the shaft on your prybar, as shown.
Use a length of 1" pipe down the tail end of the shaft, and pound the bearing home.
You know it's "good and on" when you can put the washer and snap ring on the end.
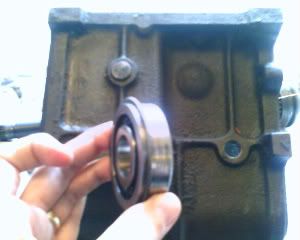
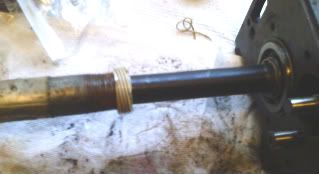
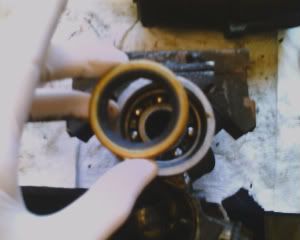
Now for the input shaft end. Set the 'oil flinger' against the gear first.

Now the front bearing, same as the rear, and pound it home the same way.
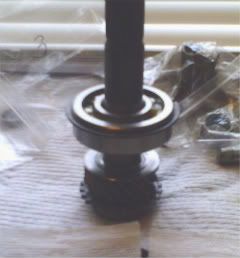
Put on the washer and snap ring...
You'll notice I pre-lubed the bearings with all-purpose grease. Probably overkill, but better safe than sorry.
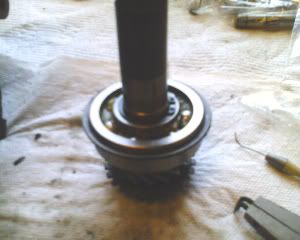
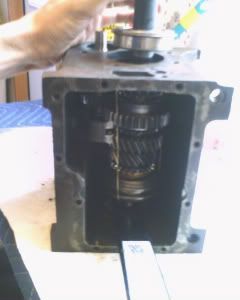
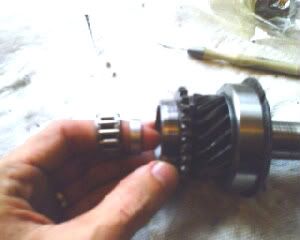
Pre-lube the caged roller bearing, and put it, with its spacer, in the end of the shaft.
Set it in place, and pound the bearing home, using the same 1" pipe method as for the rear. Turning the box upright, with the mainshaft hanging down over the edge of the table, helps.
And that's that. Next, buttoning everything up...
Put the snap ring on the rear bearing. If it has a 'set,' put it on so the edge angles out like shown. (It'll make it easier to wedge the prybar in there next time it has to come out.)
To put the bearing on, set the box upright on its front end. Rest the end of the shaft on your prybar, as shown.
Use a length of 1" pipe down the tail end of the shaft, and pound the bearing home.
You know it's "good and on" when you can put the washer and snap ring on the end.
Now for the input shaft end. Set the 'oil flinger' against the gear first.
Now the front bearing, same as the rear, and pound it home the same way.
Put on the washer and snap ring...
You'll notice I pre-lubed the bearings with all-purpose grease. Probably overkill, but better safe than sorry.
Pre-lube the caged roller bearing, and put it, with its spacer, in the end of the shaft.
Set it in place, and pound the bearing home, using the same 1" pipe method as for the rear. Turning the box upright, with the mainshaft hanging down over the edge of the table, helps.
And that's that. Next, buttoning everything up...
OP
bthompson
Jedi Warrior
Offline
The next thing to do is get the dummy shaft out of the laygear. Chances are, all that pounding has moved it around. Turn the box upside down, make sure the thrust washers haven't moved around, and jiggle and wiggle until the laygear falls into position and you can see the wooden dowel centered in the hole. This may be long and frustrating, and it may seem to be stuck at times. Be patient...it will eventually fall into place. Push the dowel a little to make sure you don't lose the alignment.
And then zzzip...in with one shaft and out with the other. Remember the shaft pushes in from the <span style="font-style: italic">rear</span>.
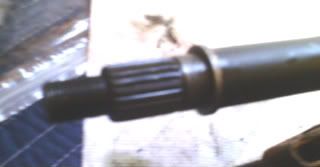
Now that you know everything's secure, take your handy 1" pipe and tap in the speedo gear. Creep up to the mark--don't overtap!! :laugh:
Moving to the rear extension for a while, pry out the old oil seal...
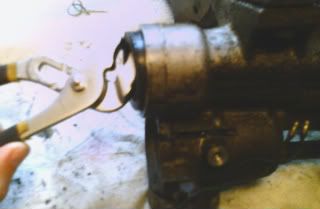
Tap out and replace the bearing if you have to (1" pipe again!) and tap in a new oil seal. Spring side faces the side you want the oil to stay in :wink:
Using a couple dabs o' grease, stick the gasket in place.
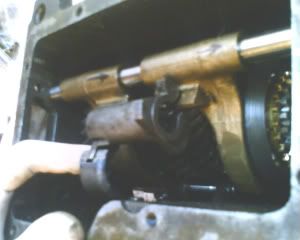
Now back to the box. Put your shift forks in position...
And slide the fork shaft in place. It doesn't have a front or back; it just floats in position.

Remember that neat little interlock spool? Remember how it fit in? Nah, me neither. :frown: Here is a refresher of how it sits on the shaft:
And then zzzip...in with one shaft and out with the other. Remember the shaft pushes in from the <span style="font-style: italic">rear</span>.
Now that you know everything's secure, take your handy 1" pipe and tap in the speedo gear. Creep up to the mark--don't overtap!! :laugh:
Moving to the rear extension for a while, pry out the old oil seal...
Tap out and replace the bearing if you have to (1" pipe again!) and tap in a new oil seal. Spring side faces the side you want the oil to stay in :wink:
Using a couple dabs o' grease, stick the gasket in place.
Now back to the box. Put your shift forks in position...
And slide the fork shaft in place. It doesn't have a front or back; it just floats in position.
Remember that neat little interlock spool? Remember how it fit in? Nah, me neither. :frown: Here is a refresher of how it sits on the shaft:
OP
bthompson
Jedi Warrior
Offline
The books say to put the washer on the end of the mainshaft when you mate the halves together. Dont. If the shaft is off even a little, it will dig into the side of the extension. And your shaft <span style="font-style: italic">will</span> be off. Instead, stick it to the inside of the bearing with --yep-- a little grease, and hold it in place with your finger as you slide the mainshaft home.
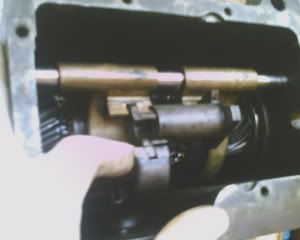
The books also say to thread the shift lever through the interlock spool and forks as you mate the halves, like this. Don't.
Instead, <span style="font-style: italic">pull the fork shaft out</span>, let the forks lie there, and mate the two halves. Bada-bing, easy as pie and no tricky threading.
In fact, if you feel any resistance at all, it's the end of the mainshaft catching on the rearmost bearing. Lift it up a little, and it'll slide right home. (Did you remember the bushing on the reverse shaft we were saving? Nope, me neither. Take it apart and do it again.)
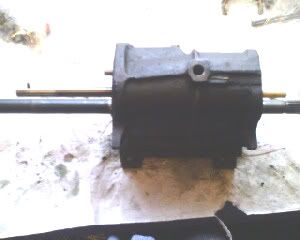
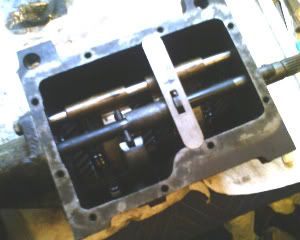
Bolt the back case on. Ahh, now it's starting to look right again.
Now, line up the reverse fork and the interlock spool...
And slide the fork shaft back in.
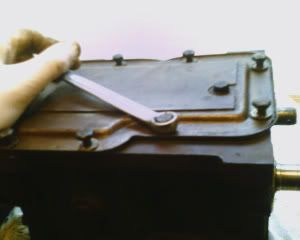
Put the interlock plate back in the top of the case...
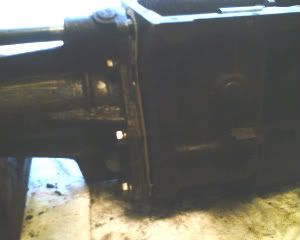
And button 'er up! (Note the little divot in the far edge? That's the point where it catches on the heater box when it's trying to go over the crossmember. Be warned. :wink:
And at this point, it's ready to bolt up to the engine and pop back in. I didn't take any pics of that procedure, because it was <span style="font-style: italic">so</span> uneventful. It really <span style="font-style: italic">was</span> just going through the list in reverse. Slow and steady with the tilt-lift, a few inches and a few degrees at a time.
And we're back on the road! Thanks for all your positive feedback through this whole experience. I've learned a lot, you've all been a great encourgement to me, and I hope you've enjoyed reading it as much as I've enjoyed posting it.
The books also say to thread the shift lever through the interlock spool and forks as you mate the halves, like this. Don't.
Instead, <span style="font-style: italic">pull the fork shaft out</span>, let the forks lie there, and mate the two halves. Bada-bing, easy as pie and no tricky threading.
In fact, if you feel any resistance at all, it's the end of the mainshaft catching on the rearmost bearing. Lift it up a little, and it'll slide right home. (Did you remember the bushing on the reverse shaft we were saving? Nope, me neither. Take it apart and do it again.)
Bolt the back case on. Ahh, now it's starting to look right again.
Now, line up the reverse fork and the interlock spool...
And slide the fork shaft back in.
Put the interlock plate back in the top of the case...
And button 'er up! (Note the little divot in the far edge? That's the point where it catches on the heater box when it's trying to go over the crossmember. Be warned. :wink:
And at this point, it's ready to bolt up to the engine and pop back in. I didn't take any pics of that procedure, because it was <span style="font-style: italic">so</span> uneventful. It really <span style="font-style: italic">was</span> just going through the list in reverse. Slow and steady with the tilt-lift, a few inches and a few degrees at a time.
And we're back on the road! Thanks for all your positive feedback through this whole experience. I've learned a lot, you've all been a great encourgement to me, and I hope you've enjoyed reading it as much as I've enjoyed posting it.