• Hi Guest!
    You can help ensure that British Car Forum (BCF) continues to provide a great place to engage in the British car hobby! If you find BCF a beneficial community, please consider supporting our efforts with a subscription.

    There are some perks with a member upgrade!
    **Upgrade Now**
    (PS: Subscribers don't see this gawd-aweful banner
Tips
Tips

I've lost second gear!!

Make up a wood dowel just a little smaller in diameter than the lay shaft and a length equal to the length of the lay gear and the 2 thrust washers. You assemble everything and push the dowel out with the lay shaft. This makes assembly easier. I assumed that you can lower the assembly to the bottom of the case with the thrust washers on the ends of the lay gear. If this can not be done than the length of the dowel should be the same as the lay gear.
 
DrEntropy said:
Wow, Bill!! "Where angels fear to tread"!!!

And a shameless plug for a short story: The "Transmissive" Tale.

:savewave:

What a great story. I didn't even know that stuff was there, how cool!

My aunt writes a bit has an automotive story about me when I was five she loves to tell. I'll have to see if she'd like to share it.
 
Well, KG, I've been pondering all through work today, and I must admit at this point that you are <span style="font-style: italic">completely </span>right. The first priority at this point is to get back on the road in the quickest and cheapest way possible. Follow the <span style="font-style: italic">impeccable </span>logic:

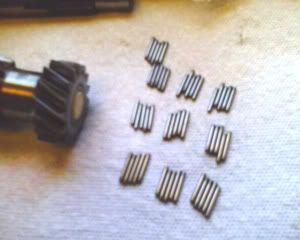
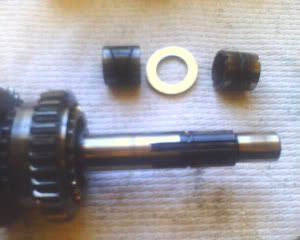
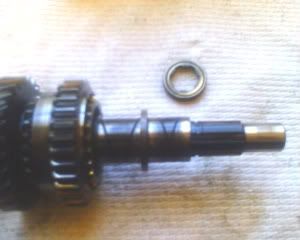
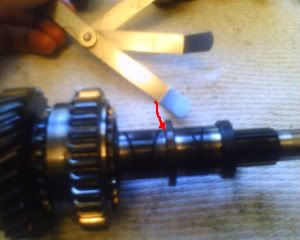
<span style="font-weight: bold">Fact!</span> Nothing is really wrong, it seems, except a broken circlip: a 50 cent bit.
<span style="font-weight: bold">Fact!</span> Replacing this bit will not make the car shift any better than it did before it broke, but it won't make it shift any worse either.
<span style="font-weight: bold">Fact!</span> I didn't really have any problems shifting before I lost 2nd. I don't drive like a rally driver or drag racer, I don't speedshift, and I know how to double-clutch. I'm not that hard, honestly, on gearboxes. The synchros still have life in them.
<span style="font-weight: bold">Fact!</span> I don't currently have a great deal of loose cash to throw Nigel's way. My wife has an upcoming surgical procedure, and Christmas is just around the corner. Cheaper, in this case, is definitely better.
<span style="font-weight: bold">Fact!</span> Spending money is an escalating game. If I'm gonna spend a couple hundred to refresh the tranny, I may as well replace the laygear for a few hundred more. If I'm gonna do that, I may as well buy a recon gearbox for a couple hundred more. And if I'm gonna do <span style="font-style: italic">that</span>, I may as well get what I <span style="font-style: italic">really </span>want, a Spitfire overdrive tranny. (There's one on Craigslist right now.) And presto, I'm up to $750 just like that.

But I don't have that kinda scratch just now, and I don't want to shell out long green for a box I'm not gonna keep.

So here's the plan. I get <span style="font-style: italic">just</span> what I need to get back on the road, which is the front bearing, circlip, oil seals, and gaskets. Vicky Brit price, about 50 bux. No thrust bearing, no clutch, no extras. Just the basics, for now. Everything will last just fine until I have the dough for a Spitbox.

And then the engine will come out again, and the clutch and thrust bearings will be waiting.
For I will have my overdrive. Oh, yes...I <span style="font-style: italic">will</span> have my overdrive. Maybe not today, maybe not tomorrow...
grin.gif
 
Well, it's time to test this "broken circlip" hypothesis. First, I'll show how to build up the gearstack piece by piece. It's not really as complex as it seems, it turns out.
First, slide 1st gear on from the back of the shaft, synchro-end first. There's a split ring that it bears against, that fits in the groove between the 1st gear bushing and the 1-2 synchro grooves.
IMAGE_01334.jpg

Slide the thrust washer behind the gear. (This is at the back of the box, against the big roller bearing)
IMAGE_01335.jpg

The 1-2 synchro assy. has lands and grooves that fit into the lands and grooves on the shaft.
IMAGE_01336.jpg

It slides right on. The reverse teeth sit toward the front when it's the right way 'round.
IMAGE_01337.jpg

There's a washer with an eccentric groove that slides on next.
IMAGE_01338.jpg

Make sure the groove faces the front! (Mine was on backwards when I took it apart...go figure)
IMAGE_01339.jpg

Next, 2nd and 3rd gear slide on. They ride on seperate grooved bushings, with a very particularly-sized washer between them. Slide them on for now. Make sure you keep the same bushing with the same gear! Don't forget and mix 'em up.
IMAGE_01340.jpg

There's an odd washer with lands and grooves, as well as the eccentric groove on the face, that goes on next. The grooved face, faces the bushings. Apparently, the eccentric groove acts like a teeny little oil pump that helps keep the bushings lubricious. The other side is hollowed out, to hold the circlip in. (The same circlip that broke on mine.)
IMAGE_01341-1.jpg

Put the washer and circlip in place. (In my case, the largest fragment of circlip--) and measure the endfloat with a feeler gauge at the selective washer. (Mine was .006") Thicker or thinner washers are available to keep everything in spec. Apparently, having the circlip to keep a tolerance <span style="font-style: italic">that</span> critical must be important, eh?
IMAGE_01342.jpg
 
So now, take the bushings back off, and put on 2nd gear with its bushing, with the synchro facing the rear.
IMAGE_01343.jpg

Then the selective washer
IMAGE_01344.jpg

The 3rd gear bushing
IMAGE_01345.jpg

And slide on 3rd gear with its synchro facing front.
IMAGE_01346.jpg

Slide on the grooved washer (and circlip!)
IMAGE_01347.jpg

The 3-4 synchro assy. slides on after that. It only fits on one way, too.
IMAGE_01348.jpg

And just to continue the stack, what would go on next would be the spacer, caged roller bearing, and input shaft. But we're not there yet. :smile:
IMAGE_01349.jpg

So now for the test. I take off the 3-4 synchro, and since I don't have a circlip, firmly hold the end of the stack in place with my fingers.
IMAGE_01350.jpg

I then slide the 1-2 synchro over the 2nd gear teeth, mimicing what the shift fork does. It seems to slide and enage well.
IMAGE_01352.jpg

Next, I let go of the end of the gearstack, and try the same thing again. Voila! the synchro pushes 2nd and 3rd gears over, a good deal farther than .006"! :laugh: In fact, the synchro teeth don't engage at all, but would grind and crash if this were done for real. Just like it DID.
IMAGE_01354.jpg

So that cinches it for me. Problem caused by circlip. Quick and easy fix, button everything up and get driving again! Hooray!
 
I think your approach to this job is wise. Certainly, it's not all that much extra work to yank the thing again when you want to do more, and of course now that you've done it, you're an expert. It's nice to see someone thinking out a problem and formulating a sensible approach to solving it; so many people just go into these things blindly.

I've also enjoyed your descriptions of the tear-down and reassembly. Much better than any shop manual I've seen.
 
Sarastro said:
I've also enjoyed your descriptions of the tear-down and reassembly. Much better than any shop manual I've seen.
Same here. I'll save this thread for any future meddling with transmissions.
 
:thankyousign: I appreciate the compliments, fellas! I was kinda thinking of the way <span style="font-style: italic">I'd </span>do a shop manual when I posted it: all the ones I've seen have muddy black and white pictures or unclear line art, and use overly "optimistic" language. And I like to know not just <span style="font-style: italic">that </span>this-goes-there, but <span style="font-style: italic">why</span>. The perspective of a Complete Novice is always fun, so I wrote down my head-scratching moments for a larf.

I'm glad it's of some use, and hope it'll give a bit of encouragement that if <span style="font-style: italic">I</span> can do this stuff, heck, anyone probably can. :crazyeyes: I've gotten so much out of this forum and watching you guys do amazing stuff with your Spridgets, I just hope I can give a little of that back.

When my parts arrive, I'll keep posting on the re-assembly and shoehorning the engine back in.
 
<span style="color: #C0C0C0">bump!</span>

<span style="color: #009900"><span style="font-weight: bold">Tie Down Your Tarp in a Hurricane
<span style="font-style: italic">(or)</span>
Don't Trust Your Brother-in-Law</span></span>

Turns out, when everything was disassembled, Nigel got the boot out of the garage 'cuz the bro's wife was terrified of a fuel leak spontaneously exploding the house. Oy. So I put the tonneau on, threw a tarp over him (Nigel, not the bro) and let him sit, waiting for his tranny parts, with the admonition that the bro peek out a window every once in awhile to check on him.

As you know, much of the southeast had torrential rains the past few days. I was glad I had bought the tarp for Nigel, knowing he was snug. Well, when I went to check on him yesterday, the tarp was sitting in a neat little crumpled pile across the yard. And Nigel was soaking wet through and through. The tonneau was deeply bowed with the weight of the small lake that had formed on it. So today, I took a few hours before work and pulled every inch of carpet. (Boy, am I glad I snapped it instead of gluing!)

Good side: Nigel gets a nice freshly-cleaned carpet for the winter. And I've learned a valuable lesson. Never assume anyone cares as much about your LBC as you do.
 
Sounds more like your sister in law needs some prozac. Yeesh! My Midget lives in a carport with its tonneau and had no issues with the winds and 4+ inches of rain over here around Raleigh. Started out today still murky, damp and chilly...cleared out pretty well this afternoon. The car's going out tomorrow...count on that!
 
....
bthompson said:
<span style="color: #C0C0C0">bump!</span>

<span style="color: #009900"><span style="font-weight: bold">Tie Down Your Tarp in a Hurricane
<span style="font-style: italic">(or)</span>
Don't Trust Your Brother-in-Law</span></span>

Never assume anyone cares as much about your LBC as you do.


.....and it goes on their permanent record......
 
bthompson said:
<span style="color: #C0C0C0">bump!</span>

<span style="color: #009900"><span style="font-weight: bold">Tie Down Your Tarp in a Hurricane
<span style="font-style: italic">(or)</span>
Don't Trust Your Brother-in-Law</span></span>

the bro's wife was terrified of a fuel leak spontaneously exploding the house.


.......... she should REALLY be worring about that now !!!!!!!

wait till they leave and then burn the house down. When they return, tell them you built a fire to dry the car out and ....... :devilgrin:


(legal disclaimer: JOKE)
 
When it is going to rain put a beach ball on the tunnel to hold the cover up in the middle so water will not drain through the zipper.
 
<span style="color: #00CCCC"><bump!></span>

<span style="font-style: italic">Baanhiru Touni-sensei</span><span style="color: #FF0000">*</span> just dropped me a PM that my bits are in the mail. Yay! Now (if I can just remember how everything went together,) it should be <span style="font-style: italic">really </span>fun! Weather co-operating, I'll be driving by Christmas. Pictures, of course, soon to follow!


<span style="color: #FF0000">*</span>That's Tony, for those of you non-Japanglish types :wink:
 
We carry a beach ball on the fire engine. If we have to draft out of a portable tank we throw the beach ball in. It finds the whirlpool over the intake strainer and seals off the whirl pool. Nothing worse than sucking air and losing the prime. Radio traffic from the fire fighter on the hose inside the structure that is on fire "Where did my water go?".
 
startech47 said:
We carry a beach ball on the fire engine. If we have to draft out of a portable tank we throw the beach ball in. It finds the whirlpool over the intake strainer and seals off the whirl pool. Nothing worse than sucking air and losing the prime. Radio traffic from the fire fighter on the hose inside the structure that is on fire "Where did my water go?".

Clever!
 
Now to put it back together:


Reassembly is the reverse of removal.
 
bthompson said:
Now to put it back together:


Reassembly is the reverse of removal.

Heh - situation normal then... :wink:
 
HA! Just kidding.

A few hours of prep before work today. The first thing to do, before bolting stuff back into the box, is to put the needle bearings in the layshaft, and load the gearstack back onto the mainshaft. Since the layshaft has to sit loose in the box until the mainshaft is in place, you need a little dummy shaft to hold in the needle bearings.

Measuring the real shaft, it's 5/8 inch. Luckily, replacement shafts are readily available: :wink:

IMAGE_01357.jpg


There's a bit of extra length, as you can see. Since the thrust washers for the layshaft stay in the gearbox, the dummy shaft just has to be the length of the laygear. Hold the shaft flush to one end...

IMAGE_01366.jpg


Mark the other end...

IMAGE_01367.jpg


And saw it off to the right length. (This is just an excuse to show off my teeny little miter box :smile: )

IMAGE_01368.jpg


Sand off the rough parts and knock down the edges a bit. I imagine wood chips wouldn't make the best oil additive.

IMAGE_01369.jpg


Find your baggie of needle bearings, and make sure you still have 50 of them, 25 for each end.

IMAGE_01370.jpg


Squirt a little grease in around the edge of the laygear. This will 'glue' the needles in place until you can get the dowel in there.

IMAGE_01371.jpg


Carefully lay in your needles, just a couple at a time, and work around the edge. As you go, the needles will get stickier while your fingers get slipperier, which can make it a bit of a challenge. Don't accidentally push a needle down into the middle of the gear...it's a pain to get back out once its sticky.

IMAGE_01372.jpg


When you finish one end, push the dowel in to keep the needles in place, and do the other end.

<span style="font-style: italic">Et voila. </span> You can now set the laygear aside until you need it, secure in the knowledge that the needles aren't goin' anywhere.

IMAGE_01373.jpg


Next, putting the mainshaft back together.
 
Laying up the gears really <span style="font-style: italic">is</span> just like I showed previously. Just remember, those oily bits probably got dusty sitting around waiting for parts to arrive, so make sure you wipe everything down and make sure no foreign crud is sticking inside a bore somewhere. Keep your bottle of 90wt on hand, and pre-lube the shaft as you go, since (hopefully) it won't be coming apart again. Spin your gears to make sure they're free.

Putting on a new, stiff circlip is a little hassle. Use a little screwdriver to pry it onto the lands and grooves...

IMAGE_01374.jpg


And then slide it home with a fair amount of force and a great deal of relief.

IMAGE_01375.jpg


Remember, since the first gear goes on from the opposite end, and holds those two split washers in place,

IMAGE_01334.jpg


You have to keep the first gear in tight to keep them from falling out. Doc's rubber band trick works great!

IMAGE_01376.jpg


Now, with the shafts ready and on standby, we're all set to start bolting stuff in. Stay tuned...
 
Back
Top