
-
 Hey Guest!
British Car Forum has been supporting enthusiasts for over 25 years by providing a great place to share our love for British cars. You can support our efforts by upgrading your membership for less than the dues of most car clubs. There are some perks with a member upgrade!**Upgrade Now**
(PS: Upgraded members don't see this banner, nor will you see the Google ads that appear on the site.)

Tips
- We have a special forum called "Member Articles" where you can submit actual articles for consideration for publication. Learn More
- Don't have an Avatar? If not, your avatar will default to the 1st character in your username. Go into "Account Details" to change your Avatar.
- Some basic forum navigation info: click
 Hey - did you know if you click on the title of a thread it will take you to the first unread post since you last visited that thread?
- Hey Guest - Is your British Car Club in our Clubs database? If not, send me a PM - Basil

- Looking for a local club? Click the "Clubs" tab above and browse hundreds of clubs world-wide.
- Add Android or iPhone APP: click
- Did you know - any picture or video you add in your posts in any marque-specific forum will also get added to the Media Gallery automatically.
- A few more tips about posting and replying: click
- Hey there Guest - be sure to keep your profile page up to date with interesting info about yourself: learn more
- More tips and tricks on Posting and Replying: click
 but were afraid to ask:
  STOP!! Never post your email address in open forums. Bots can "harvest" your email! If you must share your email use a Private Message or use the
  smilie in place of the real @
- Want to mention another member in a post & get their attention? WATCH THIS

- So, you created a "Group" here at BCF and would like to invite other members to join? Watch this!
- Hey Guest - A post a day keeps Basil from visiting you in the small hours and putting a bat up your nightdress!
- Hey Guest - do you know of an upcoming British car event?
 Pretty Please - add it to our Events forum(s) and add to the calendar! >> Here's How <<
- Hey Guest - you be stylin' Change the look and feel of the forum to fit your taste. Check it out
- If you run across an inappropriate post, for example a post that breaks our rules or looks like it might be spam, you can report the post to the moderators: Learn More
- If you would like to try some different "looks" or styles for the site, scroll to the very bottom, on the left and click the Style Selector.
You are using an out of date browser. It may not display this or other websites correctly.
You should upgrade or use an alternative browser.
You should upgrade or use an alternative browser.
I've lost second gear!!
- Thread starter bthompson
- Start date
OP
bthompson
Jedi Warrior
Offline
<span style="color: #00CCCC"><bump!></span>
For those interested, here's an update on my (still-stagnant) Nigel:
I finally have the cash laid aside for an engine hoist: specifically the Harbor Freight one-ton foldable model, selling for $130. Unfortunately, the local HF was sold out when I went there. A trip across town to the local Northern Tool showed that their one-ton foldable hoist was ten dollars less than HF's <span style="font-style: italic">two </span>ton hoist. Not too far out of the budget, but still more than I'd want to spend. So I figured I'd wait until HF got what I wanted, at the price I wanted.
Meanwhile, I ordered the Oberg tilt-lift online, which arrived today. What a neat looking item!
The other issue is a decent place to work, since I don't have a garage or driveway. My brother-in-law has a nice little flat section of paved driveway behind his house, hidden from the street. He said I could pull the engine and keep Nigel there for the duration of the repair. There's <span style="font-style: italic">just </span>enough space under his house to tuck the engine in. Since it's starting into the cold-and-rainies, my plan is to take the transmission back home with me, and do the disassembly, inspection, replacement, and re-assembly on my kitchen table. (Yes, I have a wonderful wife who is very understanding of such things!)
I've spent the interim time studying my Haynes manual and taking notes until I feel I really understand how the tranny is put together before I start. So the next stage of the game for me, is to get this hoist bought and start pullin'! :banana:
Which reminds me: What's considered the best place to attach the tilt-lift to a 1500 engine...?
Offline
bthompson said:<span style="color: #00CCCC"><bump!></span>
Which reminds me: What's considered the best place to attach the tilt-lift to a 1500 engine...?
there's two bracket with holes on the top of the engine - front right (the bracket for the alternator) and rear left - the back of the rocker cover. That's what they are there for
G
Guest
Guest
Guest
Offline
The heart of the matter is the tilt-o-matic. You can use a chain hoist or come-a-long and a tree/sturdy rafter to hoist it up and roll the car from under it.
Yes, the hydralic hoist is best, but if you're running out of time it never hurts to "shade tree it". You can pull it while waiting for the hoist and reinstall once the hoist arrives.
I find I have trouble getting the legs of my hoist under things sometimes as they are too low. I haven't put my HF hoist under my Midget yet as I haven't need to but I would imagine it would hit w/o jacking the car up first. Others will know for sure.

Online
I'd never discourage anyone from finding a cheap, clever way to do something--but keep in mind, you'll have to get under the car to remove at least a couple bolts. So, keeping the car and ground level and rolling it backward may not be practical. 'Course, these cars are small,so maybe you can just reach under from the side to get the transmission bolts. Sooner or later you'll have to remove the drive shaft; I can't see you getting the engine & trans back in without doing that.
I got my lift from HF, but saw that Pep Boys had an almost identical one for a few bucks less.
I got my lift from HF, but saw that Pep Boys had an almost identical one for a few bucks less.
bugimike
Yoda
Offline
For years before I got my engine hoist, I used a come-along hung from a sturdy rafter in the garage. Getting under the front and rear were never a problem! A floor jack and jack stands are easy enough to slip under the car to undo all the under-car stuff before working from the top to pull the engine and trans. Start lifting the units and then roll the car out from under them!
G
Guest
Guest
Guest
Offline
bugimike said:For years before I got my engine hoist, I used a come-along hung from a sturdy rafter in the garage. Getting under the front and rear were never a problem! A floor jack and jack stands are easy enough to slip under the car to undo all the under-car stuff before working from the top to pull the engine and trans. Start lifting the units and then roll the car out from under them!
ditto, break everything loose first, pull the shaft from the rear, get on top and pull mrt/trns. Drop it back in, bolt everything up and put the shaft back in from the rear.
OP
bthompson
Jedi Warrior
Offline
Well, take a lookie here: a tranny with overdrive! It's stuff like this that makes me giddy.
<span style="color: #33CC00">On the one hand:</span> it's everything I need all buttoned up and ready to go. <span style="font-style: italic">And </span>it's an overdrive, which was a definate future project. <span style="font-style: italic">And </span>the price is right, at least right now.
<span style="color: #FF0000">On the other hand:</span> Nigel'll need a fair amount of cutting and welding to shoehorn it in. Of which I have <span style="font-style: italic">no </span>experience. And the price could skyrocket before the auction's over.
I wonder if 3M Structural Adhesive would work to bond the crossmember and mount points to. I'd sure be more comfortable working with that stuff than a welder...
Edit: Researching a bit, I've noticed that Guy Weller's conversion used a subframe for the crossmember and mounting points, that <span style="font-style: italic">bolted </span>to the body. So I could get a welder to fabricate that bit, and bolt it on. Hmm... :wink:
G
Guest
Guest
Guest
Offline
He'd have to have the car there to fab it up. Since it's there, just have him weld it in. It'd be cheaper.
OP
bthompson
Jedi Warrior
Offline
Ya think? I'd'a thought if I took good measurements and gave him a good clear three-view drawing, a good welder could do it up from scratch. But it's all just dreamin' now anyway. The ebay tranny has a bid alreadykellysguy said:He'd have to have the car there to fab it up.
so the war for posession begins...I have a feeling it'll shoot past my bank account anyway. C'est la vie.On the good side, I got my engine hoist today,
and its major sub-assemblies are sitting in my car, waiting to come together tomorrow morning at my brother-in-law's place. Then the Removal of Various Bits will begin.
OP
bthompson
Jedi Warrior
Offline
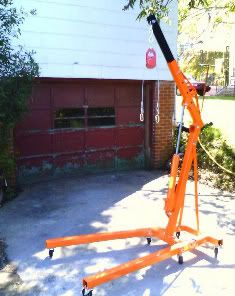
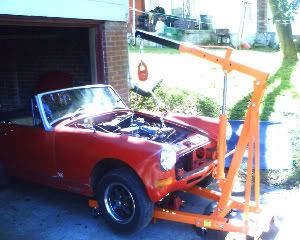
Well, today officially started off the project. I just had a couple hours in the morning before work today, and made a bit of progress. I brought my new hoist to my brother-in-law's (in pieces) crammed into my wife's Sunfire:

And here it is half an hour later. Shiny!
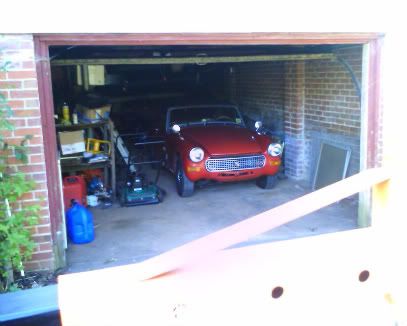
I was pleasantly surprised when I found my bro had cleared out a little spot under the house for Nigel to rest. (It's not really a garage, just a garage door opening into the unfinished basement.) The furnace is behind the car, so it'll be toasty to work on.
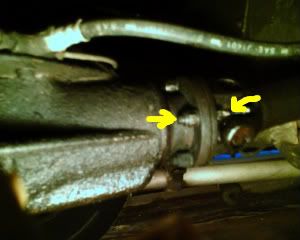
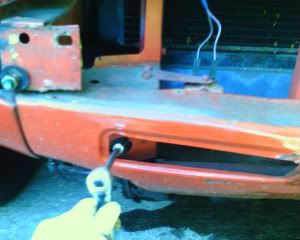
After taking the bonnet off (sorry, no pics of that; I had my hands full!) I took the driveshaft loose from the differential side. This is peeking through the rear wheelwell. Arrows show the bolts. (Hey, you never know, these pics could help someone)
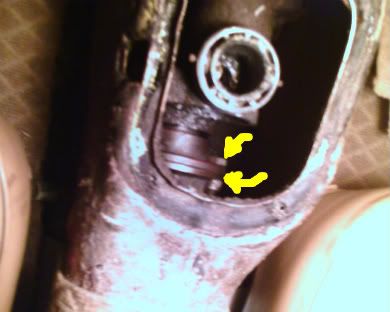
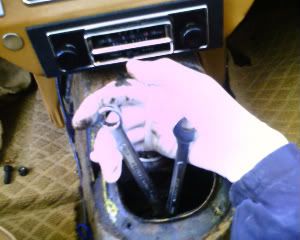
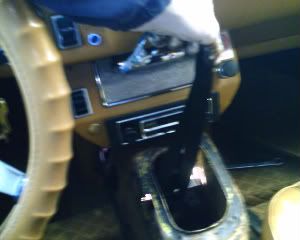
Took the shift gaiter and lever out. This is looking down the hole. The arrows show the driveshaft bolts on the transmission side.
And that's all the time I had for today. Tomorrow is supposed to be bright and in the 70s here, and I have the day off of work, so I anticipate much progress!
<span style="color: #FF6600">So what did I learn today?
-- Removing a Midget bonnet is awkward work for one person, but not impossible.
-- If you don't have a 'moving blanket' (you know, those dark blue industrial quilted things) get one. Get one <span style="font-style: italic">now</span>. I'll never lay on cardboard again. :wink:
-- Your front u-joint bolts are much easier accessed through the shifter hole than up from the bottom through the inspection hole.</span>
And here it is half an hour later. Shiny!
I was pleasantly surprised when I found my bro had cleared out a little spot under the house for Nigel to rest. (It's not really a garage, just a garage door opening into the unfinished basement.) The furnace is behind the car, so it'll be toasty to work on.
After taking the bonnet off (sorry, no pics of that; I had my hands full!) I took the driveshaft loose from the differential side. This is peeking through the rear wheelwell. Arrows show the bolts. (Hey, you never know, these pics could help someone)
Took the shift gaiter and lever out. This is looking down the hole. The arrows show the driveshaft bolts on the transmission side.
And that's all the time I had for today. Tomorrow is supposed to be bright and in the 70s here, and I have the day off of work, so I anticipate much progress!
<span style="color: #FF6600">So what did I learn today?
-- Removing a Midget bonnet is awkward work for one person, but not impossible.
-- If you don't have a 'moving blanket' (you know, those dark blue industrial quilted things) get one. Get one <span style="font-style: italic">now</span>. I'll never lay on cardboard again. :wink:
-- Your front u-joint bolts are much easier accessed through the shifter hole than up from the bottom through the inspection hole.</span>
RickB
Yoda
Offline
Nice bit of morning work!
I use a foam camping pad, the kind you put under your sleeping bag.
I have two of these, rolled up and ready to use so sometimes when I need to move around a bit I can leave one in one area and one in another. Kneeling on concrete or any other hard surface is not an option.
I use a foam camping pad, the kind you put under your sleeping bag.
I have two of these, rolled up and ready to use so sometimes when I need to move around a bit I can leave one in one area and one in another. Kneeling on concrete or any other hard surface is not an option.
OP
bthompson
Jedi Warrior
Offline
Well, I guess it's true what they say about pulling a midget engine out in a couple of hours! For me, it took about six. Four hours in the late morning, and the engine was hooked up ready to pull. Break for lunch, and another two hours of engine-wrangling in the afternoon. Many lessons learned today, but first some pics.
Picking up from yesterday, I pulled the front u-joint bolts, and yes, it IS easier from the topside!
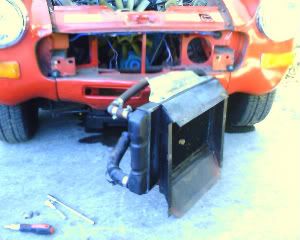
I discovered what that little round holes behind the fascia slots in a 1500 are for: Getting to the lower radiator bolts!
Grills and radiator out in 20 minutes, hoses attached. Aren't these cars amazing? (With a couple exceptions, which I'll point out later...)
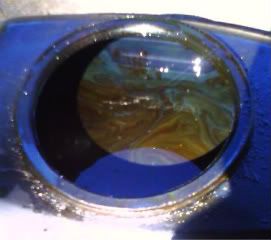
The First Sign of the Apocylpse: shiny metal bits sticking to the tranny drain plug.
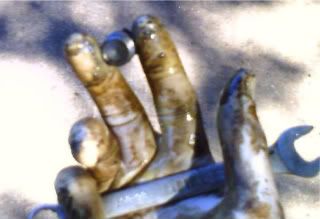
The Second Sign of the Apocylpse: uhmm, transmission fluid isn't supposed to be a silver slurry, is it...?
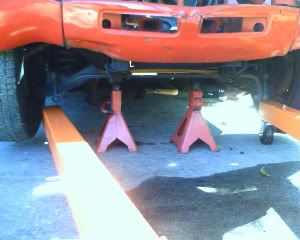
Answering the Big Question: yes, it does fit. Barely. The legs skim the inside of the front tires, and it needs to be jacked up just a couple inches for the legs to clear the stabilizer bar. (Actually, with the bar unbolted from the A-arms, it might fit, but I didn't try that.)
Ready for action, four hours in...
...and this was as far as it got before the u-joint flange got caught on the crossmember. Argh!
An idea that didn't work: a sling under the flange to try to help it over. Yeah, if I was a gorilla. Luckily the bro had a hydraulic jack; putting that under the tranny gave the inch lift it needed to clear.
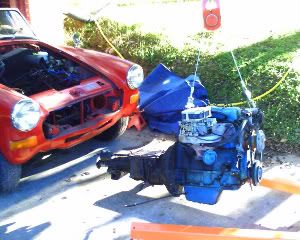
Ahh, free and clear in all its bluey...blueness. I don't know why. Maybe the PO liked Fords.
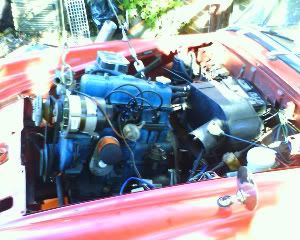
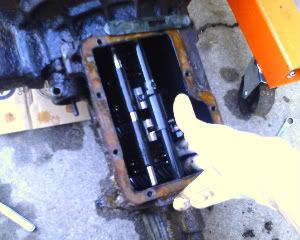
I couldn't help a little preliminary peek. Reverse is a little chipped, the synchro teeth aren't really sharp...hey, is this gear supposed to wobble around a half-inch? No, I didn't think so.
Enough fun for one day. Bits under the house with the engine. Tomorrow I'll try to separate engine from trans and start cleaning stuff off.
![url]](http://[url="https://i92.photobucket.com/albums/l39/W_J_Thompson/mg/IMAGE_01288.jpg"]https://i92.photobucket.com/albums/l39/W_J_Thompson/mg/IMAGE_01288.jpg[/url])
Nigel snoozing under cover. But which way is forward?
![url]](http://[url="https://i92.photobucket.com/albums/l39/W_J_Thompson/mg/IMAGE_01286.jpg"]https://i92.photobucket.com/albums/l39/W_J_Thompson/mg/IMAGE_01286.jpg[/url])
<span style="color: #6633FF">For posterity, here's a list of the things needed to pull the engine in a 1500, in order. Numbered baggies make a great way to store bolty bits.
1. Bonnet prop. 1 bolt, baggie 1.
2. Bonnet. 4 bolts, baggie 2.
3. Shift gaiter. 4 screws, baggie 3.
4. Shifer anti-rattle plug and spring. Baggie 4.
5. Rear driveshaft. 4 bolts, baggie 5.
6. Heater duct.
7. Front driveshaft. 4 bolts, baggie 6.
8.Grills. 6 screws, baggie 7.
9. Radiator. 4 bolts, 2 screws, baggie 8.
10.Overflow tank (pulls out)
11. Heater hose connections at back of engine.
12. Bourdon tube connection.
13. Alternator connection.
14. Starter wire.
15. Oil pressure connection.
16. Coil wire. *don't forget the low tension wires too!
17. Throttle cable.
18. Fuel line at carb.
19. Engine ground strap at steering rack.
20. Exhaust pipe from manifold. 3 bolts, baggie 9.
21. Clutch slave. 1 bolt, baggie 10.
22. Drain tranny.
23. Drain engine.
24. Transmission mount under crossmember. 2 bolts, baggie 11.
25. Transmission mount on tunnel. 2 bolts, baggie 12.
26. Unplug backup light at shifter.
27. Speedo connection. 1 bolt and plate, baggie 13.
28. "Transmission retaining cable."
29. Fan blade. 4 bolts, baggie 14.
30. Engine mounts. 6 nuts, 2 bolts, baggie 15.</span>
<span style="color: #FF6600">What I learned today:
--There is a cable, a whopping thick one, that connects the lower bellhousing to the crossmember. It apparently serves no other function than complicating pulling the engine. As it was only on USA cars, and no manual seems to mention it, it was apparently a practical joke on the part of the BL engineers. Well, ha ha, chaps.
--Getting the u-joint flange over the crossmember when the engine is tilted is a royal PITA. I would have saved 30 minutes and could have easily done this single-handed if it wasn't for this. Overdrive or not, I'm seriously considering cutting out the center crossmember and reinforcing it lower down just 'cause I'm so ticked at it.
--You cannot pull the clutch slave cylinder without rotating it so the fluid line is about 30 degrees inboard. Actually, I learned this again, as I first learned it a year ago when I replaced the silly thing.
--When the engine is hanging naturally from just the front hoist mount, it assumes the right angle to get it out. This led me to think if this is the ideal way to pull the engine with the hoist and a tilt-lift: To lock it horizontal, swing it forward until the flange clears the crossmember, unlock it, and lift up. The engine will nose-up naturally and clear the front of the car. Swing the tail of the tranny up, lock it horizontal again, and pull it forward.
--The fuel hardline is attached by a little clamp at the top of the transmission. So you have to undo the line down below the car. This siphons the gas out of the tank. (Ha ha BL engineers--got me again!) Be sure to put a little cap over this line.</span>
So the plan for tomorrow is to break the tranny loose, start cleaning, and see what there is to see...
Picking up from yesterday, I pulled the front u-joint bolts, and yes, it IS easier from the topside!
I discovered what that little round holes behind the fascia slots in a 1500 are for: Getting to the lower radiator bolts!
Grills and radiator out in 20 minutes, hoses attached. Aren't these cars amazing? (With a couple exceptions, which I'll point out later...)
The First Sign of the Apocylpse: shiny metal bits sticking to the tranny drain plug.
The Second Sign of the Apocylpse: uhmm, transmission fluid isn't supposed to be a silver slurry, is it...?
Answering the Big Question: yes, it does fit. Barely. The legs skim the inside of the front tires, and it needs to be jacked up just a couple inches for the legs to clear the stabilizer bar. (Actually, with the bar unbolted from the A-arms, it might fit, but I didn't try that.)
Ready for action, four hours in...
...and this was as far as it got before the u-joint flange got caught on the crossmember. Argh!
An idea that didn't work: a sling under the flange to try to help it over. Yeah, if I was a gorilla. Luckily the bro had a hydraulic jack; putting that under the tranny gave the inch lift it needed to clear.
Ahh, free and clear in all its bluey...blueness. I don't know why. Maybe the PO liked Fords.
I couldn't help a little preliminary peek. Reverse is a little chipped, the synchro teeth aren't really sharp...hey, is this gear supposed to wobble around a half-inch? No, I didn't think so.
Enough fun for one day. Bits under the house with the engine. Tomorrow I'll try to separate engine from trans and start cleaning stuff off.
Nigel snoozing under cover. But which way is forward?
<span style="color: #6633FF">For posterity, here's a list of the things needed to pull the engine in a 1500, in order. Numbered baggies make a great way to store bolty bits.
1. Bonnet prop. 1 bolt, baggie 1.
2. Bonnet. 4 bolts, baggie 2.
3. Shift gaiter. 4 screws, baggie 3.
4. Shifer anti-rattle plug and spring. Baggie 4.
5. Rear driveshaft. 4 bolts, baggie 5.
6. Heater duct.
7. Front driveshaft. 4 bolts, baggie 6.
8.Grills. 6 screws, baggie 7.
9. Radiator. 4 bolts, 2 screws, baggie 8.
10.Overflow tank (pulls out)
11. Heater hose connections at back of engine.
12. Bourdon tube connection.
13. Alternator connection.
14. Starter wire.
15. Oil pressure connection.
16. Coil wire. *don't forget the low tension wires too!
17. Throttle cable.
18. Fuel line at carb.
19. Engine ground strap at steering rack.
20. Exhaust pipe from manifold. 3 bolts, baggie 9.
21. Clutch slave. 1 bolt, baggie 10.
22. Drain tranny.
23. Drain engine.
24. Transmission mount under crossmember. 2 bolts, baggie 11.
25. Transmission mount on tunnel. 2 bolts, baggie 12.
26. Unplug backup light at shifter.
27. Speedo connection. 1 bolt and plate, baggie 13.
28. "Transmission retaining cable."
29. Fan blade. 4 bolts, baggie 14.
30. Engine mounts. 6 nuts, 2 bolts, baggie 15.</span>
<span style="color: #FF6600">What I learned today:
--There is a cable, a whopping thick one, that connects the lower bellhousing to the crossmember. It apparently serves no other function than complicating pulling the engine. As it was only on USA cars, and no manual seems to mention it, it was apparently a practical joke on the part of the BL engineers. Well, ha ha, chaps.
--Getting the u-joint flange over the crossmember when the engine is tilted is a royal PITA. I would have saved 30 minutes and could have easily done this single-handed if it wasn't for this. Overdrive or not, I'm seriously considering cutting out the center crossmember and reinforcing it lower down just 'cause I'm so ticked at it.
--You cannot pull the clutch slave cylinder without rotating it so the fluid line is about 30 degrees inboard. Actually, I learned this again, as I first learned it a year ago when I replaced the silly thing.
--When the engine is hanging naturally from just the front hoist mount, it assumes the right angle to get it out. This led me to think if this is the ideal way to pull the engine with the hoist and a tilt-lift: To lock it horizontal, swing it forward until the flange clears the crossmember, unlock it, and lift up. The engine will nose-up naturally and clear the front of the car. Swing the tail of the tranny up, lock it horizontal again, and pull it forward.
--The fuel hardline is attached by a little clamp at the top of the transmission. So you have to undo the line down below the car. This siphons the gas out of the tank. (Ha ha BL engineers--got me again!) Be sure to put a little cap over this line.</span>
So the plan for tomorrow is to break the tranny loose, start cleaning, and see what there is to see...
startech47
Jedi Knight
Offline
The cable is to keep the engine in place during a crash.
G
Guest
Guest
Guest
Offline
If you would, PM me a pic of your front turn signals. Thanks
OP
bthompson
Jedi Warrior
Offline
Cheers, Nomad!  I appreciate the offer. If the ebay overdrive falls through,<span style="color: #FF0000">*</span> you're the first on my list! :thumbsup:
EDIT:<span style="color: #FF0000">*</span> And fall through it seems to have done! The auction was withdrawn today. Guess the guy got a local seller.
KG: Nothing special about the turn sigs; they're just 1500 sigs in the 1500 holes. I'll shoot you a few closer-up pics and some shots of the inner feners to show you how they're clamped in, and send 'em your way.
No action today, I'm too beat and sore from yesterday!
I appreciate the offer. If the ebay overdrive falls through,<span style="color: #FF0000">*</span> you're the first on my list! :thumbsup:EDIT:<span style="color: #FF0000">*</span> And fall through it seems to have done! The auction was withdrawn today. Guess the guy got a local seller.
KG: Nothing special about the turn sigs; they're just 1500 sigs in the 1500 holes. I'll shoot you a few closer-up pics and some shots of the inner feners to show you how they're clamped in, and send 'em your way.
No action today, I'm too beat and sore from yesterday!