
-
 Hey Guest!
British Car Forum has been supporting enthusiasts for over 25 years by providing a great place to share our love for British cars. You can support our efforts by upgrading your membership for less than the dues of most car clubs. There are some perks with a member upgrade!**Upgrade Now**
(PS: Upgraded members don't see this banner, nor will you see the Google ads that appear on the site.)

Tips
- We have a special forum called "Member Articles" where you can submit actual articles for consideration for publication. Learn More
- Don't have an Avatar? If not, your avatar will default to the 1st character in your username. Go into "Account Details" to change your Avatar.
- Some basic forum navigation info: click
 Hey - did you know if you click on the title of a thread it will take you to the first unread post since you last visited that thread?
- Hey Guest - Is your British Car Club in our Clubs database? If not, send me a PM - Basil

- Looking for a local club? Click the "Clubs" tab above and browse hundreds of clubs world-wide.
- Add Android or iPhone APP: click
- Did you know - any picture or video you add in your posts in any marque-specific forum will also get added to the Media Gallery automatically.
- A few more tips about posting and replying: click
- Hey there Guest - be sure to keep your profile page up to date with interesting info about yourself: learn more
- More tips and tricks on Posting and Replying: click
 but were afraid to ask:
  STOP!! Never post your email address in open forums. Bots can "harvest" your email! If you must share your email use a Private Message or use the
  smilie in place of the real @
- Want to mention another member in a post & get their attention? WATCH THIS

- So, you created a "Group" here at BCF and would like to invite other members to join? Watch this!
- Hey Guest - A post a day keeps Basil from visiting you in the small hours and putting a bat up your nightdress!
- Hey Guest - do you know of an upcoming British car event?
 Pretty Please - add it to our Events forum(s) and add to the calendar! >> Here's How <<
- Hey Guest - you be stylin' Change the look and feel of the forum to fit your taste. Check it out
- If you run across an inappropriate post, for example a post that breaks our rules or looks like it might be spam, you can report the post to the moderators: Learn More
- If you would like to try some different "looks" or styles for the site, scroll to the very bottom, on the left and click the Style Selector.
You are using an out of date browser. It may not display this or other websites correctly.
You should upgrade or use an alternative browser.
You should upgrade or use an alternative browser.
Half way?
- Thread starter TexasKnucklehead
- Start date
OP
TexasKnucklehead
Jedi Knight
Offline
I can't believe it's only been 2 months since I started welding. Today I ran out things to weld -and I only took 479 pictures along the way. Yesterday I repaired the transmission tunnel, today I finished the last couple things that needed done with the tub off. Then I used a razor and scraped off the majority of the improperly applied POR15 on the under side of the spare tire compartment.
It's been so long since I stripped the body paint that I had some surface rust forming and used OSPHO to clean it off the inner front fenders before resting the tub back on the frame (OSPHO drips will eat away any paint). As soon as I can get the inner side of the hood stripped, I can get it blasted and primed. So I'm probably half way to seeing it painted.
It's been so long since I stripped the body paint that I had some surface rust forming and used OSPHO to clean it off the inner front fenders before resting the tub back on the frame (OSPHO drips will eat away any paint). As soon as I can get the inner side of the hood stripped, I can get it blasted and primed. So I'm probably half way to seeing it painted.
OP
TexasKnucklehead
Jedi Knight
Offline
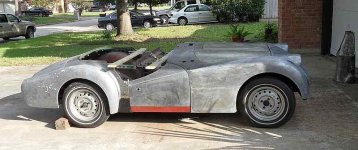
Tomorrow it will be 6 years since I picked up the TR3, and I have a special event planned. But today, just for fun, I pushed it into the drive and took a few pictures. All the removable panels are now stripped bare, inside and out and have been repaired. Less than 6 bolts were holding the panels in place for the first picture, and it took me about 1/2 hour to get the tub off (or on) and take a few pictures.
My front apron had 3 layers of paint before a "skim coat" of filler. Then another 3 layers of paint under that -excluding primers. Under all that paint was a layer of rust about as thick as the filler that caused the surface to crackle, with a few holes rusted through. I really do think I'm done welding now. I started body work 20 months ago. I think I'm half way done now.
My front apron had 3 layers of paint before a "skim coat" of filler. Then another 3 layers of paint under that -excluding primers. Under all that paint was a layer of rust about as thick as the filler that caused the surface to crackle, with a few holes rusted through. I really do think I'm done welding now. I started body work 20 months ago. I think I'm half way done now.
Attachments
hondo402000
Darth Vader
Offline
you can spray it with a 2 part epoxy primer when you get it to bare metal and it wont rust thru like the primer in the can would do, the epoxy primer will seal out any moisture
Hondo
Hondo
M_Pied_Lourd
Darth Vader
Offline
Looking great Tex. Your Body Gaps look much better than mine...I am envious.
Cheers,
Tush
Cheers,
Tush
OP
TexasKnucklehead
Jedi Knight
Offline
M_Pied_Lourd said:Your Body Gaps look much better than mine.
Thanks, but you really can't tell from those pictures. The doors are resting there, held in place with a bungee. The apron and hoods are held in place by gravity. Two bolts per fender, started, but not even tightened.
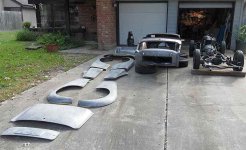
This morning I used my TRuck and my brothers TRailer to take the TR3 to breakfast and then 70 miles to La Marque to be blasted and epoxy primed. I've never had any children, and never dropped them off to school on the first day, but I know how I felt leaving the TR for the first time since I brought it home.
Did you know that both doors, the spare tire cover, the trunk lid, the hood and the apron will all fit inside a Dodge dakota back seat, leaving plenty of room in the bed for 4 fenders?
I should have it back in a week or so and can start 'getting ready' to paint.
Attachments

I learned a hard lesson when I started my TR3 restoration, never leave body parts on the ground . After telling my wife not to pull in the garage after work she still did and ran over the hood.
Take your time with the getting ready to paint stage. Prep prep prep.
Take your time with the getting ready to paint stage. Prep prep prep.
OP
TexasKnucklehead
Jedi Knight
Offline
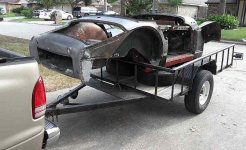
Picked up the TR3 tub and panels yesterday. It was stripped to bare metal and epoxy primed. Both the 2 front and the 2 rear body mounts (where a second section of steel is added by spot welding) rusted from the inside, and holes blew through with the blaster. So I am not done welding, but the car is all grey and back home. -The really fun part will start soon.
Attachments
OP
TexasKnucklehead
Jedi Knight
Offline
So I finally cut into my primed steel and repaired the sections I should have addressed before priming. The last weld repair was made to two small filled sections at the rear right fender attachment (allowing repair of the last cage nut with a bolt broken inside it) near original lead. Welding near lead will reflow the lead. Then I spot sand blasted the body mounts and repairs and my neighbor mixed up some epoxy primer and sprayed it on all the bare spots. Once again, the car is completly primed -this time without holes.
It feels like somtimes you've got to go backwards before you can go foreward.
It feels like somtimes you've got to go backwards before you can go foreward.
OP
TexasKnucklehead
Jedi Knight
Offline
Thanks Pat. My body work class will continue with "paint prep" along with "panel fitting". -I'm not sure what you call all that bending, cutting and welding I've already done to get solid panels.
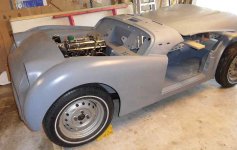
To check alignment, I bolted on the front apron -which I've learned should be done prior to tightening the 6 body to frame bolts at the front (so the front of the fenders can be aligned, especially at the front/bottom). This picture shows my left and front fender, each held on by a single bolt to the top of the apron. I thought they fit, but am very happy with how well. The right side, not so much, but I was so happy I nearly danced after seeing the left fit.
The bag on the dash is the rest of the new bolts/washers to hold on the left fender properly, but it's already so solid, you'd think it wouldn't need all that. I remember taking it apart and it being so tight with nothing holding it together but habbit. I kept thinking 'there must be another bolt somewhere'. After a litle shake, a few choice words and Wham, it fell apart.
OP
TexasKnucklehead
Jedi Knight
Offline
When I got my *free* TR3 (6.5 years ago), I was sure I'd be driving it in a few months and expected to spend about $4,000. Recently, I purchased some sandpaper and filler. Foolishly, I have been tracking my TR3 purchases and now have passed the $20k mark. I often forget that I'm doing this for the fun of it, and too often remember the monetary cost.
In all the time I've spent working on the TR3, I have never seen the end in sight. I still don't really see it, but I know it's getting closer. It will come and I am getting more anxious.

In all the time I've spent working on the TR3, I have never seen the end in sight. I still don't really see it, but I know it's getting closer. It will come and I am getting more anxious.
OP
TexasKnucklehead
Jedi Knight
Offline
Well, I think I'm about half way done with the first pass of body work. The right side needs done, but I'm happy with the way it's looking so far. I can no longer tell where the welds have been, or where the panels were bent or replaced.
It looks different in different light, but still good.View attachment 26562View attachment 26563
It looks different in different light, but still good.View attachment 26562View attachment 26563
OP
TexasKnucklehead
Jedi Knight
Offline
After I had everything bead blasted and epoxy primed, I noticed my trunk lid looked a little stretched, in the right light, you could see the "X" cross support on the top side. After skimming with filler, and block sanding, the "X" was easily seen. I wondered how much it was bent, and laid a flat tool across the high spots to measure the low spot with a "filler" gauge. A couple more passes with filler and block sanding and it looks (and feels) flat now.
I'm tired of block sanding, but the end is near.


I'm tired of block sanding, but the end is near.
M_Pied_Lourd
Darth Vader
Offline
Looking good Tex. You are well past me now.
Cheers
M. Pied Lourd
Cheers
M. Pied Lourd
OP
TexasKnucklehead
Jedi Knight
Offline
"Half way" is very subjective. Now, I think I'm "half way" to primer. The entire car has been filled and blocked and sanded with 80 grit, so now I have to block again with 180 grit. After it's primed, I'll be "half way" to paint, since I'll only have to block it twice again with finer grit before paint. Then I can start puting it back together. Since the chasis is done, I'm already "half way" there. The dash, cappings and seats are done, so the interior is "half way" there... just like it was 6 years ago when I started, all I lack is finishing.