• Hi Guest!
    You can help ensure that British Car Forum (BCF) continues to provide a great place to engage in the British car hobby! If you find BCF a beneficial community, please consider supporting our efforts with a subscription.

    There are some perks with a member upgrade!
    **Upgrade Now**
    (PS: Subscribers don't see this gawd-aweful banner
Tips
Tips

Half way?

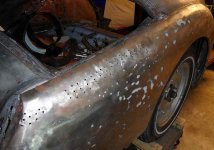
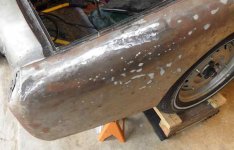
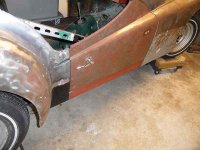
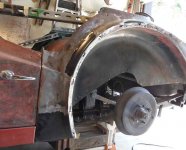
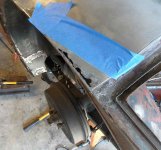
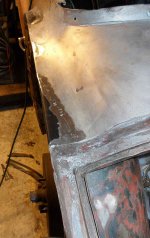
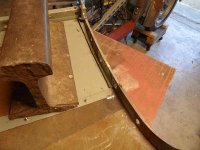
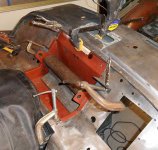
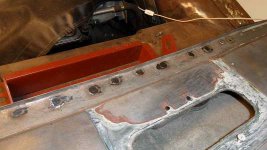
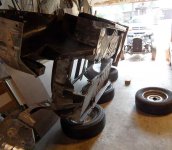
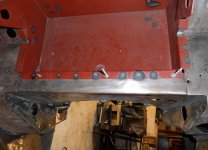
I think I'm half way done with the welding. The floors and trunk are welded solid and hopefully water tight. At least half the rear apron is repaired. The right rear fender has had a bunch of holes welded shut and some cracks welded. The rear fender well had a patch welded and several weld nuts. Three sections of the right front fender bolt flange were cut out and replaced. The lower section of the right fender was cut off and a replacement patch welded in. The hole made by drilling 20 1/8" holes in a circle of the fender was cut square and new steel welded in place of it. The matching hole in the kick panel had a patch welded over it. To get the door gap acceptable, the fender was ground down along the door edge, re-welded, and reground. The replacement rocker was slit top and bottom at the ends, to allow it to curve closer to my pre-60k doors, and make the gap at the fender acceptable. I welded the rocker in this afternoon. The front fender replacement panel took much more time than I would have guessed, but I wasn't going to weld the rocker until the door and fender fit. Also the inner fender needed patched in several places.

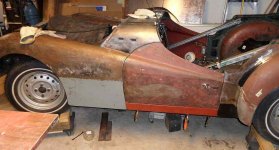
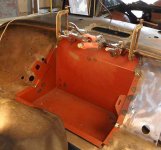
My rear fender looked like it was used by Bonnie and Clyde when they didn't quite get away. All I have remaining to weld, is the battery box, the left front fender replacement panel, the left rear fender patches, the left dog leg rusted sections, the left rocker with it's patches, and the rear closing panel (from the under side), and the front apron might need a cage nut or two. My welding skills are improving.
 

Attachments

  • 28724.jpg
    28724.jpg
    60.3 KB · Views: 520
  • 28725.jpg
    28725.jpg
    58.7 KB · Views: 524
  • 28726.jpg
    28726.jpg
    63.1 KB · Views: 523
Nice work Jer-

You willing to give a class or two?

Randy
 
And then send them down to Staunton please. My son will be off to college this fall so his bedroom and the guest bedroom upstairs will be free. You'll have access to the game room too with XBox360, Wii, Playstation 2, Sega Genesis, GameCube and Nintendo 64 as well. :smile:

Scott
 
That is some nice work. I have a couple of slide hammer holes in mine but nothing like that. Coming along nicely.

Cheers
Tush
 
TR4nut said:
You willing to give a class or two?

Well, I'd think you'd want someone who knows what they are doing, rather than someone learning as he goes, but as always, I'm happy to share what I've learned.

My neighbor has been a huge help. He came over the other day when I was unsure I was getting a good weld to the (heavier) inner rocker. He gave me some more good advice; when you are welding, it should sound like bacon sizzling, not pop corn popping. The heat and speed combination make for good penetration. Cranking it up a notch on both dials made a huge difference. He also said a good 220v welder makes a big difference.
 
To quote a popular children's book, "Your car has (HAD) the cheese touch!!" :laugh:
VERY nice work!!!
 
I think I'm half way done with welding on the left side of the car. I had to weld the patches to the inner rocker, before patching the fender well and the lower dog leg. The middle of the dog leg had some rust and 4 more sections (black now) were cut out and new sections welded in.

I'm learning that sometimes an extra step saves a lot of time and makes a nicer job. If, after the patch is spot welded in place, you take the thin blade of the dremel and recut the gap around the patch to be consistent, then make sure both surfaces are perfectly aligned (by running the blade along the slit and being sure it marks both sides of the slit), the welding will go much smoother and there is less to gring off.
 

Attachments

  • 28768.jpg
    28768.jpg
    65.1 KB · Views: 375
  • 28769.jpg
    28769.jpg
    73.1 KB · Views: 360
  • 28770.jpg
    28770.jpg
    100.7 KB · Views: 369
Hi Tex,

Can you share your technique for filling in those small holes?

I got a bunch to do on my car too, and cutting out a bunch of small patched is for the birds.

Thanks
 
Sure.

Beware, there is at least two very different types of holes. The little one in front of the replaced triangle in the last picture is a rust hole. The drilled holes are easier. In either case, you can only weld to clean steel. No rust, no paint, and the metal can't be too thin or it melts.

So, I start by cleaning the holes up. In the drilled holes, I find a drill bit 1 size larger, and drill each, to be sure all the filler and rust has been removed. Then, I weld to the edge of the hole in a circle. Once the feed rate and heat is right, there is a only slight puddle that needs ground off. I prefer to use a cut-off wheel in the grinder for very accurate grinding off of the excess weld -being sure not to cut into the surrounding metal. Finally, the entire area can be sanded to be sure nothing was missed. On my rear fender, without looking on the inside, you can't see or feel where the holes were.

The rust holes require a little more time. I use a piece of copper pipe with a copper cap tied on the end. The pipe cap is pressed against the underside of the rust hole and held there by something so I can use both hands on the welder (one to steady the nozzle). The copper provides a heat sink, and prevents weld the from dripping away. Then I carefully tack several spots of weld in short 'pecks' around the perimeter, being sure not to melt too much of the thin steel away. Eventually the drops of weld begin to be significant, and the pecks can become a little longer. Before it cools completly, I re-weld atop the weld droplets, being sure to get enough heat to melt the droplets completly and at the same time melt into the thin metal (about 1/4" bead at a time allowing about 30 seconds coling between weld pecks). Often it melts too much away, and the hole must be allowed to cool down before chasing the hole farther. Often the weld becomes a big glob that needs ground off. Often the welds are cold and the grinder breaks them off and throws them across the room. For me, after a couple trys, it works. And after grinding smooth (again I use the cutt-off wheel) you may see a several voids. Then I remove the copper plug and weld the voids, building up the new welded steel where it is low. It can be tedious, but after a doing a few, it gets quicker. -Holes bigger than a dime would be quicker to cut a patch and weld it in, rather than try to weld it shut.

That may not be the proper way to fix holes, but it seems to be working for me.
 
TexasKnucklehead said:
I'm learning that sometimes an extra step saves a lot of time and makes a nicer job. If, after the patch is spot welded in place, you take the thin blade of the dremel and recut the gap around the patch to be consistent, then make sure both surfaces are perfectly aligned (by running the blade along the slit and being sure it marks both sides of the slit), the welding will go much smoother and there is less to gring off.

That is really the key, I was taught to leave more of a gap and it encouraged me to gorilla weld everything which then takes forever plus a day to grind down and the fit is still iffy.

Trimming the patch so it very tight fits into opening is key key key key. Important as well.
 
In my younger days working as an Electrican, we would use big carbon brushes for our heat sink and build up platforms. I still use them when filling/patching holes in sheetmetal. A local Electrical motor shop will probably give you a couple of used ones.

Marv
 
As much trouble as I had on the right side, the fender patch for the front left was more difficult. Before I cut anything, I determined that the bolt flange (along the door edge) was not positioned on the patch properly. The flange was also too large and the holes positioned too close to the outer edge. Also, the bolt holes along the bottom (to the inner rocker) were positioned about an inch too far foreword. With the panel installed as it came, the panel was more than an inch outside the door, and an inch over the door edge. -Not exactly the door gap I was shooting for. I decided to cut off the new flange, and remove the lower portion of my fender but not remove the original bolt flange. After trimming away the folded door edge, I welded the original flange to the patch panel. I think it came out pretty good and the door gaps needed a little adjustment, but they look great now (same as the other side). Then I was finally able to weld in the left outer rocker and move on to the battery box.

If I didn't know better I'd think all those clamps are some kind of joke. I got it tacked in place before a tree came down on the power lines. I can't weld without power. That section of railroad really comes in handy.
 

Attachments

  • 28824.jpg
    28824.jpg
    82.8 KB · Views: 325
  • 28825.jpg
    28825.jpg
    74.7 KB · Views: 333
  • 28826.jpg
    28826.jpg
    80.9 KB · Views: 325
I love the piece of rail used as a weight!
 
I'll have you know that is a precisely manufactured forming device....that happens to be robust enough to qualify for material stabilization, given the right circumstances.
 
TexasKnucklehead said:
Sure.

Beware, there is at least two very different types of holes. The little one in front of the replaced triangle in the last picture is a rust hole. The drilled holes are easier. In either case, you can only weld to clean steel. No rust, no paint, and the metal can't be too thin or it melts.

So, I start by cleaning the holes up. In the drilled holes, I find a drill bit 1 size larger, and drill each, to be sure all the filler and rust has been removed. Then, I weld to the edge of the hole in a circle. Once the feed rate and heat is right, there is a only slight puddle that needs ground off. I prefer to use a cut-off wheel in the grinder for very accurate grinding off of the excess weld -being sure not to cut into the surrounding metal. Finally, the entire area can be sanded to be sure nothing was missed. On my rear fender, without looking on the inside, you can't see or feel where the holes were.

The rust holes require a little more time. I use a piece of copper pipe with a copper cap tied on the end. The pipe cap is pressed against the underside of the rust hole and held there by something so I can use both hands on the welder (one to steady the nozzle). The copper provides a heat sink, and prevents weld the from dripping away. Then I carefully tack several spots of weld in short 'pecks' around the perimeter, being sure not to melt too much of the thin steel away. Eventually the drops of weld begin to be significant, and the pecks can become a little longer. Before it cools completly, I re-weld atop the weld droplets, being sure to get enough heat to melt the droplets completly and at the same time melt into the thin metal (about 1/4" bead at a time allowing about 30 seconds coling between weld pecks). Often it melts too much away, and the hole must be allowed to cool down before chasing the hole farther. Often the weld becomes a big glob that needs ground off. Often the welds are cold and the grinder breaks them off and throws them across the room. For me, after a couple trys, it works. And after grinding smooth (again I use the cutt-off wheel) you may see a several voids. Then I remove the copper plug and weld the voids, building up the new welded steel where it is low. It can be tedious, but after a doing a few, it gets quicker. -Holes bigger than a dime would be quicker to cut a patch and weld it in, rather than try to weld it shut.

That may not be the proper way to fix holes, but it seems to be working for me.

Cool.

Thanks!
 
I got the battery box installed today (mostly). I had to trim a little of the front of the bent over fire-wall. It seems the replacement is slightly a different shape than the old one. This is the only piece not welded yet, as it's really hard to get to with the transmission in the way. When I flip the tub to weld the rear closing panel, I'll weld this from the underside as I did the rest of the box (except the top edge). I drilled 5/16" holes where all the old spot welds were drilled out, because it takes that much space for me to MIG weld around the hole and have it stick. I think it looks better in the end, and as if it was still spot welded (note the dark spots in the 1st pic where I welded it from the under side). The second picture is the same thing from the top side, after cleaning up the welds, it looks at least as good as the original spot welds.

I don't know when all these parts started looking like they were going to be a car, but testing the fit really made me want to drive it around the block. -All I really need to do is, install the pedals, install the MCs, plumb the MCs, install the gas tank, put the carbs back on, put a seat in, wire it... it would have taken a bit of time, but it was tempting.
 

Attachments

  • 28834.jpg
    28834.jpg
    67.9 KB · Views: 253
  • 28835.jpg
    28835.jpg
    57.4 KB · Views: 262
  • 28836.jpg
    28836.jpg
    61.3 KB · Views: 261
I may not be out of the woods, but I've got almost half the car out of the garage. I ran out of weld wire while tacking the lower closing panel under the rear apron. I had to put the tub back on, only to take it off after getting more wire a couple days later. I had several welds to do with the tub on its side including the front lip of the battery box. -A couple more welds and I'll be done welding...
 

Attachments

  • 29024.jpg
    29024.jpg
    87.9 KB · Views: 208
  • 29025.jpg
    29025.jpg
    72.5 KB · Views: 203
Back
Top