• The Roadster Factory Recovery Fund - Friends, as you may have heard, The Roadster Factory, a respected British Car Parts business in PA, suffered a total loss in a fire on Christmas Day. Read about it, discuss or ask questions >> HERE. The Triumph Register of America is sponsoring a fund raiser to help TRF get back on their feet. If you can help, vist >> their GoFundMe page.
  • Hey there Guest!
    If you enjoy BCF and find our forum a useful resource, if you appreciate not having ads pop up all over the place and you want to ensure we can stay online - Please consider supporting with an "optional" low-cost annual subscription.
    **Upgrade Now**
    (PS: Subscribers don't see this UGLY banner)
Tips
Tips

Drivers Floorplan Dimensions needed

Patrick67BJ8

Obi Wan
Silver
Country flag
Offline
I have new floorplans and forgot to get the dimensions for the locations of the seat tracks, insulation panel & exhaust hangars for my BJ8. Anyone having them please PM me or post here. This is a frame up restoration and I didn't know the new floorplans would not have what I assumed they should have.
Thanks,
Patrick
 

bob hughes

Luke Skywalker
Country flag
Offline
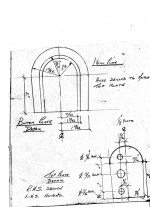
If things work out correctly, this is a shot of the reinforcement to the floor seat belt fixing, the holes are to the outside of the car - away from the centreline.

The floor pan is indented with a tear drop along side the seat and the anchorage is at the fat end - obviously.

On my BJ7 there was a bottom plate welded to the underside of the floor and there was a top plate of some 3mm thick to bring things level with the surrounding floor.

I had to make new when I installed the new floors

Bob

darn, didn't work out

That's better
 

Attachments

  • 26307.jpg
    26307.jpg
    87.3 KB · Views: 287
OP
Patrick67BJ8

Patrick67BJ8

Obi Wan
Silver
Country flag
Offline
GregW said:
Hey Patrick,
Here is an old post from John Loftus that shows the seat hole locations. BJ7 Seat Mounting Holes
I found this one and it's accurate. What's giving me problem(s) is fitting the insulation panel and exhaust bracket underneath the car.
I have another lsiter who contacted me via PM that is going to send me a drawing that should help me with the undersides.
Thanks!
Patrick
 
OP
Patrick67BJ8

Patrick67BJ8

Obi Wan
Silver
Country flag
Offline
Patrick67BJ8 said:
GregW said:
Hey Patrick,
Here is an old post from John Loftus that shows the seat hole locations. BJ7 Seat Mounting Holes
I found this one and it's accurate. What's giving me problem(s) is fitting the insulation panel and exhaust bracket underneath the car.
I have another lister who contacted me via PM that is going to send me a drawing that should help me with the undersides.
Thanks!
Patrick
Forgot to mention my car is a BJ8.
 

GregW

Yoda
Platinum
Country flag
Offline
Patrick67BJ8 said:
Forgot to mention my car is a BJ8.
No need, your handle says it all. :wink:
The heat shield is fairly easy to locate once the seat rail holes are drilled. There are two larger holes in the shield that are access ports for the rails nuts, so you can remove the seat without taking the shield and exhaust off. So centering the shield holes on the rail holes will give you the location of the six holes for the shield bolts.
 
OP
Patrick67BJ8

Patrick67BJ8

Obi Wan
Silver
Country flag
Offline
GregW said:
Patrick67BJ8 said:
Forgot to mention my car is a BJ8.
No need, your handle says it all. :wink:
The heat shield is fairly easy to locate once the seat rail holes are drilled. There are two larger holes in the shield that are access ports for the rails nuts, so you can remove the seat without taking the shield and exhaust off. So centering the shield holes on the rail holes will give you the location of the six holes for the shield bolts.
Front two or rear two holes? I compared the original insulation panel against the replacement and they are close enough. However the insulation panel sets against the left rail with no room between it and the rail. A tight fit! The exhaust mount holes are going to be tricky too.
Patrick
 

bob hughes

Luke Skywalker
Country flag
Offline
MMmmm

Most interesting post, I will be working on this area of my car this winter / spring with a new foor and sills, I do have my original bolt positions for the exhaust, they are under a sheet of metal placed over what was left of the original floor by a PO under what can only be described as lousy restoration. Patrick, I would be interested in getting any info that you gleen even though my car is a BJ7.

Bob
 
OP
Patrick67BJ8

Patrick67BJ8

Obi Wan
Silver
Country flag
Offline
Bob Hughes said:
MMmmm

Most interesting post, I will be working on this area of my car this winter / spring with a new foor and sills, I do have my original bolt positions for the exhaust, they are under a sheet of metal placed over what was left of the original floor by a PO under what can only be described as lousy restoration. Patrick, I would be interested in getting any info that you gleen even though my car is a BJ7.

Bob
Will share all info. Info still coming "in". Hindsight, I should have made a template BEFORE the new floorpans were installed but I assumed they would have been drilled and insulation studs attached along with exhaust studs, etc. No such thing as a dumb question and never assume! Best part about a frame up is that the whole subchassis is painted and everything is new or repainted, etc. and all I have to do is not scratch the paint doing it. No stress!!! lol
Patrick
 

GregW

Yoda
Platinum
Country flag
Offline
Glad those dimensions are coming. I wouldn't be able to help completely since I installed a custom exhaust. Though I don't think those measurements are critical. There should be two mounting holes on the rear outrigger for one of the hanger buffers. Building the hanger and installing it on the outrigger should yield you the holes to drill for the other side of the mount. The front mount I believe hangs between the two head pipes in the radiused cut out of the heat shield. Did you figure out the heatshield placement? All the info is in my post, kinda like an Encyclopedia Brown mystery. :wink:
 
OP
Patrick67BJ8

Patrick67BJ8

Obi Wan
Silver
Country flag
Offline
GregW said:
Glad those dimensions are coming. I wouldn't be able to help completely since I installed a custom exhaust. Though I don't think those measurements are critical. There should be two mounting holes on the rear outrigger for one of the hanger buffers. Building the hanger and installing it on the outrigger should yield you the holes to drill for the other side of the mount. The front mount I believe hangs between the two head pipes in the radiused cut out of the heat shield. Did you figure out the heatshield placement? All the info is in my post, kinda like an Encyclopedia Brown mystery. :wink:
Update - Got the seat track dems and heatshield info but no exhaust hangar dems yet. A good friend told me that the exhaust dems are not that important since most of the exhaust vary anyway. I'm holding out for those because they would be usuable even though the exhaust might vary...a starting/reference point. Anyone starting, stalled or in the middle of this project, the seat track dems are right on. Before drilling the holes though, I would place the heatshield inside the car and tweak the two holes in it to align up with the two seat track holes. I have both original and replacement heatshields and they are right on with a slight hole fluxuation. However, I will be able to trim the heatshield with my table saw 1/4" to get a perfect fit for it.
Patrick
 

elrey

Darth Vader
Country flag
Offline
You take care with the dust while trimming that heatshield! :yesnod: Asbestos! A serious health hazard, no kidding. :nonono: Use a respirator and vacuum. :yesnod: At least a dust mask. :yesnod:
 
OP
Patrick67BJ8

Patrick67BJ8

Obi Wan
Silver
Country flag
Offline
elrey said:
You take care with the dust while trimming that heatshield! :yesnod: Asbestos! A serious health hazard, no kidding. :nonono: Use a respirator and vacuum. :yesnod: At least a dust mask. :yesnod:
The new heatshield material is a cement product from the UK called "Master Board". It is the equivalent of the USA's "Hardie Board" product. No asbestos for me!! Thanks for the reminder!! All of my original asbestos panels will have patterns traced/made and then thrown away.
Patrick
 
Similar threads
Thread starter Title Forum Replies Date
dougie Did Big Healey Drivers Go Soft? Austin Healey 8
K TR2/3/3A Another electrical problem: Park light & 5ignal light on Drivers side are brighter than....... Triumph 3
R Wanted Looking for an original AH 3000 Mk1 Drivers Manual 1102B. Austin Healey Classifieds 1
gbtr6 Wanted: '96 LHD Drivers side master window switch panel. Jaguar Classifieds 0
C Wanted triumph spitfire mk2-3 drivers seat bucket Triumph Classifieds 0
HealeyRick Healey Drivers at F1 Montreal Austin Healey 2
DornTRoriginal TR2/3/3A Tub gap between Frame Drivers side Triumph 3
B Wanted I'm looking for a boot [trunk] lid and drivers rear fender for a 100/6 or 3000 Austin Healey Classifieds 0
HealeyRick What Healey Drivers Look Like Austin Healey 21
K TR4/4A Any daily drivers? Triumph 8
CJD General Tech The Story of New Drivers Triumph 12
T 100S Drivers Handbook Austin Healey 8
charleyf TR6 Plate on drivers side front inner fender Triumph 6
K MG Midget rear drivers side spring sag? Spridgets 7
F XKE SIII Drivers Door Mirror Knob Jaguar 1
maxwedge5281 drivers side 4 inch vent hose Austin Healey 5
DNK Wedge Traggic Day for 2 Holland Drivers Triumph 11
E With frame on level stands my drivers front fender is 1 inch higher than the pass? Austin Healey 5
T Question on removing drivers front lower wishbone Triumph 7
aeronca65t MG Drivers MG 0
Marvin Gruber T-Series TD or TF drivers door handle needed MG 9
dougie The Drivers - TV Series Racing 1
R BE Drivers Seat Spridgets 2
af3683 TR2/3/3A TR3 Drivers Side Defroster Vent Triumph 11
jlaird Drivers Handbooks Spridgets 11
M Drivers seat setback Austin Healey 2
M 1985 XJ6 Drivers door lock Jaguar 5
Marvin Gruber Drivers side vent glass BJ8 Austin Healey 2
jlaird Put the drivers seat Spridgets 4
PeterK Central Maine Triumph drivers Triumph 28
IanF Spitfire Clutch question for Spit drivers... Triumph 13
V Older Triumph Drivers may remember the days Triumph 19
davidk Drivers seat is too wide! Triumph 4
B Up-dated Pics! completely restored the drivers seat Spridgets 16
Woodie drivers door adjustment Spridgets 4
S White disk in drivers seat 1979 Midget? Spridgets 3
jlaird Impact drivers, and proper use of same Spridgets 8
B Looking for a BE [BugEye] drivers door? Anyone? Spridgets 20
3 Found a car, any cross country drivers out there? Triumph 2
PAUL161 MGB 1972 MGB Owners Manual / Drivers Handbook MG 2
JPSmit Drivers side fender removal Spridgets 1
mgbmedic drivers seat does not recline MG 4
KLUTZ Wedge Question for all TR7 drivers Triumph 9
B What do Healey drivers do when the cars are finished? Austin Healey 5
D Early Elans as daily drivers? Lotus 21
CDK Conclave Drivers Austin Healey 3
huck6 Mini for Tall Drivers? British Motor Corp 8
JamesD Width Dimensions for Trailer Ramps Austin Healey 1
35 Siddeley MGB MGB Armstrong shock dimensions wanted MG 0
Editor_Reid Healey 100 Chassis Dimensions Austin Healey 5

Similar threads

Top