• Hi Guest!
    You can help ensure that British Car Forum (BCF) continues to provide a great place to engage in the British car hobby! If you find BCF a beneficial community, please consider supporting our efforts with a subscription.

    There are some perks with a member upgrade!
    **Upgrade Now**
    (PS: Subscribers don't see this gawd-aweful banner
Tips
Tips

Tri-Carb Project

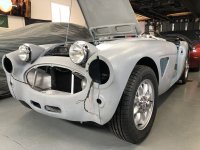
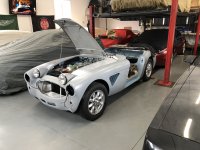
All sounds good! I love what you've done.

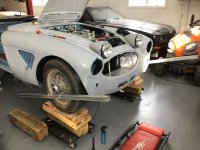
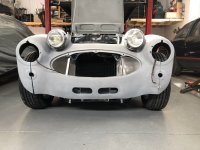
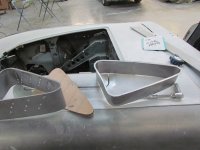
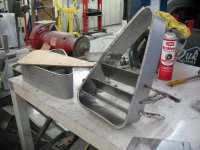
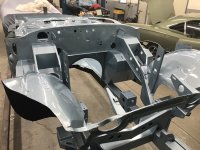
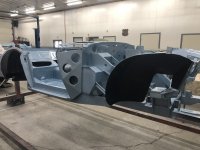
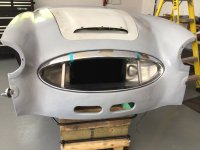
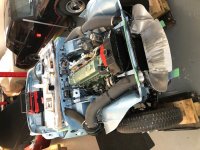
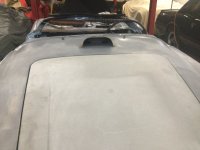
I didn't use full depth vents either. Since my guy custom made the vents from my patterns from Pat Moss's car, we, like you, thought they looked better not quite so large (deep). See pics.: Shows full depth original Works vents housing on left with my shorter custom housing on right. Of note is the carb access panel

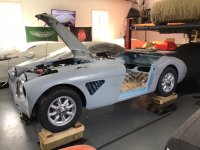
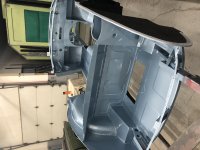
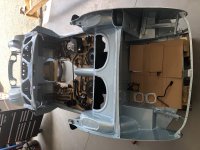
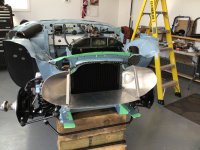
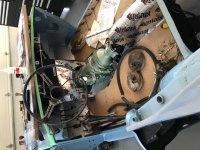
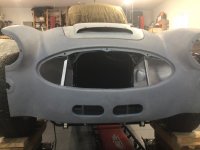
That said, we liked the airflow improvement with the upper footwell reshape so added that.... earlier pics.

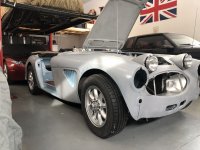
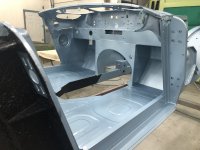
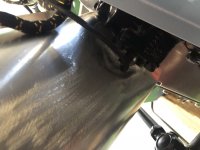
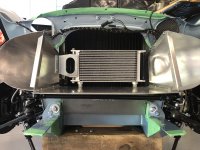
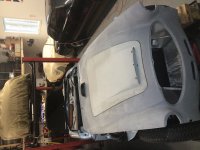
On the oil cooler ducts, we also discussed the dissimilar metals issue. My guy, who I've worked with on projects for some 30 years, was confident he has a permanent sealer that would make this a non-issue.... so installed and sealed them up. I guess if he's wrong I won't be alive to worry about it ;) .
 

Attachments

  • IMG_3139.JPG
    IMG_3139.JPG
    2.8 MB · Views: 320
  • AH Side Vents S50 IMG_1595.jpg
    AH Side Vents S50 IMG_1595.jpg
    730.3 KB · Views: 269
Now the fun can start , or it will do once I get it home and some cars get picked up to make some working room for me in my shop . Paint and black epoxy needs a few days to harden up fully before bringing her home .
So that’s the 2012 Toyota Blue .
 

Attachments

  • 6D279BE2-11CD-4D31-9C7B-757724034D51.jpeg
    6D279BE2-11CD-4D31-9C7B-757724034D51.jpeg
    2.5 MB · Views: 239
  • 299798DF-5353-4E2B-887C-ECF4D1B0915F.jpeg
    299798DF-5353-4E2B-887C-ECF4D1B0915F.jpeg
    2.4 MB · Views: 227
  • B2327B9C-E12E-4A59-B0A0-6CA6FA8F3F24.jpeg
    B2327B9C-E12E-4A59-B0A0-6CA6FA8F3F24.jpeg
    2.2 MB · Views: 233
  • D6021673-E02D-4A51-8E39-C17BF97B8B33.jpeg
    D6021673-E02D-4A51-8E39-C17BF97B8B33.jpeg
    2.3 MB · Views: 260
Lockdowns, broken ankles , forced time off work ......
A couple of winter resident cars have gone home so it’s time to get building . Just waiting on an order of parts from AutoFarm and I can start wrenching .
 

Attachments

  • 14E3D739-A299-4657-A2BB-72B93ACA1D8B.jpeg
    14E3D739-A299-4657-A2BB-72B93ACA1D8B.jpeg
    2.8 MB · Views: 230
Haven't posted progress in awhile so here’s a few pics .
I have had that rally duct in and out more times than I can think of . It was a pain to fit and AH spares (where it came from) were no help at all.
It fit in the body only mock up but once the steering box was in there was no way it would fit and look right .
I ended up taking it all to pieces and fitting each piece individually. The main problem was clearance for the steering box , hence the custom bulge on the drivers side intake to clear it .
Maybe the rally cars had different steering boxes or they just jammed the duct in and we’re not as fussy as to how it fitted or what it interfered with .
The duct sides now sandwich between the lower rad mounts using the same bolt holes .
Just some final cosmetic tweaks and it can all be scuffed with wire wool then clear coated ready for final assembly.
My next challenge is the oil cooler ,it will go in front of the rally duct behind the lower custom shroud openings mounted between the front frame rails ,and then I will create an opening in the lower angled panel portion of the rally duct so the air flows through the oil cooler then through the lower portion of the radiator .
waiting on my minilite wheels from the UK then the driveline can go in and I can start refitting outer skin on her .
 

Attachments

  • 44AA1E1C-557F-4D92-AE4B-9B864136EF18.jpeg
    44AA1E1C-557F-4D92-AE4B-9B864136EF18.jpeg
    1.3 MB · Views: 227
  • 21559C78-0149-41B9-A888-F5520C4DC514.jpeg
    21559C78-0149-41B9-A888-F5520C4DC514.jpeg
    1.6 MB · Views: 206
  • A7E6324E-E42A-4161-BC19-CA80285AD5F3.jpeg
    A7E6324E-E42A-4161-BC19-CA80285AD5F3.jpeg
    1.6 MB · Views: 215
  • C4B45005-42DC-4000-A458-00E999E448C8.jpeg
    C4B45005-42DC-4000-A458-00E999E448C8.jpeg
    1.2 MB · Views: 223
Progress looks good! I should have put the oil cooler into the front like yours. I did not do the rally vents either, at the time, I was building our house and was too busy for the customization.
Only one of my cars did I do ALL the modifications that I wanted. And that was an old mini. I can safely say that I now have twice the cost into the car vs the value on the market.
 
Why would you do that?
The air has to go somewhere if it’s a blank panel behind it then the oil cooler won’t cool much .
 
So a couple more shots , my custom bump is all smoothed out . A shot behind shows why it had to be done to clear the steering box .
Im having second thoughts about the oil cooler location
Below the duct where the white writing is on the panel behind the crossroad with a slot for airflow cut basically where the white letters are or above where I have it standing with holes drilled for the hoses from below .
 

Attachments

  • 7097F79D-635A-4EFA-8F53-0A312663C3C2.jpeg
    7097F79D-635A-4EFA-8F53-0A312663C3C2.jpeg
    2.8 MB · Views: 244
  • 78297F61-6C99-41AC-8AD4-9C8DF350A8BB.jpeg
    78297F61-6C99-41AC-8AD4-9C8DF350A8BB.jpeg
    2.4 MB · Views: 228
  • 712A9151-4ABB-423C-BDCB-F802FF8B62E3.jpeg
    712A9151-4ABB-423C-BDCB-F802FF8B62E3.jpeg
    3.3 MB · Views: 231
More progress . , getting there slowly .
I did some surface prep on the shrouds on the outside to about 70% done , they have gone back to my paint guy so he can paint the inside and get them to 90% outside before going back on the car .
I did resolve the cross rod issue , Boy racer was absolutely correct . Steering arms were upside down ie reversed etc .
 

Attachments

  • BB29373F-7FE4-4FBB-ADA0-4E939FEF142F.jpeg
    BB29373F-7FE4-4FBB-ADA0-4E939FEF142F.jpeg
    1.7 MB · Views: 229
Havent posted in a while , been busy . Anyways heres a few pics .
I was hoping to have rebuilt carburetors and instruments by now but Covid has put a dent in those plans .
 

Attachments

  • 331DE909-D46B-42D1-AD8A-F65C64354C21.jpeg
    331DE909-D46B-42D1-AD8A-F65C64354C21.jpeg
    114.7 KB · Views: 198
  • 3ED166F2-FD14-4778-9DE4-785404DC3C7A.jpeg
    3ED166F2-FD14-4778-9DE4-785404DC3C7A.jpeg
    88 KB · Views: 195
  • C964055A-5ECC-4A19-9E90-A19E440171E5.jpeg
    C964055A-5ECC-4A19-9E90-A19E440171E5.jpeg
    111.9 KB · Views: 215
More progress , front and rear shrouds on , rear fenders on but need tweaking . Scuttle scoop done . Oil cooler etc all done .
dash stripped and recovered , checking all the switches and stuff this afternoon prior to reassembly .
Instruments have gone to West Valley for repair/restoration , carbs have gone to Apple Hydraulics for overhaul .
it’s beginning to look like a Healey again . 👍
 

Attachments

  • B67F537D-C47F-43CA-8CBA-46E77CB8D392.jpeg
    B67F537D-C47F-43CA-8CBA-46E77CB8D392.jpeg
    1.5 MB · Views: 189
  • F85D540B-F80E-45B8-9D04-110DDF9CC827.jpeg
    F85D540B-F80E-45B8-9D04-110DDF9CC827.jpeg
    1.4 MB · Views: 189
  • 2760D6D8-499B-4CCB-B94B-F4D6A80D4279.jpeg
    2760D6D8-499B-4CCB-B94B-F4D6A80D4279.jpeg
    1.7 MB · Views: 202
That all looks great - first class! Congrats on the progress.

Please pardon me if this was already covered somewhere, sometime, but the scuttle vent, is that for cockpit ventilation?
Yes , the car will have the original factory hardtop on all the time so ventilation is the key . If you blow up the pic you can see I have installed two of the rubber boots that are used on top of the heater box , they will have hoses directed down into the footwells .
Im going to fabricate a small picture frame with mesh insert to add to the front of the intake . I will carry a roll of masking tape in the car so should I get caught in the rain I can mask it off to stop the water getting in .
 
Got another milestone done today . Been putting this off as it required me to drill holes for nutserts in the shroud .
Anyways I waited a year for those rally pods from Dave Hardwick but I think it was worth it now .
PS the jig for alignment is Patent Pending 😁.
Now I can finalize the work on the trim rings I made/modified and get them rechromed .
The rally look is coming along nicely . 👍
 

Attachments

  • C3CA5CB5-CE58-4C5B-BEDA-478A96EC5A8E.jpeg
    C3CA5CB5-CE58-4C5B-BEDA-478A96EC5A8E.jpeg
    1.5 MB · Views: 187
  • 56587637-4E3C-4BD6-8028-07E017312EB9.jpeg
    56587637-4E3C-4BD6-8028-07E017312EB9.jpeg
    1.5 MB · Views: 178
  • E4D0F070-55AC-4881-A584-7A13E3F6FE74.jpeg
    E4D0F070-55AC-4881-A584-7A13E3F6FE74.jpeg
    1.6 MB · Views: 177
Wheels with brand new boots going on this weekend (195/65x15s) so I can do the roll test to get my speedo calibrated .
Going to have to get my calculator out as there’s no way I can roll the car 52ft 9 1/2” etc etc as it’s minus who knows what temp outside and lots of snow . So it will be see how far the car goes over one revolution and extrapolate it out .
will post pics of them on the car soon .
 

Attachments

  • 01A053FA-CC0D-48F0-9952-48EDA7AE9593.jpeg
    01A053FA-CC0D-48F0-9952-48EDA7AE9593.jpeg
    2.4 MB · Views: 167
Healey Nut, been a while since i visited this thread....delighted to see your progress!!

I'm also making progress... engine running well on a stand in the shop.... body work modifications are done, primed but not painted ... . chassis modifications done, albeit the chassis needs media blasting and painting. Nevertheless, progress. I took the differential in on Monday to be rebuild and swap in 3:54 gears (of course you know, the originals are 3.9). Sorry I didn't see this earlier, I have a set of rebuilt tri-carbs I might have parted with for your build. Oh well, I like them on the shelf for ???.... who knows why??.. right next to the original tri-carb manifolds!!??? Some things just aren't easily explained.

By the way, I love the jig for the rally lights!... perfect....I'm confident the patent will be approved.
 
I'll be performing at Laguna Seca Raceway April 21-24th during SVRA's Tran's Am Speedfest > 2022 Trans Am SpeedFest | SVRA <
if you want to see a tri-carb Big Healey in action competitively......
My "break-in" event this fall with the new motor at UMC in Salt Lake City went well......:cheers:


SVRA UMC-LK #6.jpg
 
That would be something to see Dougie, but with border restrictions, etc., etc., I doubt it will be happening for me.
😉
 
Last edited by a moderator:
Wheel alignment done using my Pat pending method , new boots on ready for speedo calibration roll. Once she’s had the brakes bled and off the blocks .
shes looking like a little rally car now
 

Attachments

  • F8EC8D38-71DE-46CC-8AFA-18B26B32F0C8.jpeg
    F8EC8D38-71DE-46CC-8AFA-18B26B32F0C8.jpeg
    1.5 MB · Views: 162
  • 9BE9D3FF-876A-4DED-913A-6CA85BE15592.jpeg
    9BE9D3FF-876A-4DED-913A-6CA85BE15592.jpeg
    1.5 MB · Views: 166
Got the car down today to do the roll test for speedo cal . Stance of the car shows now with lowering kits front and rear .
It actually settled a bit lower after all the back n forth rolling . Going to need to buy an extra low profile race jack for this one .
 

Attachments

  • BEAC96EE-5096-40A1-B0AD-C9ADACD51760.jpeg
    BEAC96EE-5096-40A1-B0AD-C9ADACD51760.jpeg
    2.4 MB · Views: 150
  • 55EF8F4B-22AF-4010-9BFD-B2A0A05BADD7.jpeg
    55EF8F4B-22AF-4010-9BFD-B2A0A05BADD7.jpeg
    2.6 MB · Views: 153
  • 9F3B2192-53A7-440B-A5B0-8698CF29AFEB.jpeg
    9F3B2192-53A7-440B-A5B0-8698CF29AFEB.jpeg
    2.5 MB · Views: 154
  • B4BF4E09-2903-4183-B3B3-72299CB5B126.jpeg
    B4BF4E09-2903-4183-B3B3-72299CB5B126.jpeg
    2.6 MB · Views: 168
Back
Top