• The Roadster Factory Recovery Fund - Friends, as you may have heard, The Roadster Factory, a respected British Car Parts business in PA, suffered a total loss in a fire on Christmas Day. Read about it, discuss or ask questions >> HERE. The Triumph Register of America is sponsoring a fund raiser to help TRF get back on their feet. If you can help, vist >> their GoFundMe page.
  • Hey there Guest!
    If you enjoy BCF and find our forum a useful resource, if you appreciate not having ads pop up all over the place and you want to ensure we can stay online - Please consider supporting with an "optional" low-cost annual subscription.
    **Upgrade Now**
    (PS: Subscribers don't see this UGLY banner)
Tips
Tips

Tips & tricks on installing upright air compressor

JodyFKerr

Jedi Knight
Offline
Hey folks,

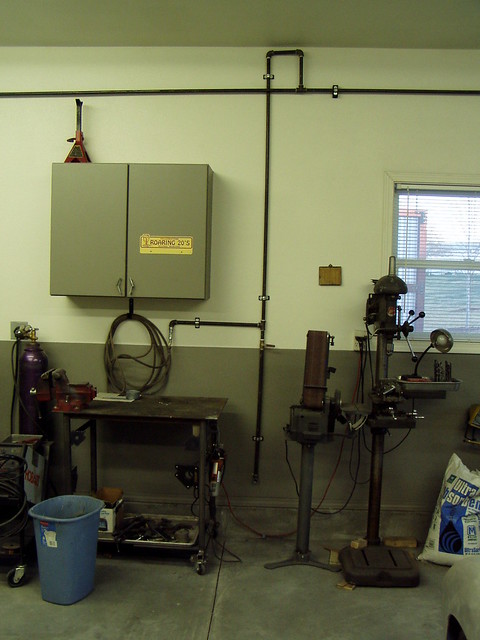
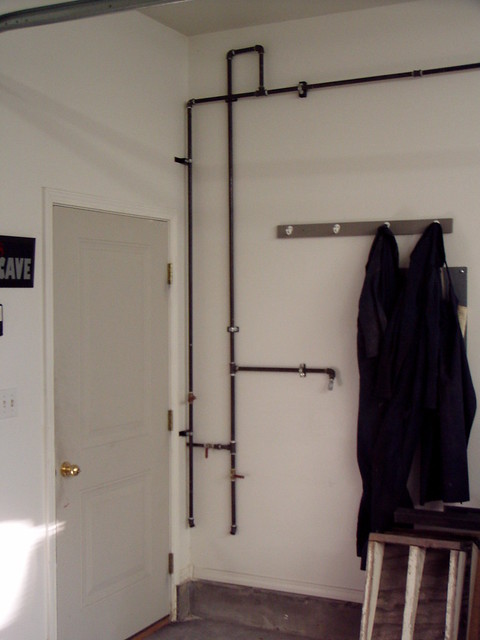
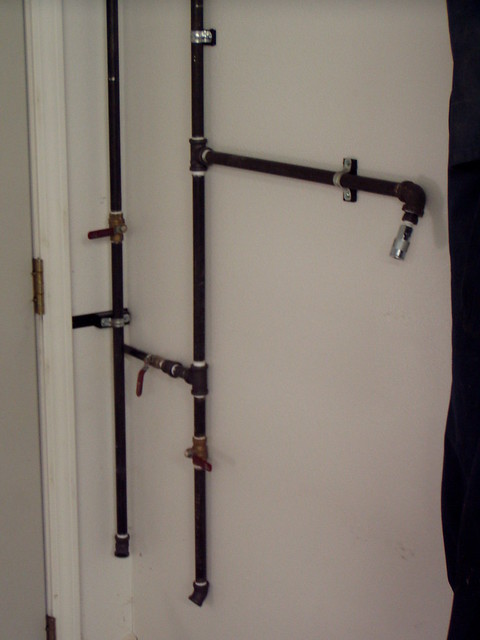
The wife finally gave me the OK to get some new tools. :smile:

Bought a 60 gallon upright (the medium sized HF one). Any tips and/or recommendations on the best way to install/setup this thing?

The one tip I remember from my Studebaker days was to cut squares from an old tire to put under the feet to absorb vibrations.

Jody
 

TR3driver

Great Pumpkin - R.I.P
Offline
If it is as top-heavy as my 80 gallon, then I would definitely suggest anchoring it to a wall or something. I used a "water heater earthquake" anchor kit from HD.

I also built a frame of pressure-treated 2x4 for it to stand on, then added some elbows & pipe to bring the drain valve out where it is easily accessible. Eventually I plan to hook up the automatic drain valve, but for now I just use a small ball valve (again from HD).

I've got a long pipe run from where the compressor is (back yard) to the garage, which had to be lower than the compressor outlet. So I made a deliberate "water leg" near the compressor, with its own drain valve, and sloped all the pipe towards it (so the water would run towards the low spot).

The air I get now is much drier than before (with the hose tapped directly into the side of the tank); the blast cabinet works much better and the die grinder doesn't spit water any more.
 

JPSmit

Moderator
Staff member
Silver
Country flag
Offline
+1 on the external drain valve
 

DNK

Great Pumpkin
Country flag
Offline
TR3driver said:
...

I've got a long pipe run from where the compressor is (back yard) to the garage, which had to be lower than the compressor outlet. So I made a deliberate "water leg" near the compressor, with its own drain valve, and sloped all the pipe towards it (so the water would run towards the low spot).

The air I get now is much drier than before (with the hose tapped directly into the side of the tank); the blast cabinet works much better and the die grinder doesn't spit water any more.

A drawing would be nice Randall
 

TR3driver

Great Pumpkin - R.I.P
Offline
DNK said:
A drawing would be nice Randall

I'm sure it would, but I'm too lazy to do one. A better written description will have to do.

Basically, from the outlet at the top front of the tank, I have a couple of elbows (to get it pointed the right way with a bit of downhill slope), a ball valve, then a flex line and more elbows to run the pipe back to the wall that the compressor is mounted against. Then the pipe turns straight down the wall and runs into a tee, with the side branch from the tee pointing towards the garage. The bottom of the tee has an automatic drain (likewise not hooked up yet) and a ball valve for manual draining.

The side branch has two street ells, so that the run towards the garage can slope towards the tee, plus a union (to make it easier to assemble and disassemble for tightening joints, etc.)

The overall effect is somewhat like the green section shown here:
https://www.tptools.com/StaticText/airline-piping-diagram.pdf except for me, the marked 8" rise is over about 60' of pipe.
 

TRMark

Jedi Knight
Bronze
Country flag
Offline
Here is how installed my air system. I would like a better air compressor, this one does not have enough cfm. The main feed line goes downward at a slight angle. This whole thing is designed to get rid of moisture. A little over kill using black pipe, but it is supposed to condense moisture better.

7040524783_4c61f359f8_c.jpg


6894427996_7400d14334_z.jpg


7040523659_e78fa5b11e_z.jpg


6894427644_14741d4feb_z.jpg
 
OP
JodyFKerr

JodyFKerr

Jedi Knight
Offline
That looks like a pretty slick set up! I'm starting simply, get it running, wall mount a regulator, then hook up my 50' of air hose.

Despite having family visiting and functions to go to over the weekend I managed to get the unit wired in, and a lot of junk removed from the garage. Now I just need to position/bolt down the unit, mount the regulator and I should be good to go (at least temporarily.

I do know that when I add the wall lines I'm going to want a split between the plumbing that supplies my Media cabinets and the line that powers tools. That way I have driers on the blasting leg and oilers on the tools leg.

Jody
 

elrey

Darth Vader
Country flag
Offline
I'd run more line before the water trap/regulator, that way the air can cool and more water will condense out in the initial trap.
 

TRMark

Jedi Knight
Bronze
Country flag
Offline
I agree, that would be better. I didn't have the room to run a longer horizontal before going up and I didn't want to go up a ladder to change the desiccant or drain the trap. In fact I could probably skip the desiccant trap all together since I am not going to do any auto painting. I need to run a line down the adjacent wall to the opposite wall to my other workbench. But it does work better than a hose laying on the floor.
 

Bayless

Yoda
Silver
Country flag
Offline
That's a really nice looking setup. :cheers:
 

elrey

Darth Vader
Country flag
Offline
One can always lay a 25'coil on the floor or hang it on the wall. That way you leave your set up intact. Nice workplace, I like your vintage drill press. :cheers:
 

TRMark

Jedi Knight
Bronze
Country flag
Offline
elrey said:
I like your vintage drill press. :cheers:


Its an old Atlas model 74. My father and law gave it to me years ago. Wouldn't want to be without it.
 

PC

Obi Wan
Country flag
Offline
On the drain line, keep in mind that when you crack the valve you'll get a spray of rusty water. Depending on your tube diameter it can be quite a blast. Be sure to route it somewhere that won't be a problem.


elrey said:
One can always lay a 25'coil on the floor or hang it on the wall. ...
You never want to mount a coil flat to the wall. You'll get multiple low points collecting water. You want every point in the line to slope toward a deliberate drain point.


pc
 

PAUL161

Great Pumpkin
Silver
Country flag
Offline
For your basic question, just make sure it's anchored to the floor or wall. I prefer bolting it to the concrete floor with cinch bolts. Then make sure it's on it's own circuit breaker. The rest is just how much money you want to spend. pj
 
OP
JodyFKerr

JodyFKerr

Jedi Knight
Offline
Thanks for all the tips guys. The compressor is in and wired now. :smile:

And the wife let me get a bigger media cabinet too! So now I have two cabinets. The old one has been converted to soda blasting. It's so nice being able to media and soda blast with enough CFM that I don't have to stop every 60 seconds to let the compressor catch up.
 

elrey

Darth Vader
Country flag
Offline
As an onsite finish carpenter I find myself setting up shop in a new place all the time. Sometimes there is not much room . I find that keeping a 20 to 25 foot hose between my compressor and my water trap/ filter/ regulator allows the air to cool down enough to make a great difference in the amount of water that accumulates in the trap. Sometimes I just leave the hose coiled on the floor. It seems to work for me. Of course I break down my setup frequently so the water never stays in the tube for long. I meant either leave the hose coiled on the floor or hang it uncoiled on the wall near the ceiling so that it drapes down to the trap. I have my trap and reg. on a portable 10 inch square sled so if I am a distance from my compressor [sometimes 200'+] I can regulate the pressure near my work. My main concern regarding my home setup is clean air for painting the %#!$ car. so my trap lies 20 ' past a black pipe that has a setup much like TR mark's except that the pickup for the air t's up off of the main line that slopes back to the drain leg. Again, good point on the wall coil collecting water in the low points. I suppose my floor coil method may have problems also but at least the water condenses out before it hits my trap and then the nail guns. This forum is great, I find myself thinking a little deeper on many subjects that I might not otherwise. A wonderful learning tool. Thank you folks for your wisdom. :cheers:
 
Similar threads
Thread starter Title Forum Replies Date
60Bugeye Sprite Body Work Tips & Tricks For A Novice? Restoration & Tools 24
regularman Any windshield installation tricks, tips? Spridgets 17
S TR2/3/3A tips for mig plug welding vertically? Triumph 11
J Tips for quarter elliiptic spring install Spridgets 3
W TR6 Anyone add Exhaust tips to standard exhaust Triumph 4
PC DIY tips from Bo his self Other Cars 0
BoyRacer Need Tips on getting wiring harness through firewall Austin Healey 4
BoyRacer Tips on gluing new fabric to dash on my BT7 Austin Healey 10
HighAltitudeTR3 TR2/3/3A Leaky Carb Tips? Triumph 11
HighAltitudeTR3 TR2/3/3A Choke setting tips? Triumph 7
drooartz Installing front hubs, tips? Spridgets 15
bugedd Bench bleed tips Spridgets 14
S TR4/4A Electrical wiring tips Triumph 2
I Tips for installing intake manifold plugs in a stock Bugeye? Spridgets 6
TEM666666 Sprite MK1 Door liner rubber mat installation.. Need tips and recommendations. Spridgets 22
F Buying a 100.... tips Austin Healey 18
drooartz MGB Changing clutch hose - tips? MG 13
T Tips for Searching FORUM Navigation Questions 2
T TR4/4A Any tips on re-torquing TR4a head now that 500 are on the rebuild Triumph 7
T TR4/4A Tips on controlling heat coming up through shifter opening? Triumph 14
M tips please on removing starter motor on 100-6 Austin Healey 6
gbtr6 TR6 Rebuilding TR6 Engine, Tips? Triumph 7
bugedd Su adjustment tips Spridgets 7
B Seam Sealer/Caulking - Any Tips on When, Where, and What to Apply? Austin Healey 45
C Any tips on how to remove frozen pistons from drum brake Wheel Cylinders??? Austin Healey 11
PatGalvin TR2/3/3A Carpet Install Tips Triumph 12
Bob_Spidell Tips Austin Healey 6
Tinkerman TR2/3/3A Front Fender Installation Tips Triumph 3
Tinkerman TR2/3/3A Windscreen mounting tips 1960 TR3A Triumph 2
W Looking for tips: BJ8 roll up windows Austin Healey 10
I TR6 Any tips on removing flasher switch Triumph 3
M Radiator Hose tips? Spridgets 0
T TR4/4A Any tips on running the overdrive switch wiring down the steering column? Triumph 11
T TR4/4A Making an OD pressure gauge - any tips? Triumph 7
bugedd About to rebuild front end...any tips? Spridgets 5
B Spitfire Changing leaf spring bushing - any tips? Triumph 6
RedTR3 TR2/3/3A Tips for Breaking in a Rebuilt TR3 Engine Triumph 6
apbos Two Restoration Tips Spridgets 11
J Tips on Re-Assembling Lenses/Gaskets? Austin Healey 5
TulsaFred Rear Hub bearing and oil seal tips Spridgets 0
5 TR2/3/3A TR3 engine building tips needed Triumph 5
TulsaFred Bugeye rear wheel cylinder replacement tips Spridgets 10
Lbp Install l-t-d fasteners on new tonneau - Tips? Triumph 8
T Wheel cylinder fitting kit - any tips? Triumph 4
D Spitfire '65 Spit window regulator installation tips needed Triumph 0
J 67 IRS Exhaust Tips Triumph 2
RickB Painting tips anyone? Spridgets 13
RJS Water Pump Replacement Tips Triumph 8
Russ Austin TR2/3/3A TR3 Transmission Installation Hints / Tips Please! Triumph 14
aeronca65t Kasnter tips Triumph 8

Similar threads

Top