• Hey there Guest!
    If you enjoy BCF and find our forum a useful resource, if you appreciate not having ads pop up all over the place and you want to ensure we can stay online - Please consider supporting with an "optional" low-cost annual subscription.
    **Upgrade Now**
    (PS: Subscribers don't see this UGLY banner)
Tips
Tips

Rear shroud repair

robolab

Senior Member
Country flag
Offline
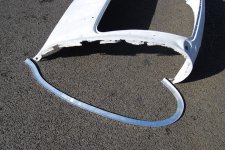
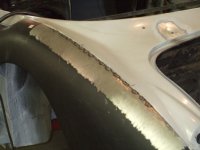
I want to repair the edges of the rear schroud of my BJ8. I must manufacture edges stripes as represented in the picture.
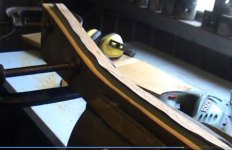
I will try to bend the Alu-stripes between hardwoodparts as shown in the example picture. Is it possible and which Aluminium-alloy should I use and which sheet metal thickness I am supposed to choose.

Gerd


attachment.php
attachment.php
 

Attachments

  • dsc_0708_med.jpeg
    dsc_0708_med.jpeg
    147.3 KB · Views: 389
  • shroud_1.jpg
    shroud_1.jpg
    38.8 KB · Views: 385

Keoke

Great Pumpkin
Country flag
Offline
Gerd !

I forget the thickness but the aluminum is very close to pure which I think is # 6000.

Man that repair strip looks great--:applause:
 

BoyRacer

Jedi Warrior
Country flag
Offline
The alloy you want is 3003 and the thickness is the same as your shroud... .060". I am assuming that the aluminum in your photo is a very light gauge if you can form that tight of a radius using only wooden forms. I would offer two tips. First, anneal the aluminum as it will make working the aluminum much easier. Secondly, using a shrinker will help you get that tight radius.
 

vette

Darth Vader
Country flag
Offline
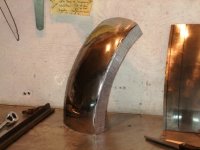
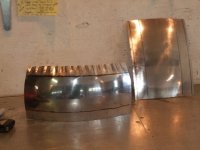
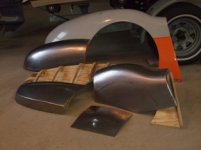
What you are trying to accomplish is very much possible. As suggusted by "boyracer" the shape of a new flange is easily done with shrinking jaws. Even relatively inexpensive ones such as bought from Eastwood Co.
You may be able to do it in the wooden form you have made, but the requirement of shrinking the flange as it bends still needs to happen. As you hammer it over the wooden form the edge will buckle and pucker up like a ribbon. Just keep hammering on the ruffles and the metal will be crushed into itself which accomplishes the shrinking. Annealing the aluminum will help the process but if the shrink or stretch is not drastic it may be done without the annealing. If you can't get the shape you want on the wooden form then you will have to get some shrinking jaws. About the thickness of the meta. I don't work with aluminum much, but when I do steel, I like to work with 19 gauge. Recently a metal supplier talked me into trying 22 gauge. I don't like it, it's just a tech too thin. 19 gauge steel holds its shape really well. So I would suggest 19 gauge for the aluminum because I think that will be enough and will be able to be worked fairly easily. Here are some pics of the possibilities. The last pic is a stretched flange because it is an outside radius. Dave.
 

Attachments

  • DSCF1467.JPG
    DSCF1467.JPG
    46 KB · Views: 165
  • DSCF1465.JPG
    DSCF1465.JPG
    43 KB · Views: 163
  • Copy of DSCF0875.JPG
    Copy of DSCF0875.JPG
    22.6 KB · Views: 154
  • Copy of DSCF3029.JPG
    Copy of DSCF3029.JPG
    40.5 KB · Views: 156

vette

Darth Vader
Country flag
Offline
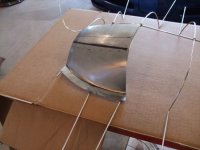
Here's a pic of welding the flange back on. I had to cut the flange off the new fender to rework the radius because it did not match the car. I then had to weld the flange back on with the fender bolted up to the car because every time I tried welding it off the car, I distorted the fender too much. I eventually made a barrier out of a 6 inch piece of copper so that when I welded i did not burn into the aluminum shroud. Of course this is steel, I have been using a tig welder from my son-in-law but had to give it back. Here I am using a mig. But for aluminum you really need tig. Dave.
 

Attachments

  • Copy of DSCF0724.JPG
    Copy of DSCF0724.JPG
    40.1 KB · Views: 192

BoyRacer

Jedi Warrior
Country flag
Offline
Thin steel is a lot easier to weld than thin aluminum. The rear shroud alloy is actually .062 inch thick. That's approximately the same thickness as 16 guage steel. And that's fairly difficult to weld with TIG even at that thickness. I would not recommend trying anything thinner for those flanges.
But, I have an idea. Forget about trying to do the entire flange as one piece. Do it in sections. Clamp the 1" flange part in a curved hardwood form and bend over just enough material that you can weld into the existing shroud material. I hope that made sense. Without a shrinker, you're gonna have a heck of a time creating that rear section tight radius... instead, trace the desired shape of the flange onto a big piece of aluminum and then you only have to worry about creating a very small flange to weld to.
 
OP
R

robolab

Senior Member
Country flag
Offline
Thank to everyone for the answers.

Roger, your proposal is exactly what I have planned. The first trials with a 15-inch long piece of 16 gauge aluminum have been very successful. So i will order the necessary aluminium and hardwood.

Gerd
 

andrea

Jedi Knight
Country flag
Offline
Richard
I can confirm your procedure - I have saw on a flat plate 1,5m tich of aluminium, some segments of my shroud profile, re-copied on hard board ,
then Mauro TIG welded the segments over the oldest rest of aluminium of the shroud, not easy but I can follow the original shroud profile and in some cases I can also have the same bolt holes traces-
At the definitive rebuilding, I put over the conection a lot of Lityum grease (water resistent)to insulate the different metals,and avoid eletrolitic reaction
 
OP
R

robolab

Senior Member
Country flag
Offline
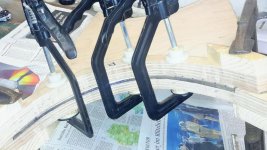
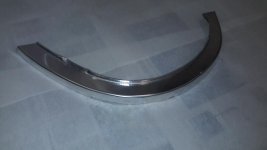
After a first test, I decided to make the side pieces of two parts. The first parts of the side pieces (LH and RH) I have bent in the wooden template The photos show the wooden template and one of the manufactured Curved sections.

attachment.php
attachment.php
 

Attachments

  • shroud_1.jpg
    shroud_1.jpg
    61.4 KB · Views: 233
  • 20151118_165035.jpg
    20151118_165035.jpg
    21 KB · Views: 242

BoyRacer

Jedi Warrior
Country flag
Offline
That sure looks pretty. Questions: What kind of wood are you using for the forms and is the alloy .062" thick?
 
OP
R

robolab

Senior Member
Country flag
Offline
I used an existing 2 cm thick beech plywood board, but i think you also can use other hardwood boards. The alloy material thickness is 1,5mm (0,059"), that is a common thickness in Germany.
 
Similar threads
Thread starter Title Forum Replies Date
T Rear Shroud Repair Austin Healey 3
B Rear shroud connection to the floor pan on a BJ7 Austin Healey 21
R Rear Shroud Rivets Austin Healey 6
R Mounting rear shroud rain gutter Austin Healey 14
B BT7 Rear Shroud Austin Healey 2
P BN1 Rear Chassis-to-Shroud Extensions Austin Healey 1
maxwedge5281 two seater rear shroud Austin Healey 15
B Painting underside of front and rear shroud - Original prep and color? Austin Healey 3
T Help ! Rear shroud measurement Austin Healey 14
5 Rear license plate shroud holes location Austin Healey 4
W BN2 rear shroud holes Austin Healey 2
Superwrench Rear shroud sealer Austin Healey 3
Superwrench Healey Rear Shroud Restoration & Tools 0
A who was asking for a bn2 rear shroud? Austin Healey 0
H Rear shroud for 2 seater Austin Healey 10
Barryp Rear shroud removal advice Austin Healey 5
F BN1 Rear Shroud Rivets Austin Healey 8
R BJ-7-Top frame connected to rear shroud? Austin Healey 3
R Holes in rear shroud-BJ7? Austin Healey 1
petnatcar Rear View Mirror Relocation Austin Healey 0
Carlbanan56 MGB Rear axel torque? MG 4
petnatcar Rear View Mirror Relocation Austin Healey 0
trbby2 TR4/4A TR4A Intermittent rear wheel locking? Triumph 19
Carlbanan56 MGB Rear wheelbearing clicking MG 8
Carlbanan56 MGB MGB rear break rebuild MG 6
B BJ8 Rear Backrest Hinges Austin Healey 4
F For Sale E Type Series II front and rear bumpers good condition Jaguar Classifieds 0
bigjones TR2/3/3A Rear tail light not budging Triumph 5
5 Wanted Wanted 1966 mgb banjo type axle rear hub MG Classifieds 0
scottkilpatrick TR4/4A TR4 Rear Brake Drum Removal - Basic Question Triumph 16
J TR2/3/3A TR2 Fitting/mounting rear wing Triumph 11
Michael Oritt Rear Crank Seal Kit Austin Healey 7
BT7 Owner Rear Crankshaft Bearing Cap Austin Healey 4
O Jaguar rear window trim repair Jaguar 1
Joel Lester TR2/3/3A Is "later" style rear view mirror taller than the "early" style? Triumph 6
S Leaking HD6 Rear Carb Austin Healey 10
B Rear Brake Cylinders Austin Healey 4
WHT BJ8 Rear Seat Surround Drain Tube Grommets Austin Healey 0
Joel Lester TR2/3/3A Do rear leaf springs wear out? Triumph 11
J TR2/3/3A Rear Fuel Line Clips Triumph 3
apbos New long term project. Sprite powered rear engined race car. Spridgets 9
60BN7 Rear Wheel Opening Austin Healey 9
glemon TR5/TR250 Answering My Own Question Rear Tube Shock Conversion Numbers TR4a-TR6 Triumph 0
S TR2/3/3A rear wheel cylinder Triumph 1
K TR2/3/3A Rear tire pressure when there is an anti roll bar at the front of the car? Triumph 1
T Rear/Differential "Clunk" Austin Healey 2
AUSMHLY BJ8 Rear Seat Squab Austin Healey 0
jfarris For Sale TR3 Rear Sway Bar Triumph Classifieds 0
J 3000 Rear Seats Austin Healey 6
KVH General TR Rear Brake Shoe Orientation Triumph 12

Similar threads

Top