• Hey there Guest!
    If you enjoy BCF and find our forum a useful resource, if you appreciate not having ads pop up all over the place and you want to ensure we can stay online - Please consider supporting with an "optional" low-cost annual subscription.
    **Upgrade Now**
    (PS: Subscribers don't see this UGLY banner)
Tips
Tips

Installing rear brake shoes

bigjones

Jedi Warrior
Bronze
Country flag
Offline
How do you get them darn brake shoes back on!?

This must be a dumb question because I searched the archives and Googled with no luck. Obviously, I'm the only one that spent 2 hours in a wrestling match.

There must be some sort of PROCEDURE that professional mechanics follow.
 
Country flag
Offline
Refit is the reversal of removal. :wink:

Seriously, are these the late model style or early?
 
OP
bigjones

bigjones

Jedi Warrior
Bronze
Country flag
Offline
Trevor,
Yeah! Thats what the manual says!
Anyways, 1500 Midget, so that would be late model.
Cheers
 
Country flag
Offline
First be sure if have them oriented correctly. Then fir the upper portion in place and leave the lower part of the shoes on the outside of the hub. with the lower spring in place you can stretch the lower spring and get the lower portion of the shoes seated into the adjuster.
Be sure that the adjuster is backed out and the E-brake is off.
 

JPSmit

Moderator
Staff member
Silver
Country flag
Offline
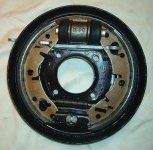
here is the definitive picture. As I recall, I put the springs in place on the shoes - then placed the two shoe ends in the brake cylinder ends and then pried the bottoms on to the adjusting nut side. (I don't even know that I had the adjustment bolt in or if it was, it was as loose as possible.
 

Attachments

  • 15924.jpg
    15924.jpg
    95.4 KB · Views: 1,382
OP
bigjones

bigjones

Jedi Warrior
Bronze
Country flag
Offline
JP,
Is that photo for the driver or passenger side. Or does it matter? The reason I ask is that on mine the slot (rather than the big hole) for the hand-brake lever is on the right. I ASSumed this was correct and thats how I re-assembled. I seem to remember this is important. Haynes is hedging its bets and shows both positions. Bentley is t*** on a boar pig.


Chris,
Yeah! And I won in the end but there has to be a better way.

Trevor,
Thanks for the reply - I think I still need some clarification on which way the shoes are supposed to go.

Cheers
 

sparkydave

Jedi Knight
Country flag
Offline
I have found that slipping the shoes in with the upper spring connected and finessing the shoes into the piston slots and parking brake lever seems to work well, then hooking the lower spring in. Yes, one shoe goes "up" and one goes "down", although they appear to be identical parts otherwise. I believe the picture above is correct; the curved end of the parking brake lever goes into the large hole, and the square end that's part of the lever arm goes in the flat slot. I just use a pair of skinny vice grips to hook the lower spring on. Watch out for the adjuster wedges falling out while you are doing this.
 

bthompson

Jedi Warrior
Offline
Yep, the shoes are made the same all around; no fussing with which is R and which is L. Just turn one upside down to make the holes for the E-brake and springs line up! The E-brake lever is the key, as I remember...the lever end fits into the slot-shaped hole. The shoes pop in just like JP said: Put the springs on first, fit the upper ends into the piston, and pry the lower ends into the adjuster slots. Took me a while at first...once you find The Secret, it'll take no time at all.
 

bgbassplyr

Darth Vader
Offline
AWAIR, when the backing plate is attached to the axel housing and the axel is there, there are places to use as a fulcrum for prying the shoes onto the adjuster. The 'right' size pry bar is the secret.
 

JPSmit

Moderator
Staff member
Silver
Country flag
Offline
so, to recap

1. yes, passenger side - drivers is mirror image
2. yes, the pads are identical - one up one down
3. yes, pry them on as per what everyone says - though I didn't find it difficult

good luck
 

tosoutherncars

Jedi Knight
Offline
All above is correct; just to note, the "blank" spots on the pad go on the leading friction edge; 1 and 7 o'clock on the p/side, 11 and 5 o'clock on the d/side. As I understand it, this is to avoid rapid wear and the need to readjust shortly after installing.

Which reminds me, one more thing to add to the spring 'to do' list... adjust rear brakes!
 

tosoutherncars

Jedi Knight
Offline
Look at the face of the brakes, as though it were the face of an analog clock. The reliefs in the pads are at approximately 1 o'clock and 7 o'clock on the passenger side, and 11 and 5 on the driver side.
 
OP
bigjones

bigjones

Jedi Warrior
Bronze
Country flag
Offline
Well,

You're not going to believe this but I took the Midget out for a test drive and now when I apply the hand-brake at about 20mph there is this rat-tat-tat noise. What could that be?

I took the drum off to see if anything had come loose and guess what. The poxy wheel cylinder is leaking.

No big deal to replace and I'm glad I found out in time but I can't find the source of the noise.
 

bgbassplyr

Darth Vader
Offline
Maybe:
Outer brake cable hitting somewhere when inner cable tightening causes it to distort slightly.
 
OP
bigjones

bigjones

Jedi Warrior
Bronze
Country flag
Offline
bgbassplyr,

Thanks - you may be on to something. I did mess with the cable last time - tried adjusting the cable but found it to be at its limit (- ie it has stretched too much). Good you mentioned that - I'll add a new brake cable to the list of parts.

BTW, I have a theory on why the hub is contacting the brake cylinder boots and actually cutting into them - the DPO used a circlip but did not replace the washer (which is NLA). The cylinder is therefore loose.

Onward and upward,
Cheers
 

bgbassplyr

Darth Vader
Offline
Try getting the cable shortened and install a piece of rubber hose over outer cable where it is hitting.
 
Similar threads
Thread starter Title Forum Replies Date
TR6oldtimer Installing Rear Brake Cylinder Triumph 9
RedTR3 Installing new rear brake shoes Triumph 5
PeterK Installing rear brake drums Triumph 5
55modified Rear anti-roll bar. Is it worth installing on a BN1? Austin Healey 22
D Installing a rear bumper guard?????? Triumph 5
H TR2/3/3A TR3- installing rear leaf springs = nightmare.... Triumph 5
jlaird Installing the rear main cap cover correctly: Spridgets 3
Wana Installing new rear shocks Austin Healey 8
J Installing Adapter Hubs for Wire Wheels on a Bugeye Austin Healey 5
S Installing a Radiator Fan Austin Healey 9
G Installing New Rocker Shaft Assembly Austin Healey 3
W Need advice on installing new side curtain glass Spridgets 1
Bayless Help please installing bonnet release cable Spridgets 8
M TR6 Installing Retrosound? Triumph 4
S TR2/3/3A Installing the distributor pedestal. Triumph 3
K TR2/3/3A Question about installing the steering wheel control head? Triumph 1
A TR6 Installing differential and transmission Triumph 10
Z Installing Toe Board Panels Austin Healey 1
K TR2/3/3A Installing Brake Caliper pistons into the bore? Triumph 21
CJ Burton MGB-GT Installing Seat Covers for 1962 - 1967 MGB GT MG 0
A Early 1967 AH Sprite - installing steering column and new directional switch? Spridgets 0
B Installing cam bearings 1275, can I do it? Spridgets 1
bighealeysource Installing stainless steel brake hose on BN2 Austin Healey 5
steveg TR6 Installing stock trailing arm bushings on the car - is it possible? Triumph 2
steveg TR6 Installing adjustable trailing arm brackets Triumph 7
T Installing Garmin GPS in a BJ7 Austin Healey 19
F Installing AC in my 1960 Healey Austin Healey 14
S TR2/3/3A technique for installing a door Triumph 5
R TR2/3/3A Installing wiring harness in steering column Triumph 59
R TR2/3/3A Installing gas tank Triumph 6
C Installing rubber grommets in firewall? Austin Healey 6
S TR2/3/3A installing a fuse in the red tail lights Triumph 4
S TR2/3/3A installing the wiring harness Triumph 8
R Installing Sprite Luggage Rack Spridgets 9
Lukens TR2/3/3A Installing a throttle. Triumph 2
J Powertune booster for a bj8 , trouble installing Austin Healey 2
B TR2/3/3A Installing dzus fastners in bonnet Triumph 8
D Prepping Floors Before Installing Interior Restoration & Tools 6
drooartz Installing front hubs, tips? Spridgets 15
E TR4/4A Wiring the horn when installing a Moto -Lita steering wheel Triumph 4
K TR2/3/3A Installing Moss wheel spacers? Triumph 5
D BT7 tri-carb installing my crank Austin Healey 4
aero3113 Installing Front rotors to hubs Austin Healey 2
C Advice for installing a 3000 Grille??? Austin Healey 7
B MGB Installing new upper fulcrum bushings MG 5
B MGB Installing upper fulcrum bushings MG 0
S TR4/4A procedure for installing gauges etc Triumph 0
I Tips for installing intake manifold plugs in a stock Bugeye? Spridgets 6
55modified Help installing toggle dip switch on dash for lights. Austin Healey 23
TRMark TR4/4A Installing a new windscreen Triumph 9

Similar threads

Top