 Hey there Guest!
 Hey - did you know if you click on the title of a thread it will take you to the first unread post since you last visited that thread?
 but were afraid to ask:
  STOP!! Never post your email address in open forums. Bots can "harvest" your email! If you must share your email use a Private Message or use the
  smilie in place of the real @
 Pretty Please - add it to our Events forum(s) and add to the calendar! >>
T
Tinster
Guest
Guest
Offline
I'm finally attending to minor but important details-
now that my car seems a tad more reliable that in the past.
When purchased, my car had a hand brake handle but the hand
brake did not seem to function, even a little bit. DPO Pedro
said it needed adjusting.
I later found out there were no cables connecting the handle to
the rear brakes. I purchased the entire Roadster Factory
hand brake kit but it did not include the arm itself.
Blah, blah, blah I now have a mostly functional handbrake
that will hold my car on a minor incline.
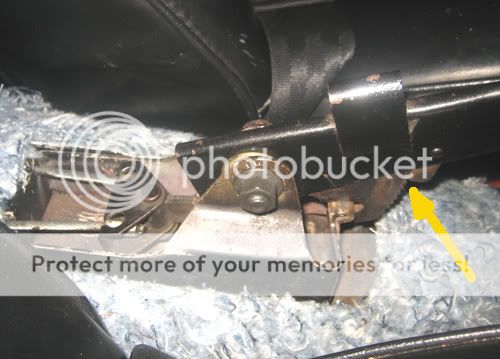
My problem is with the existing arm. It has a spring sticking
out of the end with a black plastic button on the end. Neither
seem to serve any purpose.
I must pull the hand brake arm upward with one hand, while
pushing the toothed piece into the matching toothed piece.
To release, I have to pull the handle more upward, pinch the
toothed piece and pull it away from the matching toothed piece.
Somehow that spring and button are involved but nothing happens
when I push them.
Any and all suggestions welcomed,
dale
now that my car seems a tad more reliable that in the past.
When purchased, my car had a hand brake handle but the hand
brake did not seem to function, even a little bit. DPO Pedro
said it needed adjusting.
I later found out there were no cables connecting the handle to
the rear brakes. I purchased the entire Roadster Factory
hand brake kit but it did not include the arm itself.
Blah, blah, blah I now have a mostly functional handbrake
that will hold my car on a minor incline.
My problem is with the existing arm. It has a spring sticking
out of the end with a black plastic button on the end. Neither
seem to serve any purpose.
I must pull the hand brake arm upward with one hand, while
pushing the toothed piece into the matching toothed piece.
To release, I have to pull the handle more upward, pinch the
toothed piece and pull it away from the matching toothed piece.
Somehow that spring and button are involved but nothing happens
when I push them.
Any and all suggestions welcomed,
dale

 A friendly reminder - be careful what links you click on here. If a link is posted by someone you don't know, or the URL looks fishy, DON'T CLICK. Spammers sometimes post links that lead to sites that can infect your computer, so be mindful what you click.