• Hey there Guest!
    If you enjoy BCF and find our forum a useful resource, if you appreciate not having ads pop up all over the place and you want to ensure we can stay online - Please consider supporting with an "optional" low-cost annual subscription.
    **Upgrade Now**
    (PS: Subscribers don't see this UGLY banner)
Tips
Tips

BE Rear Brake Spring Orientation

Jim_Gruber

Yoda
Country flag
Offline
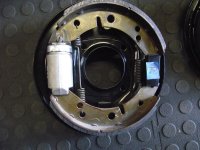
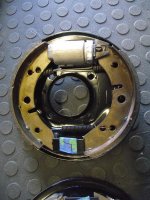
Which way do the Rear Brake Springs Go on Bugeyes? The first Picture shows current install on LR which has springs in front of the shoes. Installing like that causes the Springs to look like picture 2 until the anti rattle Springs are installed. My Shop Manual says, " The interrupted return spring must be fitted on the wheel cylinder side and both springs must lie between the brake shoes and the backplate." to me that says springs must go behind the shoe.

What's right guys. I've been fighting this basta_d for 3 1/2 hours now. The pics I have on file for a later car show springs in the back. However another set of shoes and rear brakes I was modelling from also has springs in the front. Which was is correct. I want to be done with this horrible job and now the prospect of taking apart the LR is daunting. I know this takes practice but I'm not liking this part of the job as all.View attachment 43911View attachment 43912
 
OP
Jim_Gruber

Jim_Gruber

Yoda
Country flag
Offline
OK so the only way it goes on is with the Springs at the back. But as soon as I try to lever it into place the frigging bottom spring pops off. 6 times now. back at it.
 

Rut

Obi Wan
Country flag
Offline
Jim,
Away from all my info, but are those early BE back plates or later ones? Regardless the spring goes on the backside and I've had better luck installing one spring before installing the shoes and installing the second spring after with a hooked tool. I also have a set of expanding locking vise grips that come in real handy for this type of work. Good luck!
Rut
 
OP
Jim_Gruber

Jim_Gruber

Yoda
Country flag
Offline
Rut, Early backing plates for now. Discs and upgrade master come later. Lessons Learned include:

1) Double check that the guy who started this brake rebuild actually completed the job correctly. And don't assume the guy tightened all of the Brake Union Bolts or Bleeder Valves or anything else that needed tightening.
2) Springs do go on the backside. I was following the LR as an example and it indeed was put together wrong and I need to fix that still. After 7 hours on hands and knees fighting this bastard I'm exhausted.
3) that lower Spring Return needs to go on the second notch. There are two holes on the brake shoe that lower spring can connect to. Go for the second one.
4) Be sure to have plenty of Brake Cleaner handy when you overfill the Master Resevoir which I did several times,
5) All of the pics show brake install without the Axle in place. Yes that would have made things easier but I didn't want to try that on top of everything else.

To Do to finish brakes:

1) LR need to take apart and put springs on the correct way
2) Will be much quicker now that I know the correct order and way it goes together
3) E Brake needs to be changed out but that can wait until I change out the rear backing plates and updrade to front discs
4) Adjust E-Brake it doesn't do anything right now
5) Bleed the brakes and of course I can't find my Mighty-Vac in the garage. It's in there I know as I used it 2-3 years ago. May resort to buying another. Easier that tearing the garage apart .

6) Bleed Clutch and see if I can get any action there.
7) Change Engine oil
8) Check and many sure Tranny has oil in it.

9) Figure out how to get engine to start. Not getting spark right now. A mystery at this point. Need time to look at it.
 

vette

Darth Vader
Country flag
Offline
Jim, I hope you don't mind my buttin in since I am not the typical BE mechanic. I do have a big Healey and spend time on the big Healey forum. Just 2 weeks ago a gal brought to me a BE because the brakes kept locking up. I too had to go over the complete brake system to see what a previous mechanic had done, right or wrong. I had all the wheels brakes apart and then put on new shoes on the front. I too struggled with reassembly. But note that the springs as I originally found them were on the back of the shoes and they used the outer most holes, the holes that made the springs the tightest. I then found the best way to get the springs and shoes on there. Hang the shoes together with the springs, slide them around the axel flange and mount into position, WITHOUT THE ADJUSTERS IN PLACE. After the shoes are in position with the springs holding them there, then use a screw driver to lever up the end of the shoe to slide the adjusters into place. Hope you find that this will help. Dave.
 
OP
Jim_Gruber

Jim_Gruber

Yoda
Country flag
Offline
That's exactly what I needed to do. Unfortunately I was going by what PO had done in installing new brakes all around. Now I need to go and look at the Front to make sure he didn't install the front brakes wrong. I still need to fix the LR Hopefully tonight. Now that I figured out the RR, hopefully I won't have 5-6 hours into the project fixing the LR. I also need to go around and make sure all of the connections are tight. Discovered that Bleeder Valves weren't tight as well as a defective wheel cylinder that was leaking. It's always something. Thanks.
 

Gerard

Luke Skywalker
Country flag
Offline
Jim,

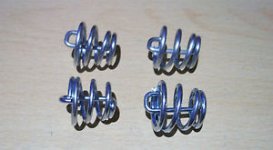
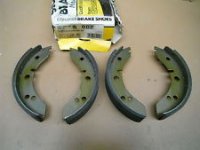
The springs go on the back side - always. The spring with the two separate coils go on the wheel cylinder side; the heavy spring opposite. The beehive bring you have are incorrect and look way too big. My only concern being they might stick out enough to hit the drum. Also, most people think the shoes should be mounted mirror image, left to right. This is incorrect, and will not produce the desired effect. Also, the correct shoes have a notch for the Micram adjuster at one end. If they don't have the notch, they are not the correct shoes.

The way Dave describes the process of hanging the shoes is how I do it.

I've attached some pix of some assembled back plates before being installed on the car. The beehive springs are not shown installed, but I have attached a pic of what the correct ones looks like.

DSCF3922.jpgDSCF3923.jpgbeehive springs.jpgbrake shoes.jpg
 
OP
Jim_Gruber

Jim_Gruber

Yoda
Country flag
Offline
Gerard,

I've got some beehive Springs off of another set of backing plates. A little rust but substantially smaller. Did not get to the LR tonight but I know those were assembled wrong. Front Springs, do they also go in the back. I'm betting if the P.O. did the rears wrong, the fronts will be wrong as well. Another night and I'll have them fixed.

7/18
Just time for a little job today but an important one. Gas Pedal Linkage was frozen up and sticking wide open and the gas pedal had an interesting. 45 degree curve in it. New Pedal and connector linkage arrived today along with a few other parts. Z shaped arm got to soak in Evaporust for several days. That freed up the bushings and a session with the wire wheel mounted in the drill press and some emery cloth shined up the bearing surfaces nicely. Some Rust X Gloss black on the linkage, reinstalled tonight and Bob's Your Uncle. No more sticky throttle and it now looks nice down there. Organ Pedal will come later. Now this job consumed probably 2 hours of time over several days just doing something simple like this. Going to be tough to have it ready for the local show Dayton British Car Days on 8/06/16 . But I'll stay after it.

IMPORTANT QUESTION - I DISCOVERED I LEFT THE PARKING LIGHTS ON AND THE KEY POSSIBLY IN THE RUN/START POSITION. THE ONE AND ONLY BULB IN THE LIGHTING CIRCUIT, THE LICENSE PLATE LAMP WAS GLOWING. NICE TO KNOW IT WORKS BACK THERE BUT IF I LEFT THE KEY IN THE RUN POSITION DID I TOAST MY POINTS/ CONDENSER / COIL?CURIOUS MINDS NEED TO KNOW. BATTERY BACK ON THE CHARGER.
 

Gerard

Luke Skywalker
Country flag
Offline
Depends on if the points were open or closed at the time. Such a thing can damage the coil, but you could have dogged a bullet. You'll know when you run the engine. It start/run fine at startup, but if the coil was damaged, it'll get weak and cause a misfire after it runs for a little while and gets warmed up.

Gerard,

... BUT IF I LEFT THE KEY IN THE RUN POSITION DID I TOAST MY POINTS/ CONDENSER / COIL?CURIOUS MINDS NEED TO KNOW. BATTERY BACK ON THE CHARGER.
 
OP
Jim_Gruber

Jim_Gruber

Yoda
Country flag
Offline
Gerard
Will the engine run, start if the 2 fuses are not installed. Not sure If ignition circuit runs through the fuse block or not. Obviously the parking lamps do not.
 

Gerard

Luke Skywalker
Country flag
Offline
Short answer- yes; the ignition circuit is not fused; neither is the lighting circuit. for that matter.

Power to the ignition circuit is supplied directly from the ignition switch. Turning on the key closes the circuit from the brown/blue wire coming from A1 on the voltage regulator, which gets powered directly from the battery. The same brown/blue wire is powering the lighting circuit when the light switch is initiated. The key on closes the circuit to the white wire, which is the coil circuit and the ignition light, as well as bringing power to the switched side of the fuse block. If you had an electric full pump, it's powered from that same source. It's the green wire side, opposite the white, that is powered through the fuse.

Gerard
Will the engine run, start if the 2 fuses are not installed. Not sure If ignition circuit runs through the fuse block or not. Obviously the parking lamps do not.
 

Rhodyspit75

Jedi Knight
Silver
Country flag
Offline
Maybe it's because I was an electrician all my life but I would never leave the battery connected on unfused 50+ year old wiring. Get a quick battery disconnect. It may save your garage.
 

Gerard

Luke Skywalker
Country flag
Offline
I agree... have 'em on all my cars.

Maybe it's because I was an electrician all my life but I would never leave the battery connected on unfused 50+ year old wiring. Get a quick battery disconnect. It may save your garage.
 
Similar threads
Thread starter Title Forum Replies Date
smaceng Rear Brake hold Down Spring Spridgets 3
M Rear Brake Spring Spridgets 3
scottkilpatrick TR4/4A TR4 Rear Brake Drum Removal - Basic Question Triumph 16
B Rear Brake Cylinders Austin Healey 4
KVH General TR Rear Brake Shoe Orientation Triumph 12
BN6_L1232 Rear Disc Brake Installation Instructions Austin Healey 3
J TR2/3/3A TR3A Girling 9" Rear Brake Initial Adjustment Triumph 9
R TR6 Rear brake wheel cylinder fitment Triumph 5
D Rear Brake Drum Nuts Austin Healey 15
fpstude TR4/4A Replacing Rear Flexible Brake Hoses on TR4A w/ IRS Triumph 11
G Rear Brake Adjustment Austin Healey 30
Kurtis TR4/4A Rear wheel brake cylinder replacement Triumph 1
J TR6 1973 TR6 Rear Brake Operation Questions Triumph 4
R TR2/3/3A Lockeed rear brake banjo fittings. Triumph 7
K MG Midget Early and Later model rear brake shoes.... Spridgets 2
A AH 3000 rear disc brake conversion Austin Healey 28
K TR2/3/3A Rear brake wheel cylinder attachment again Triumph 1
J For Sale Triumph TR3 rear differential and rear brake assembly - Northern Illinois Triumph Classifieds 1
Gliderman8 TR6 Removing Left Rear brake line... help! Triumph 9
Got_All_4 General TR Is there a special tool needed for rear brake cylinders Triumph 14
histerical Wanted WTB Set of Later Spridget Rear Brake Backing Plates Spridgets Classified 0
BN6_2197 Question on rear brake drums BN6 wire wheel Austin Healey 15
warwick-steve Rear Brake cylinder connection Austin Healey 12
Michael Oritt Moss Motors rear brake "set" Austin Healey 11
J Spitfire Spitfire Rear Brake Bleeding Triumph 9
vette Tire Size and Improving Rear Brake Drums Austin Healey 17
regularman Gear leaking from axle housing into rear brake drum Spridgets 3
nevets BN6 rear brake pipes Austin Healey 15
nevets stuck rear brake drum Austin Healey 18
Jim_Gruber Reinstalling Brake Hubs and Wheel Hubs in Rear. Spridgets 5
Jim_Gruber Brake Lines for Bugsy - What do I need for a Flaring Tool / Rear Discs for Bugsy Spridgets 39
C Help diagnosing rear brake issues... Austin Healey 20
W BN1 vs. BN2 rear brake lines / pipes Austin Healey 4
A rear brake drum too tight after rebuild Austin Healey 3
SASSAMON TR2/3/3A Rear Brake Cylinder Recommendations Triumph 2
A TR2/3/3A Newbie Question regarding Girling rear brake cylinder Triumph 5
M suggestions on vendor Rear brake rebuild Spridgets 15
Dave Richards Rear Brake Cylinders not Fitting Hand Brake Lever Austin Healey 2
L RE: Requesting help with identifying suspected rear brake adjuster piece? Austin Healey 4
K TR2/3/3A Rear brake drum won't go on? Triumph 12
RJS TR4/4A Rear Brake Hose Replacement Triumph 7
R Can't remove rear flexible brake hose Spridgets 5
J TR2/3/3A Add brake light to Rear turn signals Triumph 12
Dave Richards BJ8 Rear Brake Kit British Parts Northwest Austin Healey 4
C AH3000 MKIII - Rear Brake Problem Austin Healey 1
P Bugeye rear brake springs??????? Spridgets 5
CJD TR2/3/3A Early Rear Brake Cylinders Triumph 2
J TR2/3/3A Installation of rear brake cylinders for 9" brakes on TR 3A. Triumph 3
bighealeysource recommendation on replacing rear brake cylinders Austin Healey 13
B BJ8 Rear Brake Questions/Advice Austin Healey 4

Similar threads

Top