• Hey there Guest!
    If you enjoy BCF and find our forum a useful resource, if you appreciate not having ads pop up all over the place and you want to ensure we can stay online - Please consider supporting with an "optional" low-cost annual subscription.
    **Upgrade Now**
    (PS: Subscribers don't see this UGLY banner)
Tips
Tips

A couple of TR# questions

powerwagontim

Member
Offline
Hi Guys,
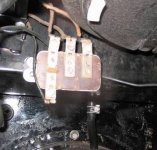
I havent posted in a couple of years as I havent worked on the 61 TR3a in a couple of years. Due to some good naturd pressure from a good friend I have gotten back to work on it. In the last 4 days I have completed the electrical system and chased all of the bugs out. All lights and accessories are working! The one electrical glitch remaining is the overdrive relay. The car had not had overdrive in its past life, this is a transplant. When I flip the switch, the relay gives off a buzzing sound. I did test the solenoid before putting the tranny cover on and it did work, apply power, solenoid throws, remove power, solenoid retracts. Other than double checking that the wires are on the correct terminals on the relay I have not done any other troubleshooting. It is a new Lucas relay. (Maybe thats the problem!) I did go through 2 new Lucas turn signal flashers both of which are faulty. I dug a generic flasher out of the drawer to test and it works like a charm.
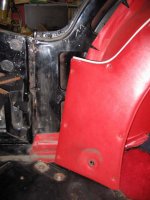
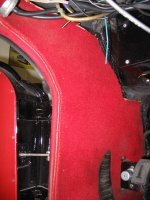
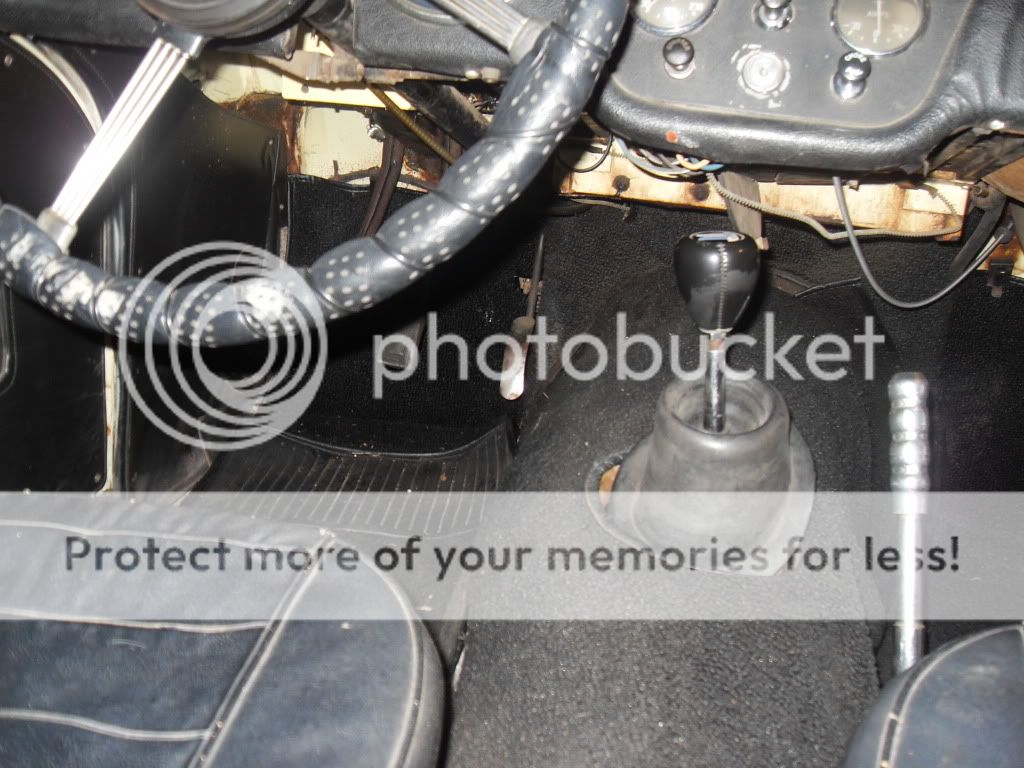
Second question is easier. Starting the carpet/ interior installation. The dogleg panels that screw over the wheel arches come down and stop about 3 inches from the floor. The floor carpet does not go up the sides, so there is a section of green paint showing fromthe back of the door opening to the rear bulkhead, about 3" up from the floor. Should a small section of carpet get tucked in behind the dogleg trim, and down under the floor carpet? This seems like the cleanest treatment. Or, is it just left bare, figuring when the seat is in you wont really see it anyway.
Another question regards the drivers side footwell. The car had a plywood panel with black vinyl stretched over it and swrewed into the foot well. It was notched around the dimmer switch box. The carpet kit comes with pieces of carpet for the same space. I know the carpet is the correct material, but how do you deal with the recess that the dimmer switch sits in? Does the carpet follow that contour, with the dimmer box screwed over the carpet? Or does the carpet mount to a piece of plywood and get notched around the dimmer box?
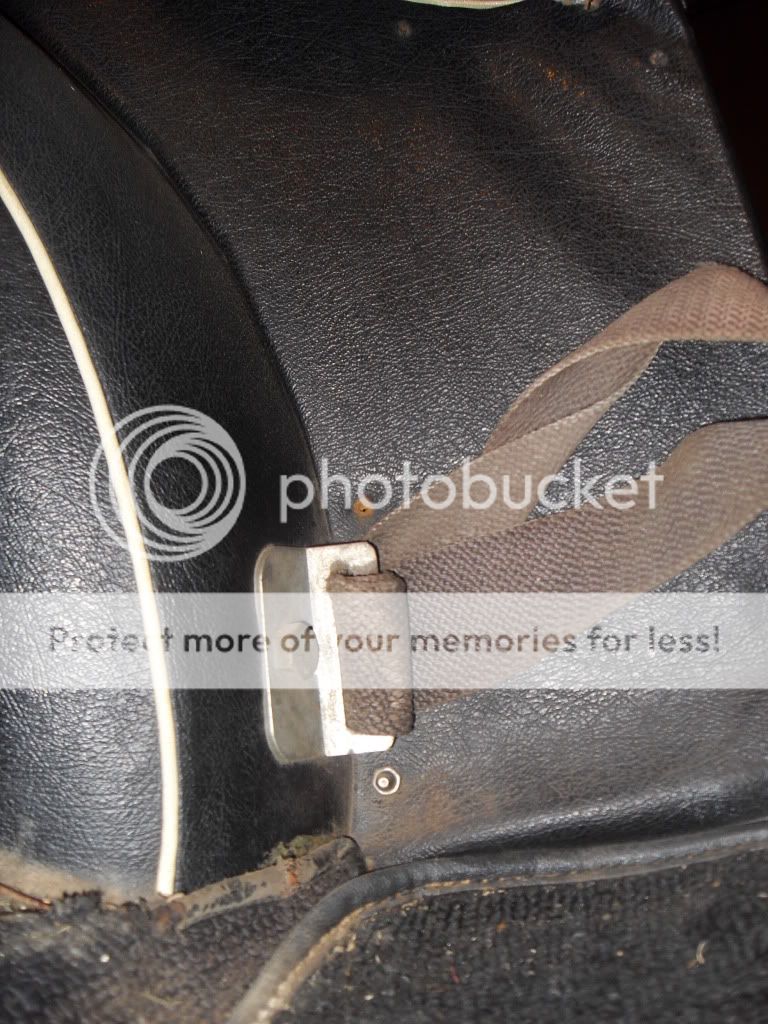
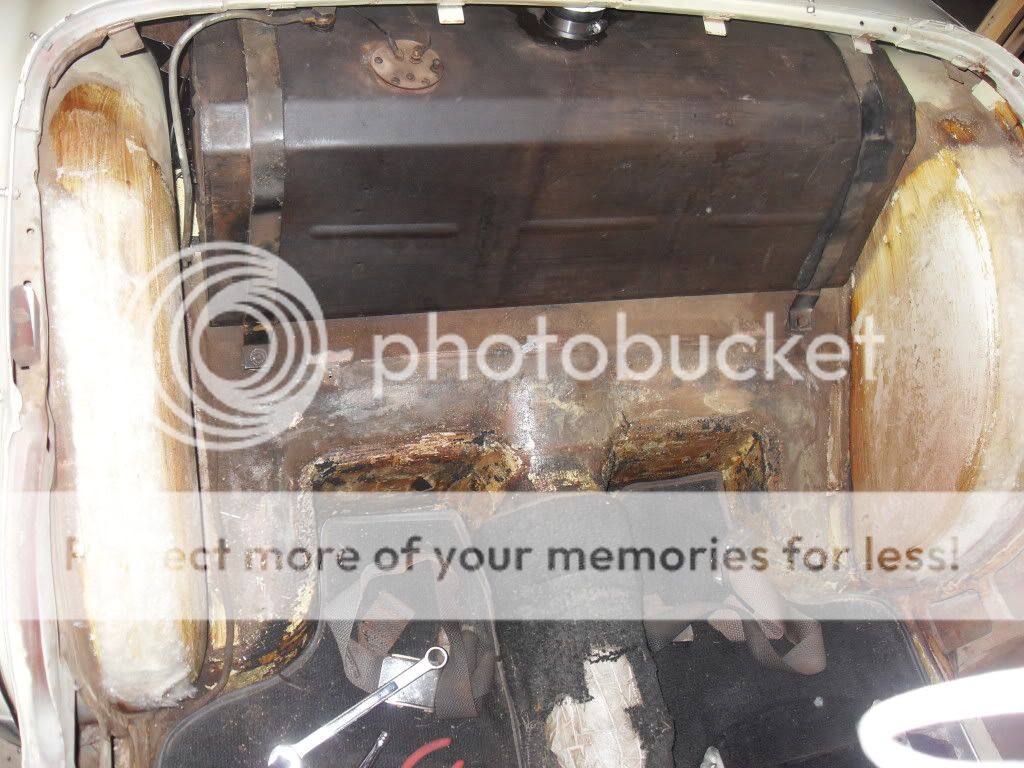
Lastly, seatbelt mounting location? I am thinking of bolting the anchors to the bottom of the rear bulkhead near the floor.
After over 20 years working on this old beast its starting to actually look like a car again!
Mechanically it is all done.
Thanks
Tim
 

Gordon_Dedrick

Jedi Trainee
Offline
Can't comment of the o/d as it is an otion I just WISH I had! On the dog leg, however, 3 inches seems to be a large gap. Is the panel "down" as far as it will go? I found mine would sit a little lower with some wiggling. Even after "wiggle" you will see some body color between the floor and the dogleg. Easiest way to finish is to use a small piece of matching vinyl and cement it behind the dogleg and just under where the carpet meets. Gives you a nice "clean" look.
Re: the driver carpet, I think you will find it will cement into the recessed dimmer area nicely.
Gordon
 
OP
P

powerwagontim

Member
Offline
Hi Gordon,
Thanks for the quick reply. The placement of the dogleg is pretty well established by the top bow holes. Maybe I am exagerating the 3", but it is no less than 2".
As for the footwell carpet, is the correct way to glue in the carpet, then attach the dimmer switch box over it?
Thanks,
Tim
 

Don Elliott

Obi Wan
Offline
That 2" of sidewall gets covered by some vinyl which matches the interior trim. It is glued there.
 

Attachments

  • 20832.jpg
    20832.jpg
    42.5 KB · Views: 458

Don Elliott

Obi Wan
Offline
The sidewalls under the front dash originally had only a piece of masonite about 2" wide all the way up the "A" posts and this also followed that top curve above the door. As for the dimmer switch, there should be no masonite there and the carpet will stay in place when you secure the dimmer switch to the captive nuts on the sidewall.
 

Attachments

  • 20834.jpg
    20834.jpg
    72.6 KB · Views: 453
OP
P

powerwagontim

Member
Offline
Thanks Don,
Those pics were certainly worth a thousand words!
Easy enough to put some vinyl down behind the doglegs, and now I am clear on the dimmer switch question!
Tim
 

ekamm

Jedi Warrior
Offline
capping033.jpg

capping041.jpg

Here are a few pics of where the seat belts on my 3 were. Factory installed I assume. Don shows the same strips of vinyl that I had as well.
 

ekamm

Jedi Warrior
Offline
triumphinterior014.jpg

Here's a poor pic of my footwell. same as yours but near as I can tell not the stock. When I pulled the panels there were two boomerang shaped millboard pieces that the original carpet was attached to. The only available option that I have found is carpet. I am also putting carpet and have not had to figure out ho to do so but hopefully some one will chime in and give us some ideas.
 

Andrew Mace

Moderator
Staff member
Country flag
Offline

TR3driver

Great Pumpkin - R.I.P
Offline
powerwagontim said:
(Maybe thats the problem!)
That would be my second guess. When my original OD relay finally gave up the ghost after some 30 years of service, I had two reproduction relays quit within a matter of weeks! I finally switched to a standard Bosch-type automotive relay, which is still working today (moved it to the project TR3 along with the OD.

I also added a solid-state diode across the relay contacts, to take some of the kickback from the solenoid.

BTW, the forum works better if you ask your questions separately instead of all together. A meaningful subject line will also help you get more responses.
 
OP
P

powerwagontim

Member
Offline
Wow, Thanks Andy and Eric. The template is perfect.
All questions answered in a very timely fashion, it is greatly appreciated.
Only one left (for now) is that foolish overdrive relay. I will play with it some more and see if I can give you guys more info.
I posted a question on a Dodge Ram forum in mid march, and have had 11 folks look at it and zero replies. Quite a different experience here!
Thanks again to all,
Tim
 

bgbassplyr

Darth Vader
Offline
I have nothing to add, just thought I'd try to up the reply count. Baah on the Dodge Ram forum. Take that.

BTW I have 2 Dodges, Caravan and Dakota.
 

Geo Hahn

Yoda
Country flag
Offline
TR3driver said:
...I also added a solid-state diode across the relay contacts, to take some of the kickback from the solenoid...

And I liked that idea so much I did it too. Here is where it is:

OD%20Diode.JPG
 

ekamm

Jedi Warrior
Offline
I looked at a few pics and it looks like the carpet on the kick panels is glued to the footwell. The boomerang shaped piece screws to the area by the a post. I assume that the carpet is also glued to that piece. I will be giving it a go in the next few days.
 
OP
P

powerwagontim

Member
Offline
TR3 Driver,
I somehow missed your post, yesterday. Can you explain the diode modification?
Also do you have a diagram that would translate the Lucas numbers to the Bosch numbers?
Re my heading, TR questions is pretty vague, I had the shift key on when I hit the 3, so it came out as a #. TR3 questions is a bit better, but agreed still lame. I will try to do better next time! :wink:
Thanks,
Tim
 

Don Elliott

Obi Wan
Offline
Here is my original overdrive realy mounted to the two flat-head screws that come through the lowe back wall of my battery box.
 

Attachments

  • 20852.jpg
    20852.jpg
    21.1 KB · Views: 336

TR3driver

Great Pumpkin - R.I.P
Offline
powerwagontim said:
TR3 Driver,
I somehow missed your post, yesterday. Can you explain the diode modification?
Not sure I understand the question ... the OD solenoid like any electromagnet has a considerable inductance, which resists any change in current flow. When the relay contacts open, the inductance tries to keep the current flowing, which means it delivers a rather nasty voltage spike back into the contacts just as they start to open. If you were able to watch the contacts open, you would see a spark jump, which in time will erode and destroy the contact surface, leading to erratic operation and eventual failure. The original relays had oversize contacts made of a special alloy to resist damage from the spark, but apparently replacement relays aren't so rugged. With the advent of cheap silicon diodes, there is no reason for them to have to withstand the arc.

The voltage back from the solenoid is the opposite polarity to what was applied, so your diode installation changes depending on whether your car is still positive ground or (like mine) has been converted to negative ground. Geo's diagram above shows the proper orientation for positive ground.

For most diodes in this size range, the cathode (flat bar in the diagram) is indicated by a white band at one end, so for positive ground, you would connect that end of the diode to ground. The other end gets attached to the same terminal as the solenoid. For negative ground, the end with the white band goes to the terminal.

I can't tell you what part number I used, it was just a junk box diode. But anything rated 1 amp or more, 50 volts or more should do fine. Eg, https://www.radioshack.com/product/index.jsp?productId=2036269&CAWELAID=107591270

You'll probably want to add some sleeving or heat shrink tubing over the diode leads, to prevent any shorts. Here's a shot of my installation. (Please ignore the dirt, I haven't cleaned in a long time.)
 

TR3driver

Great Pumpkin - R.I.P
Offline
powerwagontim said:
Also do you have a diagram that would translate the Lucas numbers to the Bosch numbers?
Here's one (click the thumbnail):


Note that you can just ignore (leave disconnected) any extra terminals like 87a or 87b that your relay may happen to have.
 
OP
P

powerwagontim

Member
Offline
Thanks for the explanation, it now makes perfect sense. And thanks for the number conversion chart. Exactly what I needed. I will troubleshoot it a bit more, and try a bosch relay and see if it starts to behave itself!
Thanks again,
Tim
 
OP
P

powerwagontim

Member
Offline
OK, here is an update on the overdrive question.
I disconnected the yellow/green wire which is the wire that goes to the switch, and then to the 2 interlock switches, then to ground. (See George's diagram above) I connected a test lead from the terminal W2 to ground. Turned on the key, flicked the OD switch and got a nice click from the relay and a quiet thunk from the solenoid. All good sounds. When the yellow/green goes back on W2, key on, all quiet, flip the OD switch, I get an angry buzzing from the relay, and dont hear the solenoid thunk in. Something in the yellow/green wire circuit isnt kosher.
Any thoughts?
Thanks,
Tim
 
Similar threads
Thread starter Title Forum Replies Date
K TR2/3/3A A couple of small distributor tech questions..... Triumph 10
AngliaGT MGB-GT Couple of Dumb Questions - '67 GT MG 11
K TR2/3/3A Couple of choke questions Triumph 1
D BT-7 couple of general questions Austin Healey 6
D Lilly Engine Latest / couple of questions Austin Healey 34
G TR4/4A A couple of engine rebuild questions... Triumph 8
M TR4/4A Dash instruments.......couple of questions. Triumph 5
gbtr6 TR6 Couple of general resto questions Triumph 4
J TR2/3/3A A couple of questions. Triumph 13
BobMunch A couple Questions about later Midget heater cores Spridgets 0
O TR6 Couple of Tr6 related questions Triumph 9
T TR2/3/3A A couple TR3 body questions Triumph 4
T A couple of clutch questions Triumph 9
T TR4/4A Lightening a TR4a flywheel - a couple of questions Triumph 7
D New to MGs w/ a couple questions MG 16
mrv8q Couple ZS 175 questions Triumph 9
walshja couple of questions Spridgets 16
motofiaccone Project start and a couple questions Spridgets 15
Tinkerman A Couple of Chrome Replating Questions. Triumph 5
Tinkerman Couple of Frame Questions Triumph 2
T a couple of questions about springs Triumph 10
S Couple of questions re: 1960 Sprite Spridgets 9
T A couple of quick questions. Triumph 25
M Couple of Elementary Questions MG 2
gsalt57tr3 couple Series 3 questions: Rover / Land Rover 5
IanF Spitfire A couple of quick Spit questions Triumph 6
MedicMan55 Introduction and a couple Triumph questions Triumph 20
KLUTZ Brought home my 7 yesterday, now. couple questions Triumph 4
Y A couple of newbie questions Austin Healey 16
Webb Sledge A couple Triumph questions Triumph 5
A A couple questions Restoration & Tools 11
AngliaGT Lotuses,Loti,er a Couple of Lotus? Spotted 4
AngliaGT At a couple of Car Shows in SW Virginia Spotted 3
DrEntropy A couple Cumberland SCCA Runoff shots, 1976 Racing 0
AngliaGT A Couple More Spotted 0
S TR2/3/3A TS27036 for a couple laps Triumph 13
T TR2/3/3A Is there a timing cover seal that will last more than a couple of year? Triumph 23
matmire couple of Healeys in this Stella Cidre commercial Austin Healey 2
Steve A couple of bikes that my dad designed British Motorbikes 8
5 Couple of Spridgets for sale Spridgets 2
PC last couple of days Spotted 2
M Help me ID a couple of bolts on my 1275 engine... Spridgets 5
J true value of a couple of books... Triumph 13
O TR2/3/3A TR3 Wheel Studs, Couple of Hinges Needed. Triumph 2
RickB Couple qyestions - plate light plinth Spridgets 3
AngliaGT A Couple of Tempting Deals MG 4
jackq MGC PLz save a couple of MGCs MG 6
theleisure A Couple [unwanted] Firsts... oil & temp Spridgets 6
S Couple pictures needed Austin Healey 5
livinginthepast Signing off for a couple months... Spridgets 7

Similar threads

Top