Now for the batting. I am using 2 layers of 3/8" thick batting. It must be slightly longer than the padding, so the edge of the pad will be, well...padded!?!
I do not bother to anchor the batting. It is "sticky" by nature. The pad below and the cover above are both anchored to the frame, so the batting will never have a reason to move. If you do decide to anchor it, do not use the thick twine...but rather a normal thread. The twine could show through the cover material as "bumps".
Finally...the cover goes on.
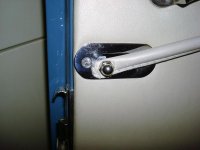
We have to anchor the cover, and in a way that it can be removed to do repairs later if necessary. TRF sent clips to hold the material. I have seen many TR seats use the clips randomly. The most common anchor are hog rings, like shown here. The rings are sold like nails, by the weight, from any upholstery supply. The pliers are very cheap from the same suppliers.
So grab your hog rings or clips and lets finish up!
The rings go in as shown. You stretch the material and then pinch the ring around a frame member. If you look, there is a special frame wire about 1" inboard of the edge of the spring frame...for the purpose of anchoring the cover. For obvious reasons, do not clip or hog the outer spring wire...it would show!!
Note that removing a hog ring will leave pinholes. The clips will leave a mark also, but no holes.
The first priority is the front piping. As with all upholstery, start center and work outward. That always assures the cover will be on the frame straight. Here I have pulled the center front bead into alignment with the edge of the spring frame...and then ringed it into place. Follow with a couple rings centered at the back of the cover, to counter the pull of the front anchors.
I am not ringing the sides yet, but simply pulling the material into general location. Once all looks right, start working from the front center outward...and then backwards. Stretch until the wrinkles just leave, and then anchor it.
Work around the sides, and fold the rear cover flap out of the way to get the rear corners anchored.
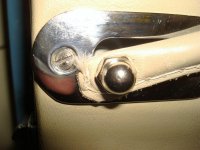
Occasionally you get a bad pinch. In this case the ring crimped closed without grabbing the under wire.
Side cutters remove the errant ring in short order. Then, using the same holes, I reinstall a new ring, only pushing harder to make sure it grabs.
These covers have a lot of selvage. It doesn't hurt anything, but you may want to trim it down to about 1-2" from the anchors.
Now the sides are finished. We just need to take care of the rear flap.
Here, when I pulled up the right flap, the underlying material shows through as a ridge. I did not get it to lie flat before I covered it. I had to use my "bone" to undo the fold and get a flat look.
To do that, the rings on the rear flap had to come out to access the side material. No big deal!
And here is the offending fold, causing the bump.
Now, that looks better! The little details make the job. Be sure to step back and look for bad folds and such.
And that's it for upholstery. It's really easier than you would think. I would estimate the seat backs took about 1 hour each, and the bottoms about 30 minutes. Of course that is excluding the 16 hours of welding to get the buckets ready to cover!!
There is only the boot, and a few clean up items to go on the upholstery. I'll add those later, but, for now, thus ends another TR2 thread!

 Hey Guest!

 Hey - did you know if you click on the title of a thread it will take you to the first unread post since you last visited that thread?
 but were afraid to ask:
  STOP!! Never post your email address in open forums. Bots can "harvest" your email! If you must share your email use a Private Message or use the
  smilie in place of the real @
 Pretty Please - add it to our Events forum(s) and add to the calendar! >>