• Hi Guest!
    You can help ensure that British Car Forum (BCF) continues to provide a great place to engage in the British car hobby! If you find BCF a beneficial community, please consider supporting our efforts with a subscription.

    There are some perks with a member upgrade!
    **Upgrade Now**
    (PS: Subscribers don't see this gawd-aweful banner
Tips
Tips

TR2/3/3A Upholstery ?!

I'm up to 61% of my available memory at Photobucket...it's the ability to post through a second website that has maxed out. I can't really complain, as it's really a lot of service for the "free" that I paid! They have very cheap options that give more memory, but no additional second site posting. You get that at the $40. I would even pay the price, but eventually I would want to opt out and all the pics would dump.

I think the obvious solution is to leave the current posts the way they are, but find another service that has a bit more "3rd party hosting", just to finish up the saga. There has to be at least one other place like photobucket?!? Or I may turn it into a blog...if I can find a place to store that.
 
100_0241.jpgThanks JP...I'll be playing with it. Here goes a try...

https://flic.kr/p/VQUUa7

Nope. That gives a link to Flickr, but I could do that with Photobucket. I'll keep trying.

https://flic.kr/p/VQUUa7[img]

Nope...

[ATTACH=CONFIG]49223._xfImport[/ATTACH]

That works, but it is using the forum memory. Not a long term solution.

Here is Imgur...

[IMG]https://i.imgur.com/YESntec.jpg

I think that's it! Can someone let me know if this picture is coming in for you like it is for me? Thx.
 
Yeah, that's better :cool:
 
Whew! Crisis solved!

1svoEOQ.jpg


While I was picking up better batting at JoAnn's Fabrics, I also picked up this burlap material. Burlap is a pivotal material in vintage upholstery. TRF did not include any in their padding kit.

The burlap must go over any metal parts that could possible contact the outer cover. Any metal spring allowed to touch the cover, even on the sides, will eventually rub through the outer cover and poke out. Burlap gives a good 2 decades of protection from the spring metal.

gqKRSgH.jpg


While at JoAnns, find a big ole' needle and old school twine. If the burlap is allowed to move on the metal spring frame, then eventually the padding will shift. I am sure that everyone has had the pleasure of sitting in a lop-sided seat at some point. Every time you sit in a car you have to slide across the seat. Over time, if the padding is not anchored, it will slip out of place. We are not going to allow that to happen.

0u1MLie.jpg


xsk8QWk.jpg


1R2gflf.jpg


lT0A3fp.jpg


Sorry Steve. After the seat bucket ordeal I couldn't make myself exchange the springs. These are the large spring models...

In these pics you can see the twisted coils pointed upward. This will eventually eat through any padding and stick into your a$$. It needs to be bent or snipped until it points downward.

v6ewFRR.jpg


Once the frame is checked out, and any errant wires fixed, it's time to thread up the twine. We are going to sew the burlap to the spring frame.

gSUIFeY.jpg


GWBZyNr.jpg


Notice I have sewn the top around the rim, and then the bottom. Many upholstery shops would hog ring the bottom of the burlap. I avoid any metal I can. Either way was used 60 years ago. There is little need to be neat. This is merely a protective layer. I made an attempt to keep the pleats organized out of habit...but one large pleat would work too!

dp0DiAh.jpg


Here is the top padding from TRF. It was originally horse hair. This is a burlap material with some sort of wool threaded into it. Where has all the horse hair gone? For now I am centering the pad on the top of the frame.

ez6AgFw.jpg


8Ue4ZPN.jpg


LKCnT3q.jpg


Now I went around the frame and did single knotted stitches at 8 different points. These will hold the pad so that it will never slip out of place from drivers sliding sideways over the seat. You could sew it in place too...but that is a lot more work.

2J3fNeM.jpg


Now that the pad is locked in place...trim the excess around the edges. TRF only gave about 1-1/2" front and rear. I prefer about 2". Any less and the pad could shift. Any more doesn't help anything, and it may get in your way later.
 
V8K3xHq.jpg


Now for the batting. I am using 2 layers of 3/8" thick batting. It must be slightly longer than the padding, so the edge of the pad will be, well...padded!?!

I do not bother to anchor the batting. It is "sticky" by nature. The pad below and the cover above are both anchored to the frame, so the batting will never have a reason to move. If you do decide to anchor it, do not use the thick twine...but rather a normal thread. The twine could show through the cover material as "bumps".

aaxLyUD.jpg


KP3lRaD.jpg


Finally...the cover goes on.

KTGAuc5.jpg


jdgH0Ux.jpg


We have to anchor the cover, and in a way that it can be removed to do repairs later if necessary. TRF sent clips to hold the material. I have seen many TR seats use the clips randomly. The most common anchor are hog rings, like shown here. The rings are sold like nails, by the weight, from any upholstery supply. The pliers are very cheap from the same suppliers.

So grab your hog rings or clips and lets finish up!

W0glTZV.jpg


0YHdzw2.jpg


Lmq8YWs.jpg


The rings go in as shown. You stretch the material and then pinch the ring around a frame member. If you look, there is a special frame wire about 1" inboard of the edge of the spring frame...for the purpose of anchoring the cover. For obvious reasons, do not clip or hog the outer spring wire...it would show!!

QuOJjpp.jpg


Note that removing a hog ring will leave pinholes. The clips will leave a mark also, but no holes.


ITzSDGe.jpg


The first priority is the front piping. As with all upholstery, start center and work outward. That always assures the cover will be on the frame straight. Here I have pulled the center front bead into alignment with the edge of the spring frame...and then ringed it into place. Follow with a couple rings centered at the back of the cover, to counter the pull of the front anchors.

DhtQ0HE.jpg


6YHdET1.jpg


OtYuhDq.jpg


KKuztQ5.jpg


L4AjCfG.jpg


I am not ringing the sides yet, but simply pulling the material into general location. Once all looks right, start working from the front center outward...and then backwards. Stretch until the wrinkles just leave, and then anchor it.

smiR0Hk.jpg


FMxgYiF.jpg


Work around the sides, and fold the rear cover flap out of the way to get the rear corners anchored.

rRi3vRt.jpg


Occasionally you get a bad pinch. In this case the ring crimped closed without grabbing the under wire.

96pT75z.jpg


5h5BKr2.jpg


q7nCjco.jpg


Side cutters remove the errant ring in short order. Then, using the same holes, I reinstall a new ring, only pushing harder to make sure it grabs.

R5O6G8s.jpg


These covers have a lot of selvage. It doesn't hurt anything, but you may want to trim it down to about 1-2" from the anchors.

gkSNKtp.jpg


41giF8q.jpg


Now the sides are finished. We just need to take care of the rear flap.

LwYhO0u.jpg


A55ObNB.jpg


Here, when I pulled up the right flap, the underlying material shows through as a ridge. I did not get it to lie flat before I covered it. I had to use my "bone" to undo the fold and get a flat look.

MKaSSd8.jpg


To do that, the rings on the rear flap had to come out to access the side material. No big deal!

izGEy1Y.jpg


And here is the offending fold, causing the bump.

ntUJncQ.jpg


REK3Bij.jpg


NgueH5P.jpg


Now, that looks better! The little details make the job. Be sure to step back and look for bad folds and such.

YrJ1hTp.jpg


OC0AZ7V.jpg


53aEI5H.jpg


A9iTouK.jpg


82ahul4.jpg


2uiUGI8.jpg


And that's it for upholstery. It's really easier than you would think. I would estimate the seat backs took about 1 hour each, and the bottoms about 30 minutes. Of course that is excluding the 16 hours of welding to get the buckets ready to cover!!

There is only the boot, and a few clean up items to go on the upholstery. I'll add those later, but, for now, thus ends another TR2 thread!
 
I do have a question for you guys...

CMpi73Y.jpg


avn2aLV.jpg


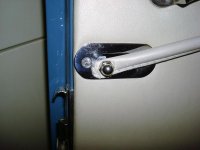
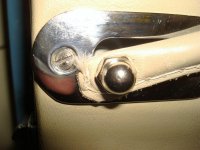
This is the way the door pull came. Does anyone have a picture of the way the factory attached the pull to the latch bolt?
 
I think this is what you want. If the tubing in the pull is hollow run a thin cable through it and make a loop on both the ends and crimp it. This way the leather is not stretched and eventually rip out the hole where the bolts go.
 

Attachments

  • DSC05345.jpg
    DSC05345.jpg
    49.8 KB · Views: 155
  • DSC05344.jpg
    DSC05344.jpg
    57.1 KB · Views: 153
That's it...thanks! I have to assume the ends are open to run a cable through.

Well...hope you guys enjoyed the pics while they lasted. I just realized that photobucket locked my entire 7 years of picture posting. Terrorists, they are! Akin to ransomware! It was too much work filling in the 4 posts I made from last night, so the threads are dead for good unless photoB changes their mind. You would think they would give notice that I was "approaching" their limit. I still have 40% of my memory available, just no linking. Oh well. It merely continues the type week this has been...
 
Hello John

Not a good advert for photobucket or cloud storage in general. They can always pull the plug and you lose years of work.

I would second the CD idea your photos are such a treasure trove of information.

David
 
Hello John

Know what you mean about new parts that are wrong or almost correct.
Could it be we are so happy to get new parts that we overlook some of the flaws in them.

I have found that the cage nut cage needs to be fixed so the nut does not fall out.
I just got door latches from TRF and found like you that the springs are so strong that it is almost impossible to operate the latch. Did your trick with the spring.
Front wing repair panel that has the edge beading tacked on not rolled into the panel.
A few that came to mind.

David


Today was not a good day on the project.

Steve...you still there? I had to pull the seat buckets you sent me out of the shed...and resurrect them from the dead!!

If you remember, I spent yesterday straightening the bottom buckets of the Rimmer seat frames so they would sit on the slides. Today I installed the tack strips and padding, only to find that the Rimmer seat backs are shaped wrong!! I went through every mental gyration possible trying to decide how to "fix" the Rimmer frames. I ran to the shed and grabbed your frames, Steve, and they are shaped correctly. At first I planned to cut the backs off your seat frames and weld them to the Rimmer.

After staring at my dilemma for an hour...I decided it would be the same amount of work to correct the Rimmer seats that it would be to repair Steve's seats. I decided to put the time into "original" seats rather than beat the dead Rimmer horse anymore. I spent 8 hours today fixing rusted out bottoms. Basically ALL the work I did the last 2 days getting the Rimmer frames going was a complete waste of time. I will have to rip off the trim work and the tack strips. I have another 3-4 hours of welding to do, and then I can start over from scratch.

I have decided that we, as a group, must be the most forgiving Hobbiests on the face of the globe. The new parts we are dealing with are absolute crap...and we put up with it!! This week Every new part I touched has been absolute junk. The TRF water pump would not fit without modifying it. I spent 2 days trying to make do with new seat frames that are a lost cause. I'll spend more time later fixing my new upholstery.

Sorry. I'm just a little bummed. I was so close to driving....only to get knocked back 4 days work. Oh well!?!

To catch everyone up on Steve's seats...after the 1st year of searching for decent seat frames, Steve sent me the frames I am now using...but I told him they were too far gone. I then went through 3 more years of searching, including 2 waste of time and money Ebay purchases. At least Steve will get the base from one of those...so not a complete loss. At one point I thought Marv was sending decent buckets in the donor car. Nope. I finally bought the Rimmer frames 4 months ago, and was kicking back with the thought that "at least the seat frame situation is taken care of".

I will download pictures when I catch up on the welding work, but Steve's seats will be sporting new 14 gage bottom panels in the area of the rear mounting holes. Those are the weak parts of the original seats. We fat Americans crack the rear bolt hole, and the seat rocks back. That binds the rear of the seats on the slides. After that, any water pools in the rear of the seat pan...and it rusts out from the rear forward. Well, now the rear mounting holes have reinforced washers, welded to 14 gage metal carrying my fat A$$ load to the mounting holes without over stressing them. A lot of work, and not really up to my desired standards, but the seats WILL be strong and they will last without cracking ever again.

Now I need to go take my frustrations out on Rimmer...

And Steve, Thanks for the seat frames!! Sorry I snubbed them!
 
Beautiful work as always John.

Cheers
Tush
 
John looks to me you got the seats with coil springs looking fine. I see a crucial point as the filling of the outside long right angle corners that return to the parallel line of the seat and car as a big part of a tr2 seat and you accomplished that beautifully. The tr3 is much more rounded all the way around even down the side straight side some.

Anyways, I see that as one of the significant differences between the tr3 and tr2 seat. Another slight difference is the angle the seat has on the bottom pad front to back, I think you are good there also. I never notice how the back of the seats at the top were bigger on a Tr2 until you had everything side by side with the tr2 seat cover on a tr3 seat frame. My eye just told me there is a difference up at the top, but I would not have been able to say just what it is.

You made those seats beautiful and original again, and I am just happy to be part of it, amigo. Keep up the grate craftsmanship and maybe one day we will meet in person at show.
steve
 
Thanks David, Tush, and especially Steve, for supplying the seats! I owe you those sidescreens now!

I wrote to Photobucket. If you want to have fun, try to find a contact number on their site. No word back, nor do I expect any word. So the old threads are likely picture dead for good. Real shame. If there's a lot of interest I could reassemble all the restoration threads into more of an article or book format. If I ever do go to the trouble again, it will be a format. that could be saved and not destroyed. Lesson learned!
 
Thanks John for all your great postings, with pictures originally!! Like others I will be referring to this info many times over the next couple of years. I did export as PDF files a good many of the body restoration pages so I do have many of the original pictures. A DVD of this work would be great, but I imagine a lot of work.
For the upholstery, how many "tan" colors did John Skinner offer and what is the name of the color you are using? My goal is to go signal red with tan interior on my TR3b (not an official color combo).
Thanks again,
 
Back
Top