• Hi Guest!
    If you appreciate British Car Forum and our 25 years of supporting British car enthusiasts with technical and anicdotal information, collected from our thousands of great members, please support us with a low-cost subscription. You can become a supporting member for less than the dues of most car clubs.

    There are some perks with a member upgrade!
    **Upgrade Now**
    (PS: Subscribers don't see this gawd-aweful banner
Tips
Tips

TR2/3/3A Tr3 frame work finally

Tr3aguy

Jedi Knight
Country flag
Offline
So after way to long I have found a way to get started again
17FD7179-518C-40FA-AE33-81DFFD6AA179.jpg

It has been a while but after soon reclaiming of garage space and moving the frame to a different location I decided to begin again.
ACAB11BE-4FBB-4814-9279-9F8D54446B6C.jpg
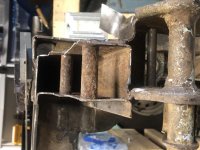
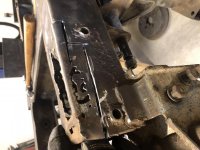
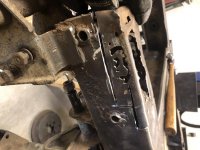
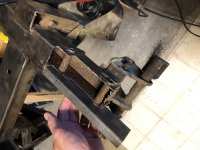
I trimmed out the rot and have it cleaned up. I need to mock up some cardboard to get the final pieces layed out. I need to rust convert the inside of the channel to stop any more degradation.
5ACF811F-2280-4447-A754-285FE40FBB82.jpg
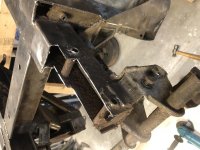
I picked up some 16 gauge steel and bent it to replicate the original frame construction.
I need to cut out and construct a new end cap. I will need some new disk for my Dremel tool to get in tighter spaces. It will be an adventure and a much better repair to hold up another fifty years.

more to follow
 

Attachments

  • 33C967DC-BDD8-464C-99FC-AFE7B5A2CC7E.jpg
    33C967DC-BDD8-464C-99FC-AFE7B5A2CC7E.jpg
    64.3 KB · Views: 261
  • C5AA1F34-54A7-4C3B-970F-C899DBCB0B0A.jpg
    C5AA1F34-54A7-4C3B-970F-C899DBCB0B0A.jpg
    63.9 KB · Views: 231
  • 43E04541-79BD-4A52-8AF4-DB45B002E420.jpg
    43E04541-79BD-4A52-8AF4-DB45B002E420.jpg
    66.7 KB · Views: 219
  • 7F938E79-53EA-48CA-9565-387C3EAAD867.jpg
    7F938E79-53EA-48CA-9565-387C3EAAD867.jpg
    67.1 KB · Views: 245
Last edited:
Looking good JP, the first steps break the ice and get us going. Keep after it these cars are very forgive. Glad to see the top of the frame is fine. Those pins look like a lot of work, but yours look great.
steve
 
Steve the pin that holds the bump stop on one side is half missing so that should be fun...
Looking good JP, the first steps break the ice and get us going. Keep after it these cars are very forgive. Glad to see the top of the frame is fine. Those pins look like a lot of work, but yours look great.
steve
 
No, so far it looks like you have a handle on it. Interesting all your rust appears to be up front.

The frame was the first thing I undertook on my TR2. At the time I had low-balled the seller, assuming he would turn me down and I'd be on my way...but he took the offer! The car needed to go to the scrap yard, so I really didn't have my heart in the project for almost 2 years. I started with the frame and kept telling myself that, "it'll be twisted and that's where I'll draw the line and scrap the project". Once I made it through the frame repair, and it was still within 1/16th" all around...I was finally invested in the restoration.

But the frame was my turning point. Once you get it ready, everything else builds off that. So keep the pics coming, it's great living through you guys!
 
Yep, great to see you getting back into things. Good place to start. Keep posting pics please.

Cheers
Tush
 
Yeah well if you quit taking Les’s car apart you could get back on your project!!!

Yep, great to see you getting back into things. Good place to start. Keep posting pics please.

Cheers
Tush
 
Yeah well if you quit taking Les’s car apart you could get back on your project!!!

Well, I don’t mind helping out with other projects...not like I don’t have something to drive already...so, my project will get done when it’s done :cool: no worries! If I were closer, I’d be coming to your house too!

Cheers
Tush
 
I have taken the little end cap off and straightened a lot of the metal. It was a very tight space to get a piece of metal out without destroying a lot around it
4DDCB68B-6F41-4686-8F7D-4704E29A55AC.jpg

it looked a bit off at first but upon closer inspection it really it is not too bad. I am terrible at making metal pieces so I am going to take my time putting this together. My lighting in my shop is horrible for this kind of work so time to go shopping... on amazon of course.
I am thinking about a rust converter for this front little bit before I get to the welding.
4AFE70A3-88E2-4A88-BE77-A1A5D9104053.jpg

and one more. I have just enough 16 gauge metal to get this back together so I will be precise(slow) in my methodology!
I need a few more tools as well.

DE5827E7-65AD-4D0A-AADF-1AE7B5A41088.jpg

last one for now
 

Attachments

  • 30619043-2C0A-41EB-87C0-E84060C26C8B.jpg
    30619043-2C0A-41EB-87C0-E84060C26C8B.jpg
    69 KB · Views: 198
Looking good JP--- I started thinking after a while that if my repairs last 20 years that is good enough; otherwise, I start building a piano!
 
Hi JP, When I did my frame , after all the repairs I removed the front frame rail caps and took a piece of 3/8" aircraft cable frayed the end to make a flexible wire brush that I ran it thru the frame them blew out all the flaked off coating and rusty scale. After that I bought the sprayable rust converter from the rust store ( I bought a gallon which was plenty to do the frame. I used a piece of copper refrigerator line and soldered the 360 degree spray tip from eastwood to the end so that the entire inside of the frame got coated. I used a garden sprayer to put the rust converter in to spray with. I sprayed it once up side down and once right side up. After a couple of days for that to cure I then sprayed the inside of the frame with eastwoods internal frame coating, Same method. Best I remember it took 3 cans to coat it right side up and upside down including the inside of the cross tubes as well. I wanted to Ecoat the frame but was way out of the budget. The price to Coat was $1000 plus taking the frame to Mississippi and back to pick it up once it was coated. I did the inside for about $100 + my time which is free. I like the 20 year rule. I hope the frame last 20 years. Frank
 
Well I am still trying to get this done but learning metal fabrication as I go. I thought the first thing I would need to do is convert some of the rust back to iron oxide so:


03649715-8CB2-4962-AB16-185FCC650930.jpg


I was missing cut off wheels and such so I went for a mission essential run to get fabrication tooling. First attempt at the repair piece went horribly wrong so take two.

DD17D45D-0669-4BC3-B8EC-70A0E8250585.jpeg

This one is much better but I have a slight rise at the end that I will have to massage out to meet my before cut out measurements. You have to know where you started so you can return there.


I purposely made the over cap piece larger so I could trim it down as seen in this photo. I will get it cut out, probably tomorrow and try to mock up a good test fit. Then paint the backside and drill some holes for plug welds to simulate the pinch welds.


I am slow with this work because metal work is my nemesis. Oh yeah and it has been raining like a mofo here with makes time in the garage very dreary. Still working on it:

0FA764A6-6860-4FA0-9915-17E5BFA85DC1.jpeg

Cheers

JP
 
Looks like you have a good fit up of the pieces. It is always easier to cut it off than to add it back. 3/16" hole is a good size for spot welds. You might need to set it pretty hot because the weld time does not build up heat. One thing to remember is that your wire speed is like a fine adjustment. Most welders have a chart that should get the machine set up close. If your weld needs a little more heat to get more penetration subtract just a little wire speed. If it is a little too hot add a little wire speed. This is a very fine adjustment, you might need to go up or down with your amperage control to get in the ball park. Hope it helps, Don't get discouraged with speed, This type of fabrication will not go fast. You think welding is slow wait til you have to take something back apart. you find out how strong welds can be. When you are welding do not put a weld somewhere you can't get to it if you have to take it apart. Frank
 
I am not a welder like Frank and some of the other guys. This is what I see, and maybe I am wrong; the area you are working on is not really that structural. The fenders and apron bolt up more to the tub. Those 2 front mount holes do not hold the car up that much, so if it was me, I would do my best and weld it and keep moving. But again, trust Frank or John more. From my point of view even it crack there, I would drive it somewhere and have it fix by pro.
steve
 
Thanks for all the feedback, right now I have more time than money and I really want to learn to do more of this by myself! I will pick up speed as I gain more confidence. I am usually a pretty quick study. I do strive for something close to perfection, in my mind anyway, but just trying to make it drivable and solid. Keep following it keeps me moving forward!
 
Speed is not important. Having fun a learning something new is. My motto is “ I can’t possibly make is worse than it was”..

Keep on Truck’n

Cheers
Tush
 
Back
Top