• Hey Guest!
    British Car Forum has been supporting enthusiasts for over 25 years by providing a great place to share our love for British cars. You can support our efforts by upgrading your membership for less than the dues of most car clubs. There are some perks with a member upgrade!

    **Upgrade Now**
    (PS: Upgraded members don't see this banner, nor will you see the Google ads that appear on the site.)
Tips
Tips

Sent back a slew of wrong parts yesterday

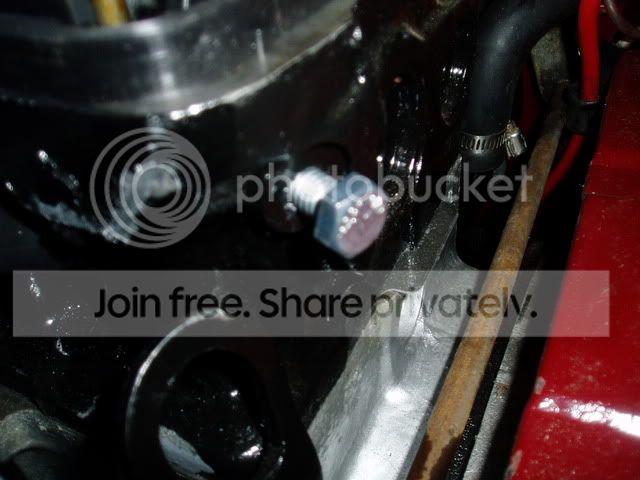
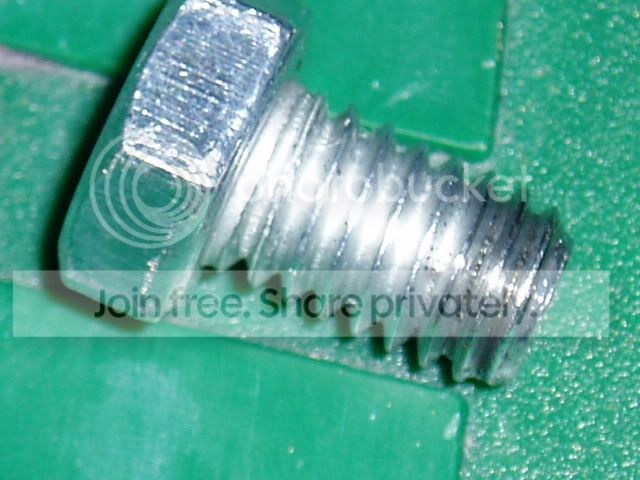
Okay. It's dinner time so gotta yield; but, for your info: I picked
up standard and fine threads; 5/16 by 1/2. Got a copper washer and if it
is a bit big round, I'll grind that baby down and buff the edges with
the ole wire wheel.

Thanks 'gain, and I'll keep you posted as it develops. Oh, yeah, should I
put a dab of silicone on the copper washer in order to help seal or is that
just wrong onacountabecause it could end up inside my head?
 
DNK said:
Mine measure 5/16 X 24

HeadBolt.jpg

Nice pic, Don. Do you think this bolt could actually be tapered as well?
Something I didn't allow for, if true.
 
Check this pic. 5/16, standard threads; 1/2 length. Gets in about
three threads, without really torquing down on it:

P1010002-49.jpg


And here is a pic of the bolt. There is evidence of black POR paint that
evidently encroached the threads. Gets about three threads, then really
tightens up:

P1010009-31.jpg


and now I will post a bad pic of the thread hole just cause I have it.
Sorry, it's in kind of a tight spot:

P1010011-29.jpg
 
Maybe I should go back to waiting for the part(s) to come and busy
myself elswhere.


All the best at cha....
 
Certainly appears that the threads are just full of POR-15, which means you should probably run a tap in to clean them up. Smear some grease in the flutes first, to catch as much of the swarf as possible. Then every couple of turns, remove the tap, wipe off the contaminated grease and apply some more. When you are done, squirt a little carb cleaner into the hole to dissolve the grease, then run the engine for a few seconds with the bolt still out, so the oil will flush away anything left behind.

If you are worred that the threads aren't right, one trick I've used where it's hard to see is to sand down a wooden dowel (5/16" in this case) until it can be screwed into the hole with vise grips. Unscrew it, and hold a thread gauge to the marks left by the threads to check the thread pitch.

But from the looks of that bolt, I'm confident those are the right threads.
 
Thanks, Randall. I wouldn't be able to touch it until tonight, now,
anyway. Very early here now, coming up on 3:30 am. I'll begin a long
day, soon as I'm done with this post.

Gotta tell ya, but I'm sure you already know, that that darned POR is some
hard stuff.

Thanks for looking in and we'll touch bases tonight.
 
Those threads look course to me, or is it just the photo. Recheck them with a gauge.
 
DNK said:
Those threads look course to me, or is it just the photo. Recheck them with a gauge.

<span style="color: #660000">Don, I was thinking the same thing but did not
chime in since I'm a rookie when it comes to that stuff.

I usually check my fasteners with a tap and die, just to be sure.
If I remove an existing bolt, I always run a tap into the threads.
Basic bolts 101 from Paul Brosky.

d :thumbsup:</span>
 
Back
Top