
-
 Hey Guest!
British Car Forum has been supporting enthusiasts for over 25 years by providing a great place to share our love for British cars. You can support our efforts by upgrading your membership for less than the dues of most car clubs. There are some perks with a member upgrade!**Upgrade Now**
(PS: Upgraded members don't see this banner, nor will you see the Google ads that appear on the site.)
-
 When posting a classified ad, you MUST select a prefix from the drop-down next to the subject line. If you don't you will get an error and your ad will not be posted!

Tips
- We have a special forum called "Member Articles" where you can submit actual articles for consideration for publication. Learn More
- Don't have an Avatar? If not, your avatar will default to the 1st character in your username. Go into "Account Details" to change your Avatar.
- Some basic forum navigation info: click
 Hey - did you know if you click on the title of a thread it will take you to the first unread post since you last visited that thread?
- Hey Guest - Is your British Car Club in our Clubs database? If not, send me a PM - Basil

- Looking for a local club? Click the "Clubs" tab above and browse hundreds of clubs world-wide.
- Add Android or iPhone APP: click
- Did you know - any picture or video you add in your posts in any marque-specific forum will also get added to the Media Gallery automatically.
- A few more tips about posting and replying: click
- Hey there Guest - be sure to keep your profile page up to date with interesting info about yourself: learn more
- More tips and tricks on Posting and Replying: click
 but were afraid to ask:
  STOP!! Never post your email address in open forums. Bots can "harvest" your email! If you must share your email use a Private Message or use the
  smilie in place of the real @
- Want to mention another member in a post & get their attention? WATCH THIS

- So, you created a "Group" here at BCF and would like to invite other members to join? Watch this!
- Hey Guest - A post a day keeps Basil from visiting you in the small hours and putting a bat up your nightdress!
- Hey Guest - do you know of an upcoming British car event?
 Pretty Please - add it to our Events forum(s) and add to the calendar! >> Here's How <<
- Hey Guest - you be stylin' Change the look and feel of the forum to fit your taste. Check it out
- If you run across an inappropriate post, for example a post that breaks our rules or looks like it might be spam, you can report the post to the moderators: Learn More
- If you would like to try some different "looks" or styles for the site, scroll to the very bottom, on the left and click the Style Selector.
You are using an out of date browser. It may not display this or other websites correctly.
You should upgrade or use an alternative browser.
You should upgrade or use an alternative browser.
Brosky
Great Pumpkin
Offline
Well Dale, look at it this way. If you only clean up the crap and put it back together, it will be better than before, at the cost of some of your labor, parts cleaner and a valve cover gasket.
Try that and see how it is after cleaning the shaft out. Lube it well with oil and reassemble. It can't hurt and it will be running again.
Try that and see how it is after cleaning the shaft out. Lube it well with oil and reassemble. It can't hurt and it will be running again.
TR4nut
Yoda
Offline
Somebody please correct me here if I'm wrong, but isn't one of main difficulties of this kind of work the rebushing of the rocker arms if it is needed? I think they are similar to the TR3/4 trunnion bushings in that after you press them in you need to ream to fit, which is a pain.
Randy
Randy
kodanja
Obi Wan
Offline
<span style="font-weight: bold"> Check this out' </span>
TR6oldtimer
Darth Vader
Offline
OK, first thing I need to get is a lathe!kodanja said:<span style="font-weight: bold"> Check this out' </span>

OP
Tinster
Guest
Guest
Offline
Brosky said:Well Dale, look at it this way. If you only clean up the crap and put it back together, it will be better than before, at the cost of some of your labor, parts cleaner and a valve cover gasket.
Try that and see how it is after cleaning the shaft out. Lube it well with oil and reassemble. It can't hurt and it will be running again.
Paul, I've purchased a new shaft and it should arrive in 10 days or so.
My rocker arms look pretty good and have a fairly uniform I.D.
My existing shaft is smooth except at rocker No. 12. I believe No. 12
had a clog of some kind and did not permit proper lubrication.
I'll probably purchase a new RA for No. 12.
I'll clean everything up very well, install parts on the new shaft
and watch it closely.
Wow! Mr. Kopf- that video was amazing!! That is exactly how I took
my assembly apart!! except I made a parts board and took more photos.
Best regards
OH Paul- I looked into the shaft end plugs. From what I can tell, they
are expansion plugs and driven into place. It appears (on mine) they
must be drilled out. Part of my problem with RA No.12 might be the end
plug was driven in very deep.
dale (Tinster)
Brosky said:Well Dale, look at it this way. If you only clean up the crap and put it back together, it will be better than before, at the cost of some of your labor, parts cleaner and a valve cover gasket.
Try that and see how it is after cleaning the shaft out. Lube it well with oil and reassemble. It can't hurt and it will be running again.

I replaced the shaft on the heralds engine and believe me the shaft looked much worse than what Dale has! The rockers all fit on with out any wiggle and the oil comes comes out the top hole just like it is supposed to. Perfect NO, but more than good enough.
TR6oldtimer said:OK, first thing I need to get is a lathe!kodanja said:<span style="font-weight: bold"> Check this out' </span>The rocker arm wear where the arm hits the valve stem is often over looked by the backyard mechanic. With labor prices as they are in my area, it is less expensive to buy new, the refurb. A great video.
Neat grinder for refacing the rocker arms. I did them by hand and it took quite allot of patience to get them all nice and straight. Still probably not nearly as good as what the proper tool can do.
OP
Tinster
Guest
Guest
Offline
TR6oldtimer said:OK, first thing I need to get is a lathe!kodanja said:<span style="font-weight: bold"> Check this out' </span>The rocker arm wear where the arm hits the valve stem is often over looked by the backyard mechanic. With labor prices as they are in my area, it is less expensive to buy new, the refurb. A great video.
Randall: My wife about had a heart attack when I fired up the propane
torch on her glass stove top. Monsoon outside so no choice. Wow!! Under
five minutes and both stuck pedestals slid down the shaft. Thanks for the tip.
Mr. Kodanja: I rented the lathe for an hour and the rocker shaft cleaned up real nice.
Just for curiosity since I've a new shaft ordered. The most cutting into the shaft was
by the springs.
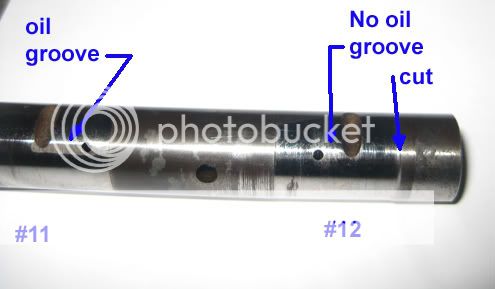
A very interesting project, I am having fun. There are tiny oil paths all in and
out of the assembly. cool! I noticed one odd thing. Every rocker arm except No 12
has a shallow oil path cut from the oil feed hole to the vertical notch cut into
the shaft. Could this account for the problem with No.12 or is there not supposed
to be an oil path for No. 12 ? Photo attached: Thanks all! Paul- I'll drill out
the end plugs when my new shaft arrives.
OP
Tinster
Guest
Guest
Offline
Brosky said:But Dale, are you getting new plugs with the new shaft? Did they confirm that they were already in it, or did you order news ones to go with it?
Yes, confirmed they come with: not sure if installed or not.
When I know the new shaft is OK, I'll profile grind the old shaft
to show the end plugs in cross section.
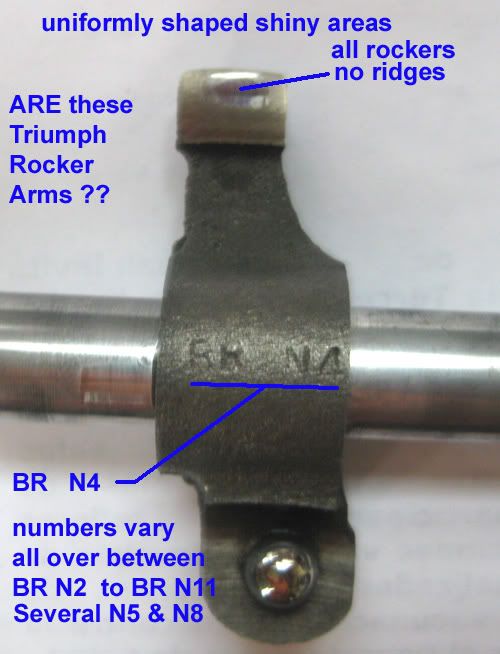
I've been thinking about something. Many parts on my car had been
replaced with Japanese car parts from the auto junkyard. Is it possible
my rocker arms are from a Japanese wrecked car? The arms have numbers
stamped BR N6, BR N4, etc. NOT in order and no BR N1 or BR N12,
several BR N8s and BR N5s. Are these the real deal Triumph rocker arms?
Thanks as always,
dale (Tinster)
edit-typo

Offline
Those look to be decidedly Triumph rockers. Besides, can't imagine a Japanese rocker being proper shaft I.D. and lengths along with correct pushrod ball diameters.
With a new shaft you'll have another 50K miles to go before you revisit this issue, likely more.
With a new shaft you'll have another 50K miles to go before you revisit this issue, likely more.
TR3driver
Great Pumpkin - R.I.P
Offline
I just called and spoke to Blaine at that number, he assured me that they are still in business. Unfortunately I didn't think to ask about pricing for a TR6, so someone else will have to do that.tdskip said:Rocker Arm Specialist
19841 Hirsch Ct
Anderson, CA 96007-4910
(530) 378-1075
Anyone have a ballpark from them vs TRF for the rebuild?
It has been a few years back, but they charged me less than half what TRF wants today for a rebuilt TR2-4 shaft. And their rebuild clearly included a new shaft, rather than reconditioning the old one. It still looked perfect after maybe 30,000 miles (although I only slid one rocker aside to look at it, didn't bother disassembling).
TR3driver
Great Pumpkin - R.I.P
Offline
I only watched a few seconds, but it's interesting that his device does not hold a constant radius on the tip. It's left to the skill of the machinist; which is certainly a valid technique with a good machinist. But I'm not that good with freehand work, can't even grind a decent drill bit.kodanja said:<span style="font-weight: bold"> Check this out' </span>
TR3driver
Great Pumpkin - R.I.P
Offline
Just a thought, Dale. I've not tried this on a TR6 rocker shaft, but the plugs that retain the shift detents in the gearbox top cover appear to be similar. I found that I could remove them easily using a bottoming tap of suitable diameter (so the tap would cut into the inside walls of the cup), a short spacer (or a stack of flat washers would do) and a nut. Load the nut & spacer onto the tap, then turn the tap into the cup until the cup turns, and turn the nut down to extract the cup.Tinster said:From what I can tell, they
are expansion plugs and driven into place. It appears (on mine) they
must be drilled out.
They would have been reusable, but I elected to install threaded plugs instead.