
 Hey Guest!
Frank Canale
Jedi Warrior
Offline
I am going to take a break from the front end tub and inner sill alignment and start working on repairing the back half. There is an awful lot of repair work to be done and am very grateful for the post Lionel did with his incredible metal forming skills. I am going to start with some easy pretty safe repairs.
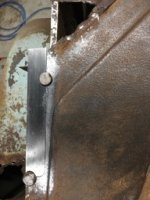
 This is my template to cut and form the repair panel from.
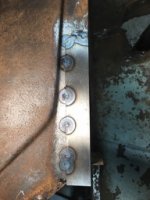
 This shows the spot welds drilled out. The boot floor is going to be replaced so damage from drilling thru is not a big deal. The new repair panel is clamped in place and scribed to be cut. I usually cut small areas like this with a dremel using the heavy duty cut off wheels. You can cut right on the scribe line for a very good fit.
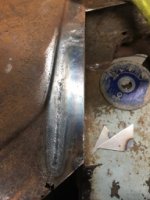
 Repair panel welded in place and a little hammer and dolly work. I have not decided if I am going to need any grinding as I will probable use some type of undercoating to the inner wings. I may come back with a quick pass over it with a sanding pad. The red area on the new repair is a reflection, it is new 18 gauge metal. I did not notice it when I took the picture. with this repair there is a little shrinkage at the weld but the curved shape helps to minimize the warpage. Keeping the heat affected area consistent also helps. Frank
This is my template to cut and form the repair panel from.This shows the spot welds drilled out. The boot floor is going to be replaced so damage from drilling thru is not a big deal. The new repair panel is clamped in place and scribed to be cut. I usually cut small areas like this with a dremel using the heavy duty cut off wheels. You can cut right on the scribe line for a very good fit.Repair panel welded in place and a little hammer and dolly work. I have not decided if I am going to need any grinding as I will probable use some type of undercoating to the inner wings. I may come back with a quick pass over it with a sanding pad. The red area on the new repair is a reflection, it is new 18 gauge metal. I did not notice it when I took the picture. with this repair there is a little shrinkage at the weld but the curved shape helps to minimize the warpage. Keeping the heat affected area consistent also helps. Frank


.jpg")


.jpg")
.jpg")
.jpg")


.jpg")


.jpg")

