
-
 Hey Guest!
British Car Forum has been supporting enthusiasts for over 25 years by providing a great place to share our love for British cars. You can support our efforts by upgrading your membership for less than the dues of most car clubs. There are some perks with a member upgrade!**Upgrade Now**
(PS: Upgraded members don't see this banner, nor will you see the Google ads that appear on the site.)

Tips
- We have a special forum called "Member Articles" where you can submit actual articles for consideration for publication. Learn More
- Don't have an Avatar? If not, your avatar will default to the 1st character in your username. Go into "Account Details" to change your Avatar.
- Some basic forum navigation info: click
 Hey - did you know if you click on the title of a thread it will take you to the first unread post since you last visited that thread?
- Hey Guest - Is your British Car Club in our Clubs database? If not, send me a PM - Basil

- Looking for a local club? Click the "Clubs" tab above and browse hundreds of clubs world-wide.
- Add Android or iPhone APP: click
- Did you know - any picture or video you add in your posts in any marque-specific forum will also get added to the Media Gallery automatically.
- A few more tips about posting and replying: click
- Hey there Guest - be sure to keep your profile page up to date with interesting info about yourself: learn more
- More tips and tricks on Posting and Replying: click
 but were afraid to ask:
  STOP!! Never post your email address in open forums. Bots can "harvest" your email! If you must share your email use a Private Message or use the
  smilie in place of the real @
- Want to mention another member in a post & get their attention? WATCH THIS

- So, you created a "Group" here at BCF and would like to invite other members to join? Watch this!
- Hey Guest - A post a day keeps Basil from visiting you in the small hours and putting a bat up your nightdress!
- Hey Guest - do you know of an upcoming British car event?
 Pretty Please - add it to our Events forum(s) and add to the calendar! >> Here's How <<
- Hey Guest - you be stylin' Change the look and feel of the forum to fit your taste. Check it out
- If you run across an inappropriate post, for example a post that breaks our rules or looks like it might be spam, you can report the post to the moderators: Learn More
- If you would like to try some different "looks" or styles for the site, scroll to the very bottom, on the left and click the Style Selector.
You are using an out of date browser. It may not display this or other websites correctly.
You should upgrade or use an alternative browser.
You should upgrade or use an alternative browser.
Half way?
- Thread starter TexasKnucklehead
- Start date
OP
TexasKnucklehead
Jedi Knight
Offline
So I'm pretty sure I am at least half way done painting. The in/undersides of everything is done, except the hood and trunk lid, but the fenders are done inside and out. Spraying clear coat is not going as smoothly as hoped, pun intended. Everything looks fine, but the orange peel is terrible. I will either be sanding or buffing or sanding and re-spraying clear. The odd thing is, I try to do exactly the same thing each time, but the results are very different. -But it is coming along.

CJD
Yoda
Offline
You may have already found this info...
This time of year high outside temperature is always a problem. You can buy high temp thinner which helps slow the dry time, but in any case best not to spray with the temp over about 90 degrees or in direct sunlight. I spray first thing in the morning. Also, spray more paint on each pass, I.e. thicker coats so there is more to flow together. Runs are much less of a problem in high temp.
Orange Peel
Also known as: poor flow, poor levelling, pebbling
*
Description
Uneven surface formation - much like that of the skin of an orange - which results from poor coalescence of atomized paint droplets. Paint droplets dry*before they can flow out and level smoothly together.
*
*
Origin and Potential Causes:
Improper gun adjustment and techniques. Too little air pressure, wide fan patterns or spraying at excessive gun distances causes droplets to become too dry during their travel time to the work surface and they remain as formed by gun nozzle.
Extreme shop temperature. When air temperature is too high, droplets lose more solvent and dry out before they can flow and level properly.
Improper dry. Gun fanning before paint droplets have a chance to flow together will cause orange peel.
Improper flash or recoat time between coats. If first coats of enamel are allowed to become too dry, solvent in the paint droplets of following coats will be absorbed into the first coat before proper flow is achieved.
Wrong thinner or reducer. Under-diluted paint or paint thinned with fast evaporating thinners or reducers causes the atomized droplets to become too dry before reaching the surface. Too high viscosity.
Low shop temperature.
Too little thinner or reducer.
Materials not uniformly mixed. Many finishes are formulated with components that aid coalescence. If these are not properly mixed, orange peel will result.
Substrate not sanded thoroughly*
*
Prevention Techniques:
Use proper gun adjustments, techniques, and air pressure.
Schedule painting to avoid temperature and humidity extremes.
Select the thinner or reducer that is suitable for existing conditions. The use of a slower evaporating thinner or reducer will overcome this.
Allow sufficient flash and dry time. Do not dry by fanning.
Allow proper drying time for undercoats and topcoats. Not too long or not too short.
Reduce to recommended viscosity with proper thinner/reducer.
Stir all pigmented undercoats and topcoats thoroughly.
Prepare and sand substrate correctly.
Follow recommendations on technical data sheets.
*
Remedy
For mild cases, sand and polish using recommended materials and techniques.
In extreme cases, sand down to smooth surface and refinish, using a slower evaporating thinner or reducer at the correct air pressure.
*
M_Pied_Lourd
Darth Vader
Offline
Yes, I have been waiting for both temperatures and humidy to drop so I can do some priming. Today was a good day and I managed to get the doors and the front valance done. Tomorrow looks good so will most likely be priming the boot and bonnet. Cheers, Tush
OP
TexasKnucklehead
Jedi Knight
Offline
We were graced with some rain last night and a cooler than normal moist morning today. I was prepared to clear coat and got to see it flow like it's supposed to. A couple runs, but it looks great compared to the orange peel on the fenders. Ultra fine sanding on 2 of the fenders has required more color be applied, so I might just save the time and re-coat the clear on the remaining fenders. Still, for an inexperienced DIYer, I am very happy with all the results so far.
I am half way to putting it back together.

I am half way to putting it back together.
OP
TexasKnucklehead
Jedi Knight
Offline
Nope. No buffing yet. I keep sanding thru the color and have to do do-overs... I'm sure there's an end in sight, but I can't see it just yet. Not even after I cleaned all the specs of clear coat off my glasses. That stuff gets everywhere.
M_Pied_Lourd
Darth Vader
Offline
Looking great Jerry.
mt10flyer
Senior Member
Offline
I just read through this entire thread. TexasKnuckleHead, I say this with all due respect. You must be insane. What you have done is crazy, as in crazy good. Amazing work. I have a 1959 TR3 driver car. It's in OK shape, and I WAS considering, sometime, maybe to do such a restoration. Seeing this, and what you have had to do, I may stick to my trickle restoration. Wow. When you are done, this restoration will be one of the best. I bow in your presence. 
OP
TexasKnucklehead
Jedi Knight
Offline
I prefer to think of all the color/clear coats I have had to sand and respray as just really high class primer coats. Otherwise I would cry when I think of the cost of good paint...
Thanks John. I was starting to think I was the only one. Each time my neighbor stops over and helps me see my mistakes, I feel like crawling under a rock. Sometimes it seems to get worse no matter how I try to fix it. Example: left fender clear didn't lay right, so I try to fine sand (#1000) it smooth, 99% finished when I go thru to primer, so I sand (#400) and re-spray color on that one spot, the color lifts and needs sanded (#400) and sprayed again, two coats of clear later on the whole fender looks ok except for one big run on the corner, carefully sand off the run in the clear(#1500), fine sand (#2000) the whole fender and find the color where I resprayed is different -about the size of a dime is much darker yellow, buff the fender to see too many 'fish eyes', so I sand (#400) it all away, sand (#240) the dime spot, re-seal the spot with epoxy primer and sand (#400)... tomorrow I'll re-spray the whole fender yellow (again) and get ready to spray clear the next day. -The other panels are cooperating as well but each are in different stages. One situation makes me chuckle; the rear apron is awaiting another coat of color because after I finished the other 4 panels I was working on (2 coats 10 minutes apart), I couldn't remember if I had or hadn't put the second coat on the rear apron, but I finished the paint I had mixed up and cleand the gun. Just in case I didn't do the second coat, I chose not to clear it until I did.
Mtn10flyer: "When you are done, this restoration will be one of the best." Thank you, it will be the best I have ever done, but there are better. Few have chosen such a disaster to start with, but we are all challenged differently.
OP
TexasKnucklehead
Jedi Knight
Offline
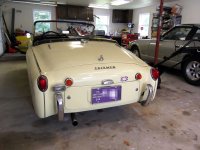
Saturday, on the trunk and hood, I put 3 coats of color followed by 4 coats of clear -more than recommend by PPG, but I need enough clear to sand off the orange-peel. Sunday I spent wet sanding those two panels. Monday I buffed and polished them. Today I polished the tub with the fenders installed with all the bolts finger tight.
I wanted to see the 'finished' result actually in the sun so I pushed it out into the driveway. I think I'm more than half way out of the garage...

I wanted to see the 'finished' result actually in the sun so I pushed it out into the driveway. I think I'm more than half way out of the garage...
trglory
Jedi Trainee
Offline
M_Pied_Lourd
Darth Vader
Offline
Awesome. Hope mine turns out as well! Cheers Tush
OP
TexasKnucklehead
Jedi Knight
Offline
A TR3 don't need no stinkin' paint booth.
I painted it in my garage with the doors open and a large exhaust fan pushing air out from the back side of the garage through a soffit vent. I would generally stand some old closet doors across the front to try to stop leaves and stuff from blowing in while I was painting. I painted small sections at a time when possible. In this picture you can see the hood and trunk in my "paint booth" -the last of the body parts to be painted.
Dust? Well, a few cat hairs fell into the 2nd coat of clear. I saw them before the 3rd coat, but they were too stuck to be blown off with an air tool and I didn't want to dig them out. When I was 'color sanding' I found the hairs useful to show me that I still had more clear before I hit paint. I know of at least 5 cat hairs, but I don't know how to tell where the dust is. Anyone would be hard pressed to find the hairs. I'm not worried about dust, hairs, a few fish eyes, or anything.
Thanks, considering where I started, it looks very good. Considering what I got for what I spent, I think I did well. It looks fine -probably better than new.
OP
TexasKnucklehead
Jedi Knight
Offline
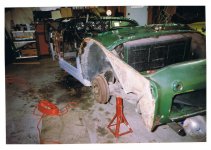
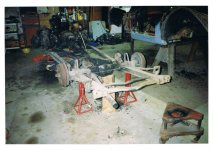
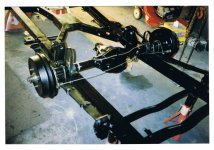
Even though the rear end is more than half way put back together, I still have to put the beads on the front, install the steering column, and dash and wire... so I'm hoping I'm close to half way done with the final assembly. Whoever came up with the idea for beading on the rear fenders must have 6 hands and a lot of patience.
View attachment 28672
View attachment 28672