-
 Hi Guest!
You can help ensure that British Car Forum (BCF) continues to provide a great place to engage in the British car hobby! If you find BCF a beneficial community, please consider supporting our efforts with a subscription.
There are some perks with a member upgrade!**Upgrade Now**
(PS: Subscribers don't see this gawd-aweful banner

Tips
- We have a special forum called "Member Articles" where you can submit actual articles for consideration for publication. Learn More
- Don't have an Avatar? If not, your avatar will default to the 1st character in your username. Go into "Account Details" to change your Avatar.
- Some basic forum navigation info: click
Hey - did you know if you click on the title of a thread it will take you to the first unread post since you last visited that thread?
- Hey Guest - Is your British Car Club in our Clubs database? If not, send me a PM - Basil

- Looking for a local club? Click the "Clubs" tab above and browse hundreds of clubs world-wide.
- Add Android or iPhone APP: click
- Did you know - any picture or video you add in your posts in any marque-specific forum will also get added to the Media Gallery automatically.
- A few more tips about posting and replying: click
- Hey there Guest - be sure to keep your profile page up to date with interesting info about yourself: learn more
- More tips and tricks on Posting and Replying: click
 STOP!! Never post your email address in open forums. Bots can "harvest" your email! If you must share your email use a Private Message or use the
  smilie in place of the real @
- Want to mention another member in a post & get their attention? WATCH THIS

- So, you created a "Group" here at BCF and would like to invite other members to join? Watch this!
- Hey Guest - A post a day keeps Basil from visiting you in the small hours and putting a bat up your nightdress!
- Hey Guest - do you know of an upcoming British car event?
 Pretty Please - add it to our Events forum(s) and add to the calendar! >> Here's How <<
- Hey Guest - you be stylin'
Change the look and feel of the forum to fit your taste. Check it out
- If you run across an inappropriate post, for example a post that breaks our rules or looks like it might be spam, you can report the post to the moderators: Learn More
- If you would like to try some different "looks" or styles for the site, scroll to the very bottom, on the left and click the Style Selector.
You are using an out of date browser. It may not display this or other websites correctly.
You should upgrade or use an alternative browser.
You should upgrade or use an alternative browser.
Half way?
- Thread starter TexasKnucklehead
- Start date
CJD
Yoda
Offline
Way to go!
I have never gotten away with only one coat of primer, so I spray the first after the 80 grit. Then switch to 220 grit under the second coat of primer. 400 grit after that. Lower grit really saves time, so don't move up till you are sure it's ready.
I hear ya with the block sanding...have your fingertips rubbed through all the skin yet?!
OP
TexasKnucklehead
Jedi Knight
Offline
I've worn through the leather in the gloves -then wore through several duct tape applications on the fingers. It is amazing how subtle gloves become.
The curves keep coming. Yesterday I realized I'd never test fitted the trunk handle, and it didn't have one when I got it. The two threaded holes for the handle somehow became not centered with the top holes in the trunk sheet metal. One side had a broken stud in it. Luckily I had another trunk lid in the attic, because I was sure the attachment plate under the sheet metal should move -but it doesn't. I'm not sure how it's attached, but it wasn't rusted/primed in position. I 'stretched' the top holes and drilled/re tapped the mount. The spare had a broken stud in the right side too...
1/8? Not by my logic. Always 1/2. You have to define the start and end point a little clearer. I was "1/2 way home" when I got it onto the trailer in Bay St Louis because all that was left was to get it into my garage and off the trailer. The marks move along with the progress. Everyone knows we never really get all the way done.
OP
TexasKnucklehead
Jedi Knight
Offline
After only a month of procrastinating, I installed the 1.7mm tip and mixed up some high build primer. I never used a HVLP gun before and I managed to use up the paint on some parts, but it wasn't working as expected. After cleaning the gun I figured out to get the settings to function by filling the cup with water and spraying cardboard. I'm still having trouble getting a nice consistent pattern, but it's much more usable.
After a couple attempts separated by more block sanding, I have a few parts looking pretty good. I still have a ways to go before I try a guide coat, but I am making progress again. I'd say I'm half way to knowing how to apply high build primer.
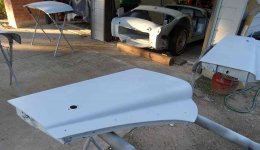
After a couple attempts separated by more block sanding, I have a few parts looking pretty good. I still have a ways to go before I try a guide coat, but I am making progress again. I'd say I'm half way to knowing how to apply high build primer.

CJD
Yoda
Offline
It is truely a misnomer calling the newer HVLP guns "low" pressure. They still need a lot of pressure at the gun inlet (like 60psi for my debillvis)...but they reduce the pressure internally compared to the older, so called "high pressure" guns, so the pressure at the spray tip is lower.
If you plan to spray a lot...and primer/color/clear for your TR3 counts as a lot!...a pressure regulator at the inlet for the gun is a really good idea. A lot of guns come from the factory with the regulators. The idea is to pump up the pressure in the hose, and then the regulator at the gun inlet has plenty to feed into the gun at the correct pressure.
My numbers are full pressure in the hose...or about 120psi. The regulator at the gun inlet is set to 60 PSI. The higher pressure will give you a great pattern. The problem with setting 60 psi at the hose inlet is that the pressure at the gun starts right, but then reduces quickly to 25-30psi once you pull the trigger to spray, due to the resistence in the hose. At lower pressure the gun will spit rather than spray.
The HVLP guns usually give the pressure rating they want at the tip. The problem is that most of us don't have the equipment to read the "tip" pressure. To get the correct pressure, they need 45-60 at the gun inlet...so that is a more usuable number for us amateur painters. I found this out the hard way. Bought the new HVLP gun whe they first came out and went home all excited, only to find it spattered all the paint. I had to thin the paint to water to even get it to spray halfway decently. Went back to the paint store complaining, and the owner filled me in on the joke about calling the new guns "low pressure". Seems the "joke" is that the older guns took about half the pressure at the inlet that the new "low pressure" guns do!?!
Anyway, you may already know all this...so sorry if I got too long winded. And oh yeah...Pics!
OP
TexasKnucklehead
Jedi Knight
Offline
All good advise. The instructions that came with my gun say not to exceed "43psi to the gun". I have a regulator at the tank set to about 60, and the (added) regulator at the end of the hose (at the gun) set to about 43psi. I found it odd that the setting is made while you are spraying, and it goes up significantly when idle. I've changed both regulators (twice) and the hose, but no matter, the pressure drops when in use. The big mistake I originally made, was to adjust the air into the gun to a minimum, instead of letting the regulator handle it. Once I cranked that up, I got spray instead of spit.
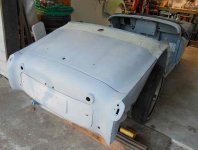
Pictures. It's funny that ever since I started body work, the pictures looked so much better than the car did in real life. My welds looked clean and solid. The filler looked smooth. But, now that it really is much flatter and smoother, it looks better in real life than in the pictures. When I run my hand across it, I can't believe it's the same old, bent up, twisted, rusted out, and re-welded panel. I'll put some pictures up when I can set a few finished parts on the finished tub -and by finished, I mean primed and ready for final sanding. Halfway finished.
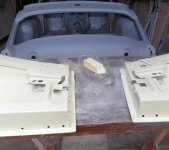
(but here's the 'finished' spare tire cover)

PatGalvin
Jedi Warrior
Offline
Hi Jerry
What gun model and what primer are you shooting. I've shot 4-5 gallons of primer (high build polyester, 2K, and epoxy) and typically use my Devilbiss Finishline3 for most of the primer work. Tip requirements vary hugely, from about 1.4 to up to 2.2, based on material and if you reduce it. I've never heard of cranking air pressure up to 40 PSI and higher when shooting with all the guns I own (and I have about 5 HVLP guns). Typically, one sets the wall pressure pretty high (north of 100 psi, but under the set point that turns on your compressor). Then use the pinch valve at the gun (the valve at your gun regulator) to tune the pressure at the gun when trigger is fully pulled). So, with my trigger closed, my pressure at the gun is line pressure, of 100 psi. But with trigger fully pulled, I tune gun regulator to between 23 and 30 psi, depending on gun and how material is spraying. If you crank up to 40 psi and higher, you'll way overatomize and I often see spray patterns that look like a elongated figure 8, rather than a nice stretched vertical oval. Primer is often the easiest thing to spray, so you shouldn't need those super high pressures to get it to lay down pretty well. I'm interested in hearing what material you're spraying and with what gun.
Also, poly primer and 2K dries super fast, so you need to clean or at least rinse your gun well between coats. If you coat the tip with primer, your second coat won't spray worth beans.
Good luck.
pat
M_Pied_Lourd
Darth Vader
Offline
Following along Tex. Looking great.
OP
TexasKnucklehead
Jedi Knight
Offline
What gun model and what primer are you shooting.
I am using a "Central Pneumatic Professional 2pc HVLP spray gun kit model 94572", specifically the larger gun with the 1.7 needle installed. It was the least expensive gun I could find that included a 1.7mm needle. I am using PPG Shop Line JP202 2k Primer Surfacer -the spec sheet suggests 1.6 to 1.8mm tips with 8 to 10 psi at the (HVLP) gun and I'm mixing with a 4:1:1 ratio as I'd prefer more coats and more sanding than trying to do it all the first time.
I already realized that mixing up more than a cup of paint is counter productive. By the time one cup is sprayed, the gun needs cleaned. After refilling the cup, I laid a nice mist across a door that was noticeably darker than the first coat (minutes earlier). After it cured, I was able to wipe all the tiny, rough spots off the surface with my hand. The second coat (from the large premixed paint) was worthless. It was as if I was spraying wall texture and the "high build primer" was dry before it hit the door. I am getting better, but I see that it takes an artist to paint.
I could have never gotten this far without all the help I've found on-line and from my neighbor. Although I still have a ways to go until this car is finished, I'm already starting to wonder what I'm going to start on next.
PatGalvin
Jedi Warrior
Offline
Hi Jerry
A couple thoughts. The gun is probably just fine for primer. And reducing the 2K primer is fine. Make sure you are not using too fast a reducer or shooting when it is too hot out. I had a struggle with SPI 2K Primer (which is great stuff) when I overatomized the paint (too high a pressure) on a hot day. The rough poorly adhered texture that you describe is exactly what you get when the paint is partially dry before it hits the panel. I have personal experience with this. For your gun, I'd set the air at 30 PSI with trigger pulled (100 psi at the wall), reduce the primer as described, make sure the gun is clean every time, and keep your gun to panel distance at about 6 inches max. I bet it lays down just fine. The JP202 spec sheet shows two reducers (one slow, for higher temps) and two hardeners (one for higher temps). It shows a flash time of 5-10 minutes, so you can spray - stretch your legs a bit, and spray again after 5 minutes. And pot life is an hour at 70 degrees, with the mix you described.
Pat
CJD
Yoda
Offline
Once you get the pressures right the gun won't need cleaning every cup. When its spraying dry the paint builds on the tip. The correct spray (wet) doesnt build.
The cats meow are the cup liners...a bit more expensive, but really worth it. Cleaning is reduced to about 2 minutes...nice! I often mix the primer in the liners and use the same cup all morning when I'm working on a lot of small parts.
The cats meow are the cup liners...a bit more expensive, but really worth it. Cleaning is reduced to about 2 minutes...nice! I often mix the primer in the liners and use the same cup all morning when I'm working on a lot of small parts.
OP
TexasKnucklehead
Jedi Knight
Offline
So it was (relatively) cooler this morning and I sprayed some more primer. I turned up the pressure into the line, and down to about 30psi at the gun inlet. Changing the air control knob at the bottom of the gun causes the pressure at the inlet to change while using the gun. So when I'm trying to shoot my test pattern, I must change both the air regulator into the gun as well as the air control knob. The fluid control knob seems to function as I'd expect: causing the test pattern to be barely covered or running at either extreme. But the top knob (pattern control) does not seem to do anything. I always get a round pattern.
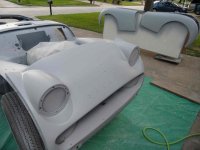
The adjustments today provided much more 'wet' coverage than previously, and much of it looks good, but the result is a sort of striping, since I'm painting strips with little overlap. After I sand, it will probably look fine but I don't understand how to get an oval pattern. I used up 1/2 gallon of primer now, and everything except the 4 fenders has more than 1 coat of primer.View attachment 27618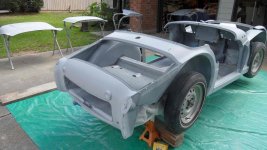
The adjustments today provided much more 'wet' coverage than previously, and much of it looks good, but the result is a sort of striping, since I'm painting strips with little overlap. After I sand, it will probably look fine but I don't understand how to get an oval pattern. I used up 1/2 gallon of primer now, and everything except the 4 fenders has more than 1 coat of primer.View attachment 27618

OP
TexasKnucklehead
Jedi Knight
Offline
Duh. I simply had to open the valve a little more. Now I have the pressure set to about 15psi at the gun (as the paint spec suggests), and my pattern is much better. I had to get some more primer anyway, so I also got some high temp hardner. My latest spray looks like someone did it who has a clue what to do.
I was teenager when we got our first colored TV set. I had seen The Wizard of Oz many times on our black and white set, but waiting for the half-way point when the color would turn on was exciting. I was reminded of that today when I picked up some color at the paint store. Primrose yellow, or as the mixer called it "butter".
 View attachment 27627
I was teenager when we got our first colored TV set. I had seen The Wizard of Oz many times on our black and white set, but waiting for the half-way point when the color would turn on was exciting. I was reminded of that today when I picked up some color at the paint store. Primrose yellow, or as the mixer called it "butter".
 View attachment 27627
CJD
Yoda
Offline
Awesome...headway!
I find that with most guns you have to increase the paint knob when you increase the pattern to oval. When you switch to the color, it tends to run much easier than the primer, so you'll have to reduce the paint knob...and if you are using a clear top coat, it sprays about like water, so the paint setting is even lower to prevent running.
The oval pattern is great for most of your shooting. The round comes in handy for shooting inside the spare tire well or in the grill mouth. It's definitely time for the high temp hardeners and reducers here in TX now.
Enjoying the pics!
OP
TexasKnucklehead
Jedi Knight
Offline
On day two thousand five hundred and three, PPG said 'let there be butter'.
My first time shooting base and clear coat. As paint jobs go, it doesn't look that good, but considering most of it will never be seen, it looks great. The outside of the door was masked off around the edge. I plan to do the same with the fenders, hood, inside the trunk, and by the time I get to the engine bay/inside the hood, I should be able to make it look decent. -actually, the door insides are decent...
My first time shooting base and clear coat. As paint jobs go, it doesn't look that good, but considering most of it will never be seen, it looks great. The outside of the door was masked off around the edge. I plan to do the same with the fenders, hood, inside the trunk, and by the time I get to the engine bay/inside the hood, I should be able to make it look decent. -actually, the door insides are decent...

M_Pied_Lourd
Darth Vader
Offline
I'm Jealous... 
