-
 Hey Guest!
British Car Forum has been supporting enthusiasts for over 25 years by providing a great place to share our love for British cars. You can support our efforts by upgrading your membership for less than the dues of most car clubs. There are some perks with a member upgrade!**Upgrade Now**
(PS: Upgraded members don't see this banner, nor will you see the Google ads that appear on the site.)

Tips
- We have a special forum called "Member Articles" where you can submit actual articles for consideration for publication. Learn More
- Don't have an Avatar? If not, your avatar will default to the 1st character in your username. Go into "Account Details" to change your Avatar.
- Some basic forum navigation info: click
 Hey - did you know if you click on the title of a thread it will take you to the first unread post since you last visited that thread?
- Hey Guest - Is your British Car Club in our Clubs database? If not, send me a PM - Basil

- Looking for a local club? Click the "Clubs" tab above and browse hundreds of clubs world-wide.
- Add Android or iPhone APP: click
- Did you know - any picture or video you add in your posts in any marque-specific forum will also get added to the Media Gallery automatically.
- A few more tips about posting and replying: click
- Hey there Guest - be sure to keep your profile page up to date with interesting info about yourself: learn more
- More tips and tricks on Posting and Replying: click
 but were afraid to ask:
  STOP!! Never post your email address in open forums. Bots can "harvest" your email! If you must share your email use a Private Message or use the
  smilie in place of the real @
- Want to mention another member in a post & get their attention? WATCH THIS

- So, you created a "Group" here at BCF and would like to invite other members to join? Watch this!
- Hey Guest - A post a day keeps Basil from visiting you in the small hours and putting a bat up your nightdress!
- Hey Guest - do you know of an upcoming British car event?
 Pretty Please - add it to our Events forum(s) and add to the calendar! >> Here's How <<
- Hey Guest - you be stylin' Change the look and feel of the forum to fit your taste. Check it out
- If you run across an inappropriate post, for example a post that breaks our rules or looks like it might be spam, you can report the post to the moderators: Learn More
- If you would like to try some different "looks" or styles for the site, scroll to the very bottom, on the left and click the Style Selector.
You are using an out of date browser. It may not display this or other websites correctly.
You should upgrade or use an alternative browser.
You should upgrade or use an alternative browser.
Half way?
- Thread starter TexasKnucklehead
- Start date
OP
TexasKnucklehead
Jedi Knight
Offline
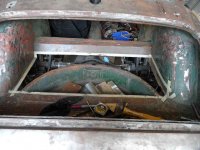
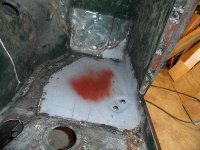
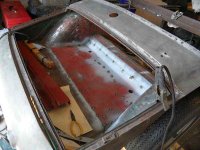
Well, it's been another busy month, unfortunately, no time was spent on the TR3 until this week. I finally tackled the rust holes in the trunk floor and gas tank issue. I decided to use the newer style tank requiring the holes to be in different places. And the shape is different, requiring some brackets to hold the back of the tank above the trunk floor (the front rests on the shelf). I routed new 5/16" steel line to the tank from the union and the rubber coupler fits (barely) as well as the cap and rear seat. I removed 40 spot welds between this section of the trunk floor and the spare tire compartment. I took the brackets with nuts welded (for the tank straps) off the old floor and made another patch. It would have been much easier if I was using the original tank -but a club member gave me a tank that needs a little work, and you know I can't pass up something free from a club member.
One more area to tackle, and I can start welding.
One more area to tackle, and I can start welding.
Attachments
OP
TexasKnucklehead
Jedi Knight
Offline
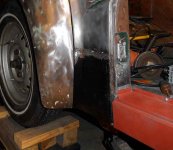
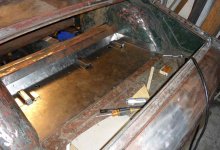
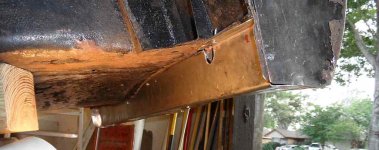
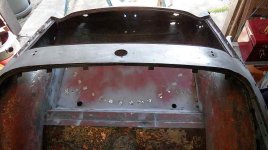
More progress. Last week I lifted the tub off the frame so I could address (to steal a line from Macy's web site) "that little bump from a Buick back in 1964". Actually, I have no idea who, what or when it was bumped. But somwhere in the life line between two shades of BRG, there was a bump. And somewhere a little rust creeped in, so I removed the back side, pounded it out and made a new panel to close it back up solid. My welding lessons will start as soon as my neighbor has time to bring over his MIG and get me started. The tub is back down, bolted solid, and I'll start with the floor patches.
BTW I made some very long (8"-10") alignment rods by threading a little of a 5/16" rod. Once the tub is close, the rods can be inserted into the tub and threaded into the outriggers. It makes line-up a snap.
BTW I made some very long (8"-10") alignment rods by threading a little of a 5/16" rod. Once the tub is close, the rods can be inserted into the tub and threaded into the outriggers. It makes line-up a snap.
Attachments

OP
TexasKnucklehead
Jedi Knight
Offline
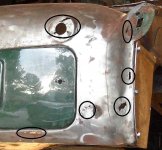
I'm half way through my welding lesson.
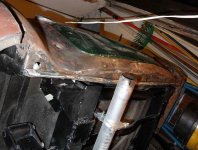
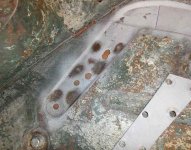
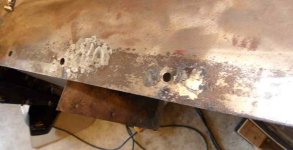
I practiced on a rusted out battery box that I removed and some old steel from a rusted fender. New cleaned steel is easier to weld than rusted steel with paint and filler on it. My neighbor has been patient and kept saying, if you don't like the weld, grind it off, and do it again. At this point, I'm just trying to patch up the floor and make it solid. I have a small sheet of copper under the floor (above the frame) where I'm welding. This is the 3rd patch I welded, so it's good enough to share. The underside shows the welds should be solid.
I have a lot more welding to do... nowhere near 1/2 done.
Attachments
ScottFromNH
Senior Member
Offline
Great work.. Looks like its going to come out great..
Can I ask how did you attached photos? I have been trying to figure that out for a while now and haven't been able to.
scott
Can I ask how did you attached photos? I have been trying to figure that out for a while now and haven't been able to.
scott
TR3driver
Great Pumpkin - R.I.P
Offline
ScottFromNH said:Can I ask how did you attached photos? I have been trying to figure that out for a while now and haven't been able to.
Have to be a paid member to do multiple attachments, or larger than 100Kb. But you can put your photos up on another site (I use PhotoBucket) and link to them without being a paid member of BCF.
For example, if you input <div class="ubbcode-block"><div class="ubbcode-header">Code:</div><div class="ubbcode-body ubbcode-pre" ><pre>

ScottFromNH
Senior Member
Offline
oh thanks for the heads up...
the code didn't come through so I could read it but I see your photo. So I will have to play around and see if I can get something loaded..
I used flicker and posted the link in my other post asking question.
scott
the code didn't come through so I could read it but I see your photo. So I will have to play around and see if I can get something loaded..
I used flicker and posted the link in my other post asking question.
scott
ScottFromNH
Senior Member
Offline
Hey TR3Driver,
Thanks for the tip it worked great using photobucket..
Scott
Thanks for the tip it worked great using photobucket..
Scott
OP
TexasKnucklehead
Jedi Knight
Offline
mallard said:No fuel in that line I hope. The work is coming along just fine, looks good.
Thanks. There is no fuel in that line. No brake fluid either.
OP
TexasKnucklehead
Jedi Knight
Offline
Thanks, my glass seems half fuller... Or fooler.
Randy, Maybe I'll have breakfast Wednesday morning.
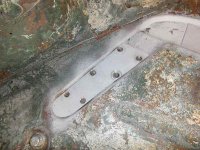
I did some more welding this weekend, and half way to a decent weld with half as much grinding. I'm getting the feel for it and at the same time completing some ugly welds that after a little seam sealer, a little heat/sound deadner, some padded carpet and a thick floor mat, and you'll never know it was patched.
Randy, Maybe I'll have breakfast Wednesday morning.
I did some more welding this weekend, and half way to a decent weld with half as much grinding. I'm getting the feel for it and at the same time completing some ugly welds that after a little seam sealer, a little heat/sound deadner, some padded carpet and a thick floor mat, and you'll never know it was patched.
Attachments

Nothing to do but practice practice practice. Oh, and keep the fit tight between the original and patch panel. And maybe buy grinding disks in Costco sizing. That is what I do since I can't seem to keep my patch panel fit tight.
Thanks for the update - she is really coming together.
Thanks for the update - she is really coming together.
OP
TexasKnucklehead
Jedi Knight
Offline
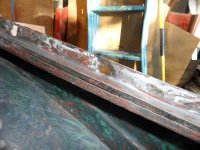
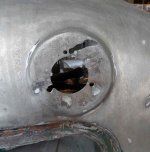
I've used about 40 cut-off wheels, but there's almost no sign of wear on the grind disc. My harbor freight 4" angle grinder has held up well -but occasionally it gets so warm I have to shut it off to cool down. Yesterday I shattered a weld-cutter drill bit after I failed to keep the panels tight, and welded them to stay apart. It was difficult to straighten that out. If drilling a hole to allow welding a panel to the panel under it is called plug welding, then I'd like to put in a plug for that, over seam/butt welding.
Is it just me, or is my trunk smiling at me...
Is it just me, or is my trunk smiling at me...
Attachments
OP
TexasKnucklehead
Jedi Knight
Offline
tdskip said:Nothing to do but practice practice practice.
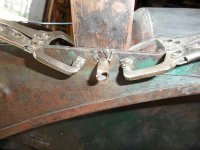
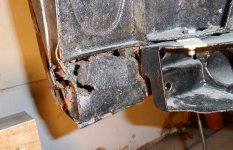
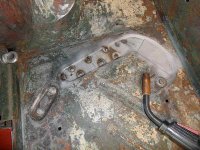
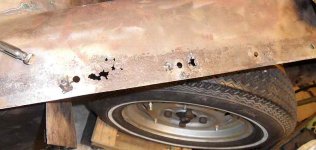
Lawyers and doctors practice. I may still be practicing, but my welds are good to go. I tried a few trickier welds today that involved rusted and/or thin metal. Tush had a great suggestion, and I used a length of copper pipe bent so it sat against the inside of the holes I was trying to weld shut. Aside from shedding some heat, the weld will not stick to it, but the weld-wire will still arc when it hits it (instead of just disappearing into the hole).
I'm not sure if I am practicing welding, or grinding. Thin metal can be a challange.
Attachments

OP
TexasKnucklehead
Jedi Knight
Offline
I failed a welding quiz this morning. I couldn't get a weld to work no matter how I tried. Cold, spitting, no flow, etc... Luckily I had a lunch appointment, and when I shut down everything, I found I hadn't turned the gas on.
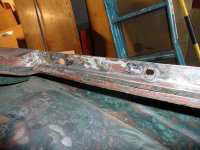
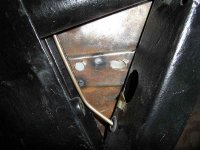
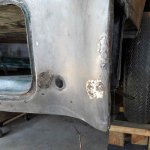
But this afternoon I passed my first real test. I wleded in my dog-leg patch. It's seam welded solid to the section above it, and inside the door jam (and tacked to the fender patch as well as to the inner sill on the under side). I purchased a new dremel today to help with the grinding in tight places. I wish I'd have done that sooner.
Yesterday I used the copper pipe trick to fix the holes inside the trunk that take screws to hold on the rear fender. My holes were so messed up, the screws couldn't be positioned properly to align the fender correctly. Now that fender fits like it was made to.