
-
 Hey Guest!
British Car Forum has been supporting enthusiasts for over 25 years by providing a great place to share our love for British cars. You can support our efforts by upgrading your membership for less than the dues of most car clubs. There are some perks with a member upgrade!**Upgrade Now**
(PS: Upgraded members don't see this banner, nor will you see the Google ads that appear on the site.)
You are using an out of date browser. It may not display this or other websites correctly.
You should upgrade or use an alternative browser.
You should upgrade or use an alternative browser.
TR2/3/3A Beginning the TR2 Bodywork
- Thread starter CJD
- Start date
TRopic6
Jedi Warrior
Offline
Yeah - weird that an early 3A body with flat hinge mounts is missing so many pre-60K features. I hope the original tub can be saved, but would be a big job. Hopefully others have some suitable patch pieces around if you go for it. I salute your skill & dedication to authenticity; will PM you about a driver floor I have in case the Maine floors fall through.
Jeff
Jeff
John_Progess
Jedi Warrior
Offline
John,
The TR2 looks bad but the TR3 does not look that bad. I think mine was that bad and yes it was alot of work but that is what we get messing around with 50 to 60 year old cars. My 64 Healey 3000 I ended replacing the entire bottom 6" of the car. Alot of work but it was worth it. I also have an extra RH floor panel if you need it. Roadster factory part 950054. And thanks again for the accelerator rod bearing half shell you sent me for a friend. Have a good day!
John
M_Pied_Lourd
Darth Vader
Offline
Nope, John won't do that as he doesn't want to see the 2 scrapped under someone else's ownership..he will make it right and be darn proud of his accomplishment. Rightly so!
Cheers
Tush
Cheers
Tush
Your tr2 shell looks almost as bad as mine, same kinda rust issues, just not as bad in some spots as others. But the differences are huge, I think that's why I got my tr2 as a parts car, not really touched due to the differences to a tr3. Plus you'll be the only one that notices the little differences anyways so use what's the best out of the pair!
OP
CJD
Yoda
Offline
Thanks, everybody, for the support...I definitely need it!
The CL floors came close...the gentleman at first said he was willing to ship and asked for my address. But then he came back that they sold locally. I bet he just didn't want to deal with packing them...Not sure I would want to either.
I think I've had enough beer to evolve an attack plan. I will remove the front cowl sections from both tubs, and then splice the front cowl of the TR2 onto the TR3. The floors will be replaced, and possibly the inner/outer sills, depending how they emerge from the sand blasting. This operation will get me started, and give me something to do while I figure out the details.
So stay tuned!
OP
CJD
Yoda
Offline
I had several offers for body parts...Thanks to you all! I am now covered for the floors, outer sills, and battery box.
I still have not gotten deep enough to see the inner sills on the donor car, but if anyone has inner sills sitting around, I'd love to buy them from you. That should be the last key to fixing the tub.
I still have not gotten deep enough to see the inner sills on the donor car, but if anyone has inner sills sitting around, I'd love to buy them from you. That should be the last key to fixing the tub.
OP
CJD
Yoda
Offline
Week 26
Well. This week marks an entire half year, just on bodywork. A milestone, although not a particularly good one.
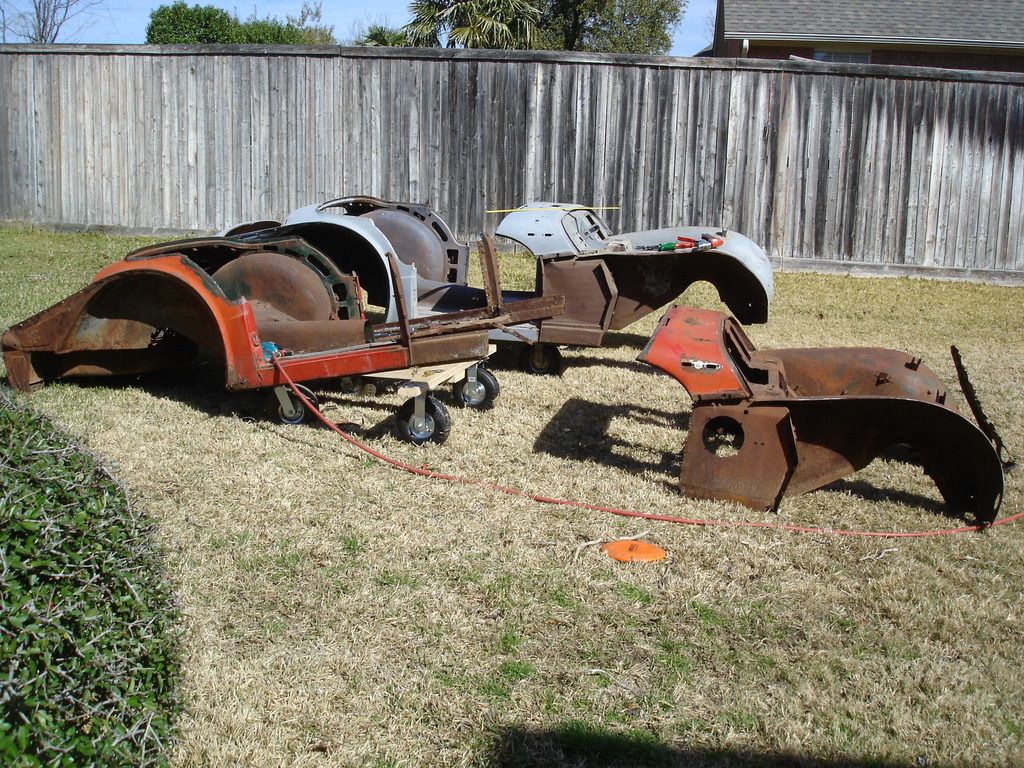
As I left last week, I managed to come up with a tentative game plan for the tub. It envolves using the front cowl from the original car...since I was raised working on American metal, I'll refer to this as the front clip. Then, I will use the rear clip from the donor car. Finally, most of the metal in the middle will be new.
Sounds simple...if only it were simple.
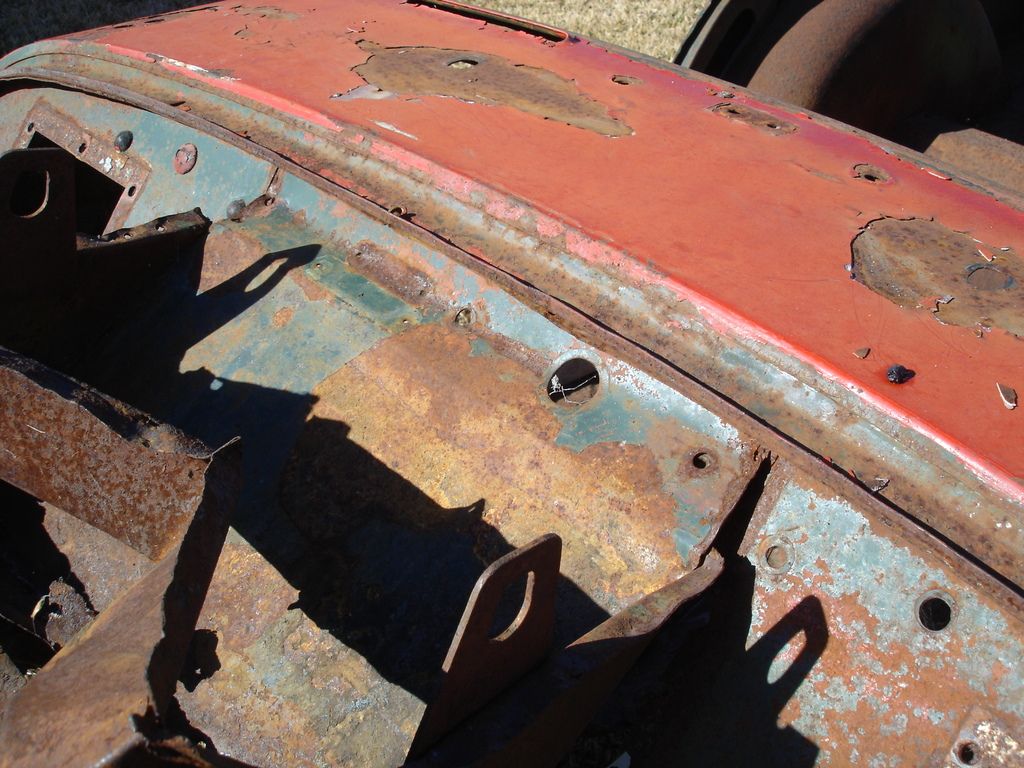

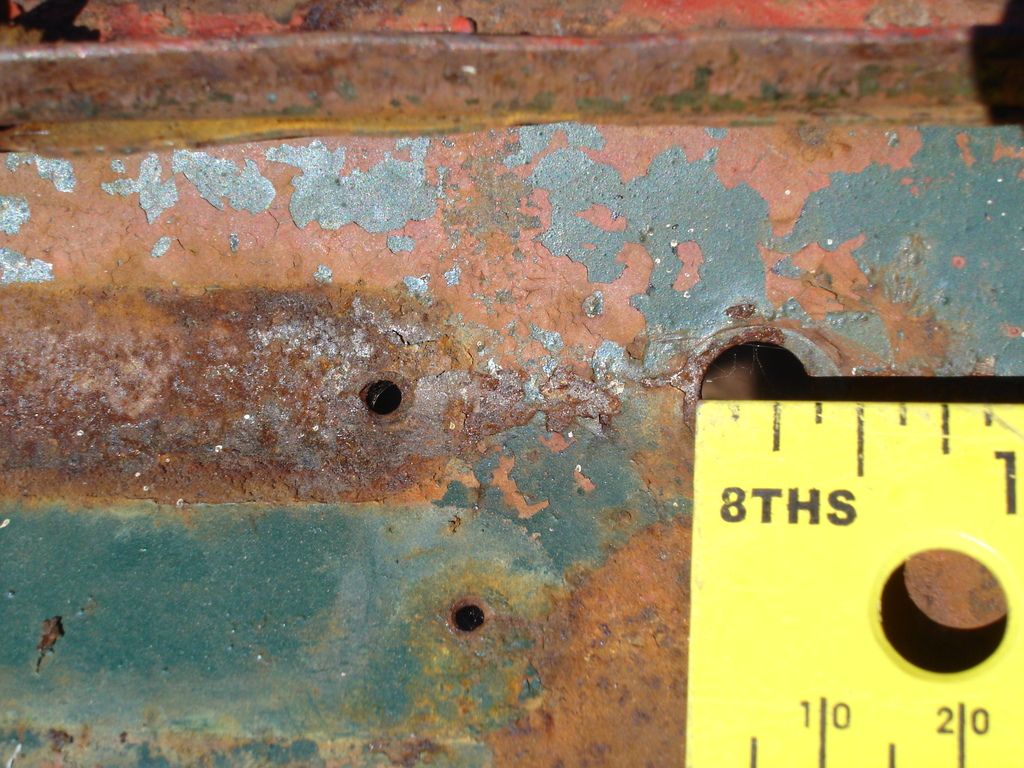
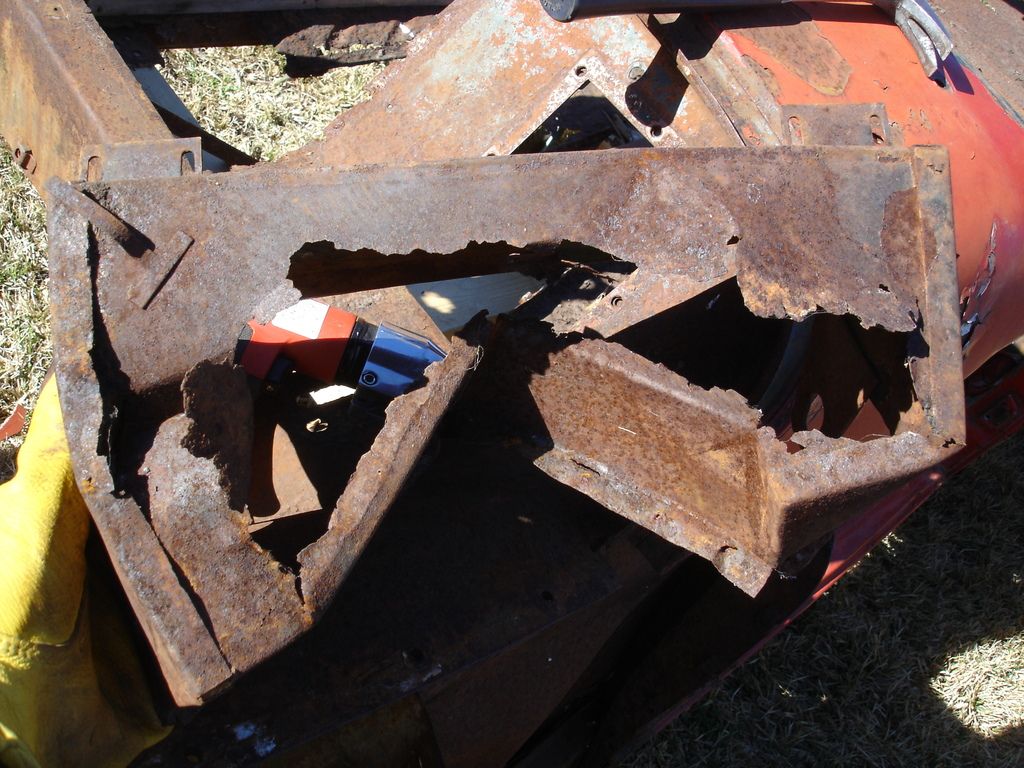
This is a view of the battery box on the TR2 tub. I started removing it 3 years ago, and was so totally disgusted with the situation that I quit. 3 years later I am finishing the removal. The battery box in the donor car is intact, but it looks like some home made affair, and it was welded in to well to make removal easy. I will spring for the $58 for a new box.
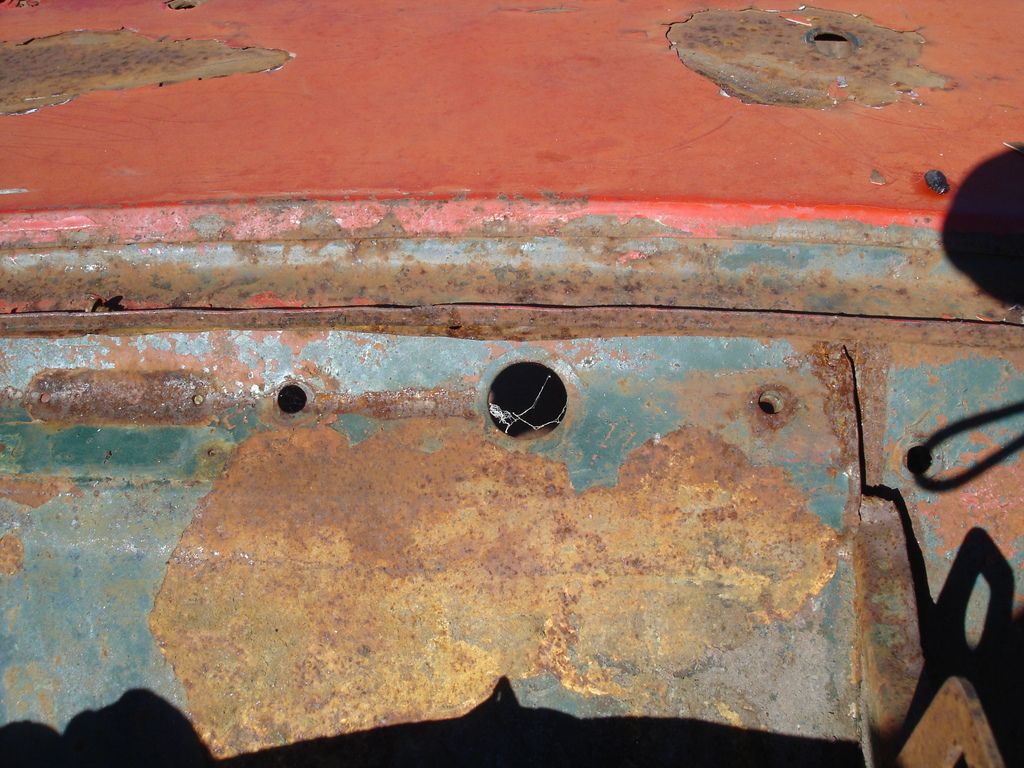
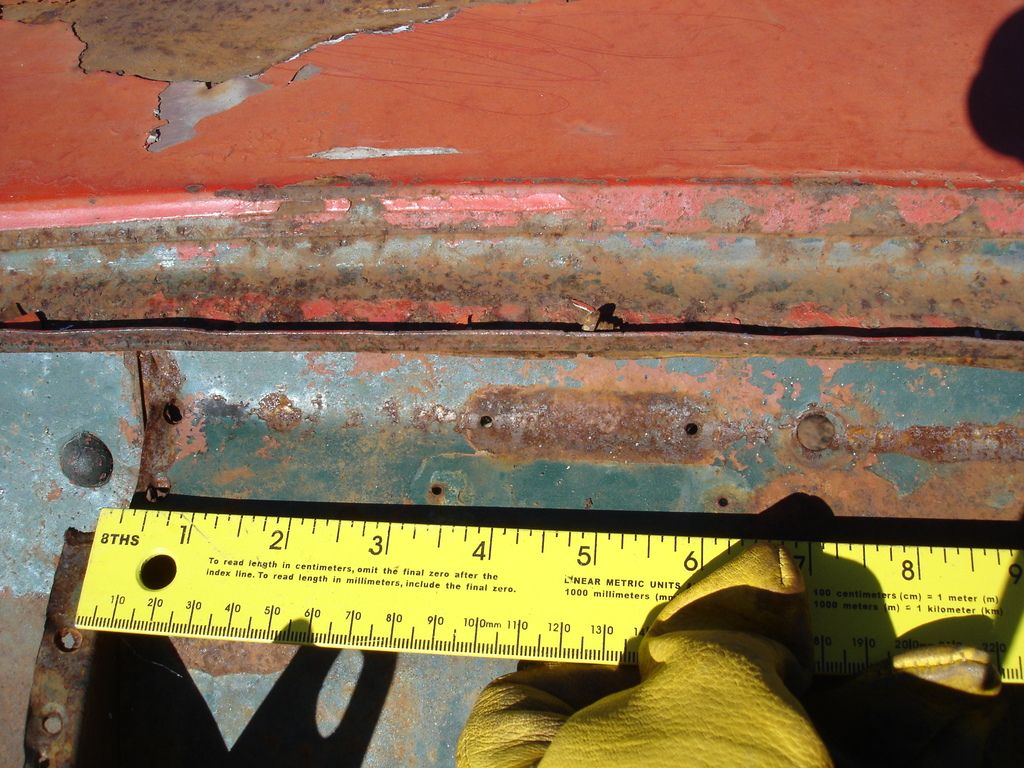
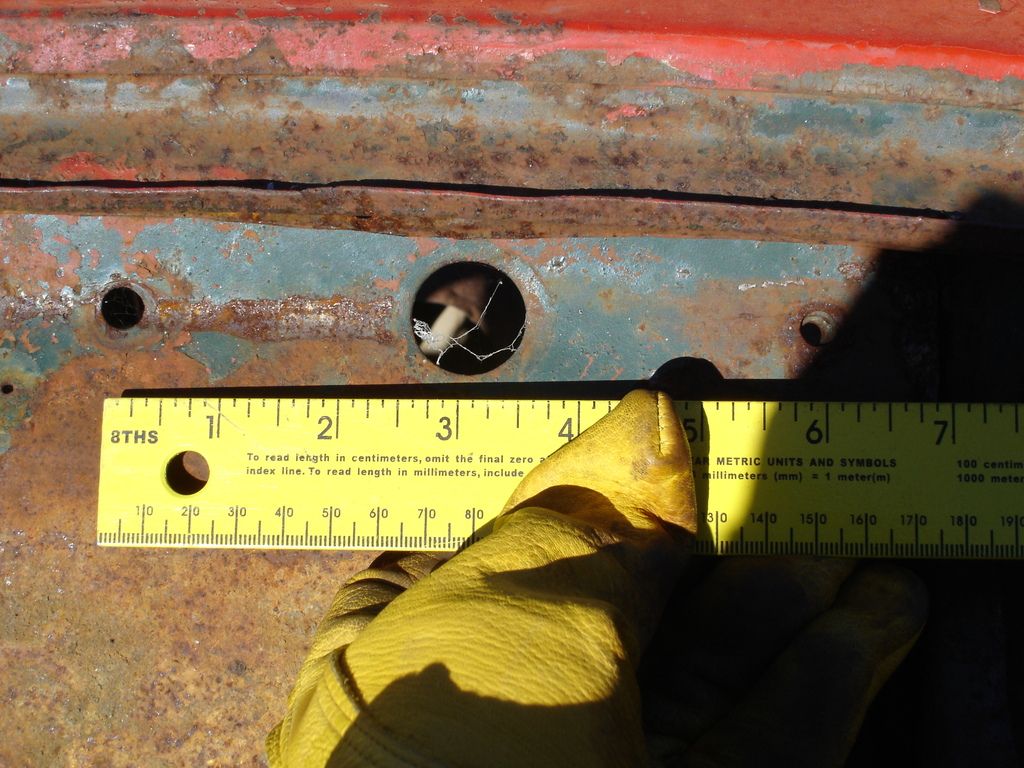
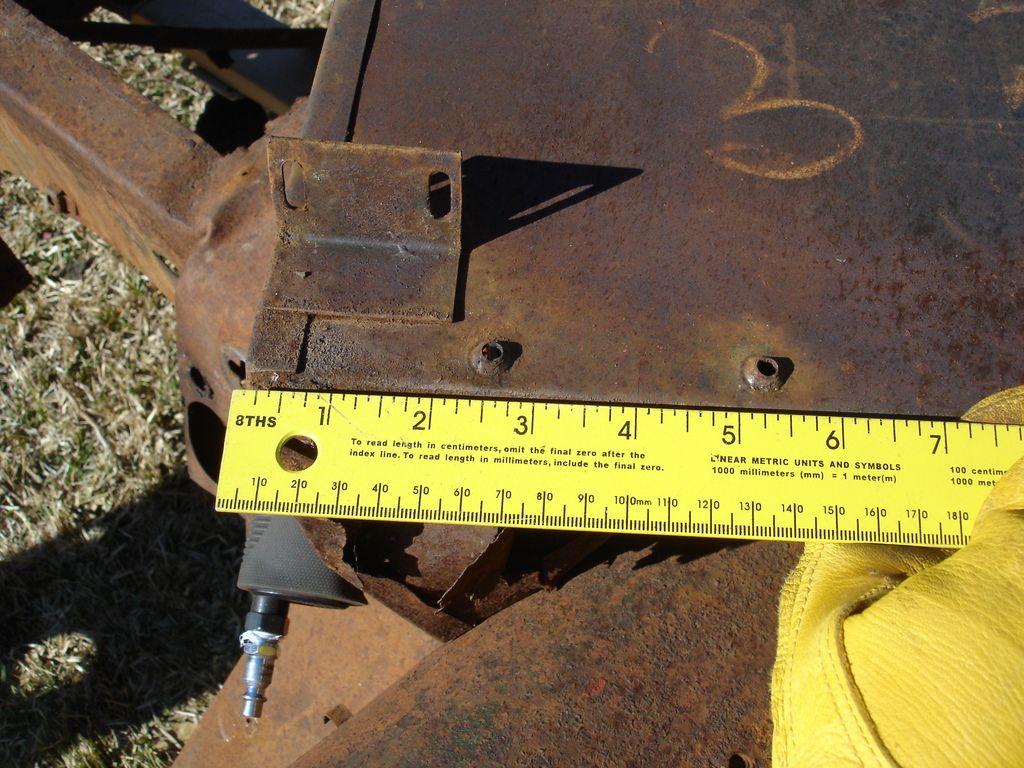
Here, and the next few pics I am taking measurements so I can duplicate the series of holes that are in the original box. Also, the little "T" wire loom holders do not come on new battery boxes, so I am documenting their locations.
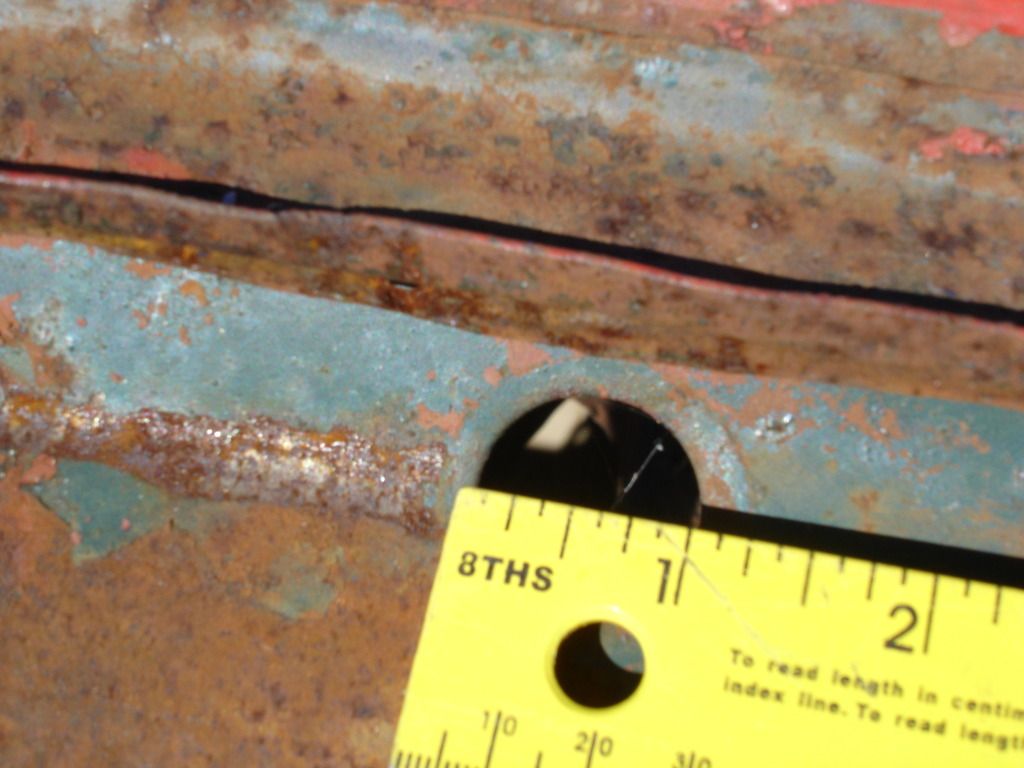
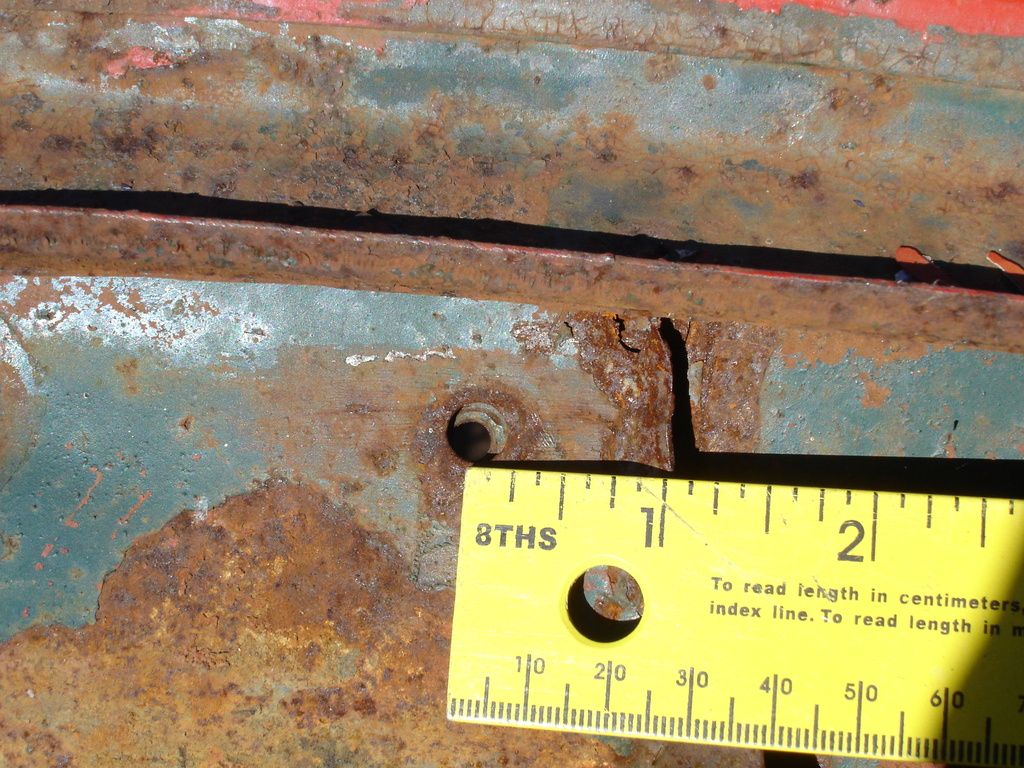
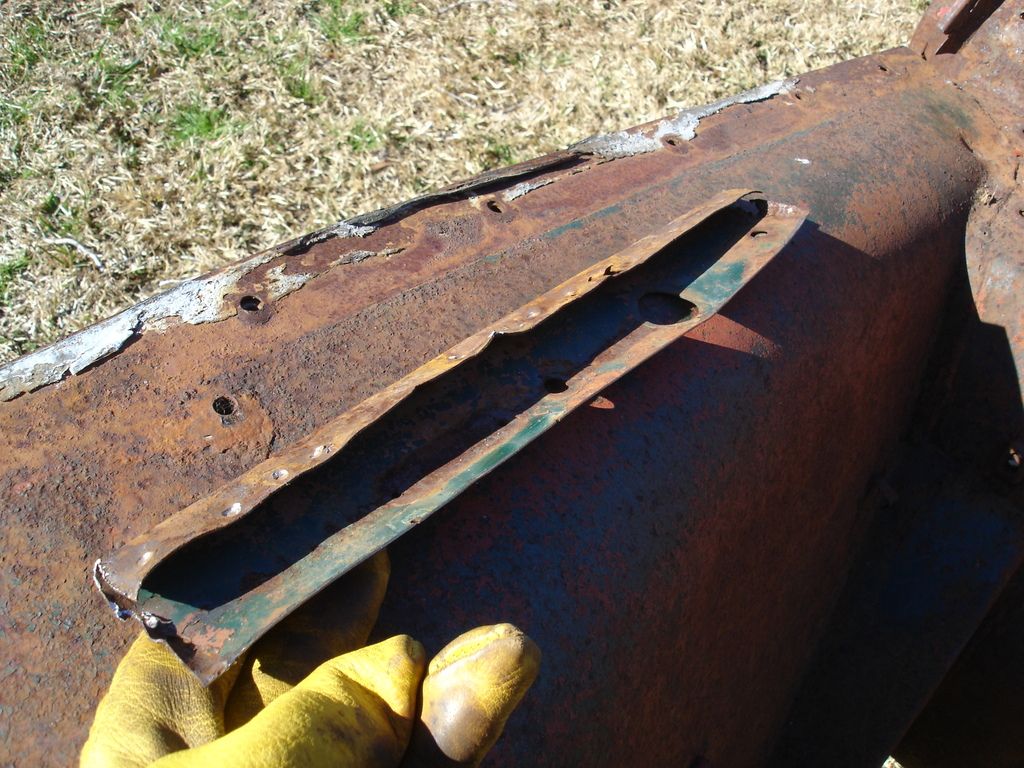
Here I went ahead and cut out the box, leaving just the spot welded top metal to be drilled out.
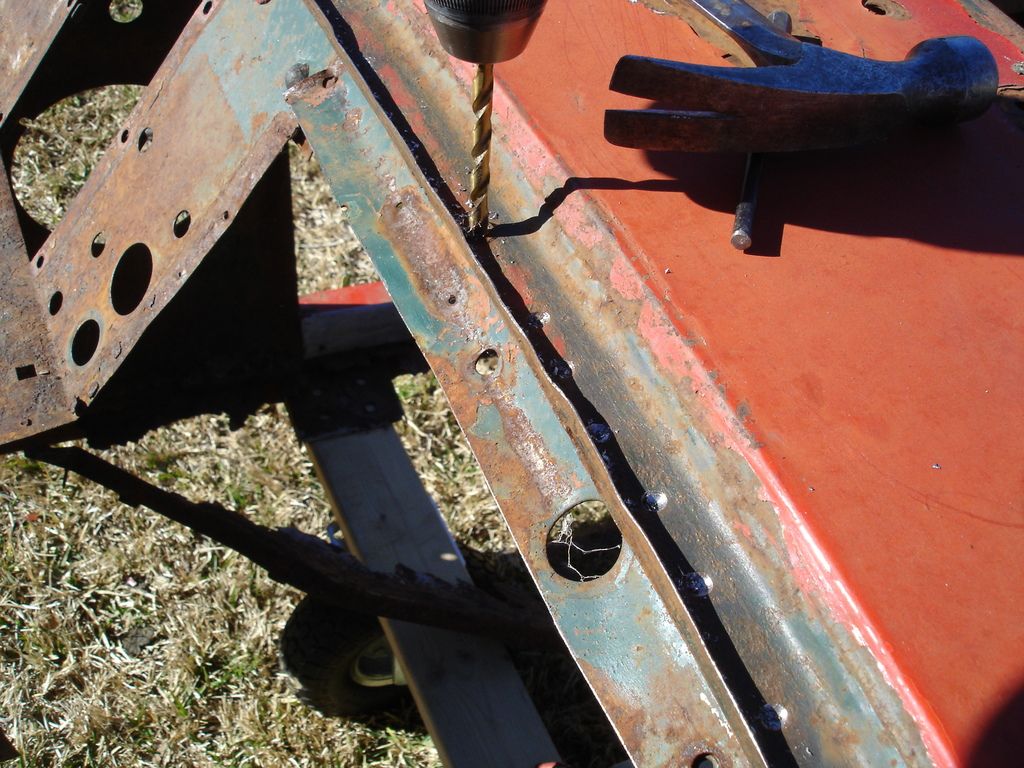
Standard 3/16" drill bit on each spot weld, and then I rapped the plates apart using a 3/16" drift punch. Any problem areas get chiseled. This process wears out drills and chisels fast, so I stop frequently to sharpen them.

The box removed. The tub already looks better, without the mangled box dangling there!
And, Just in case I get confused, I will save the top section with the holes, until I have duplicated them on the new box.
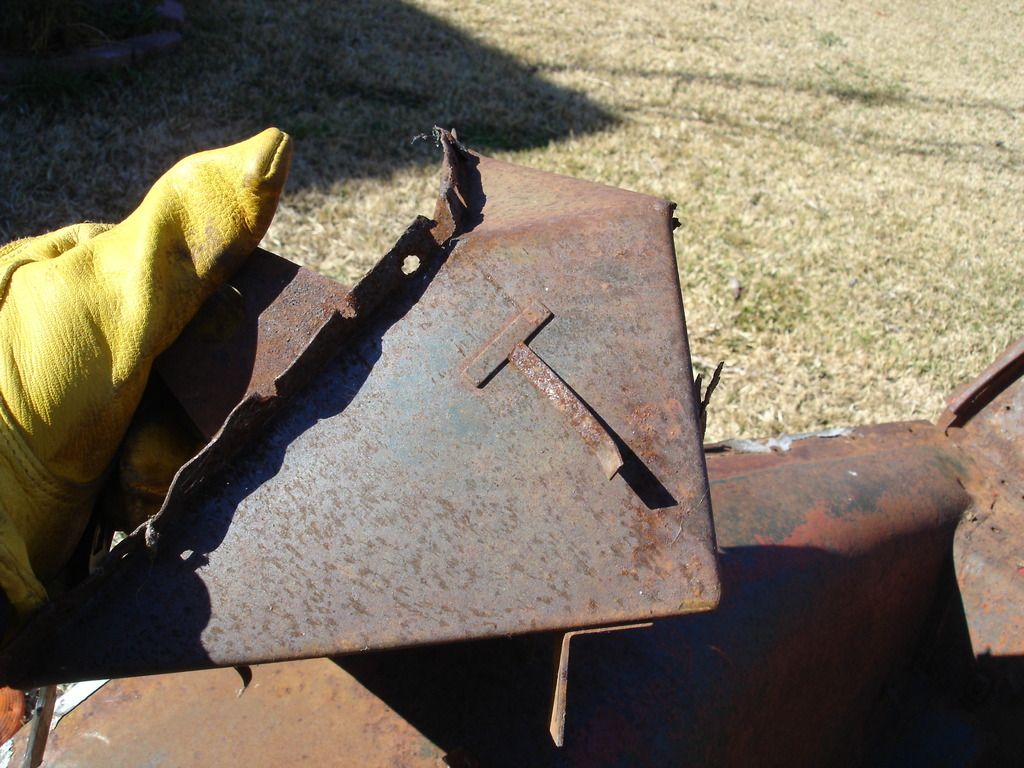
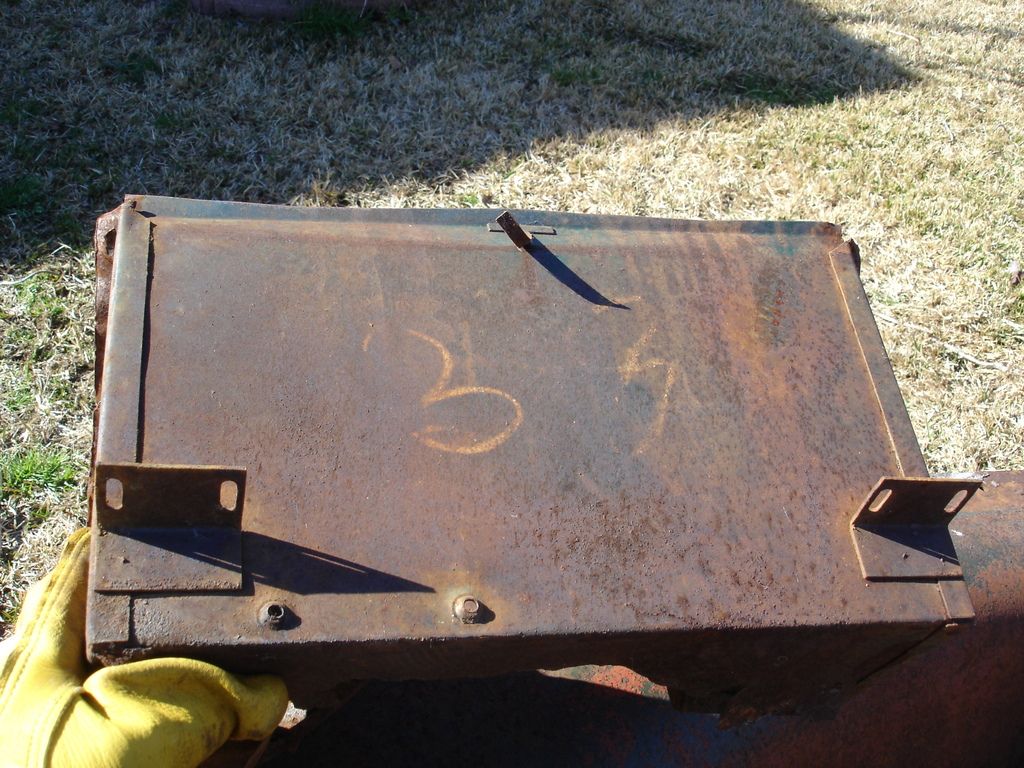
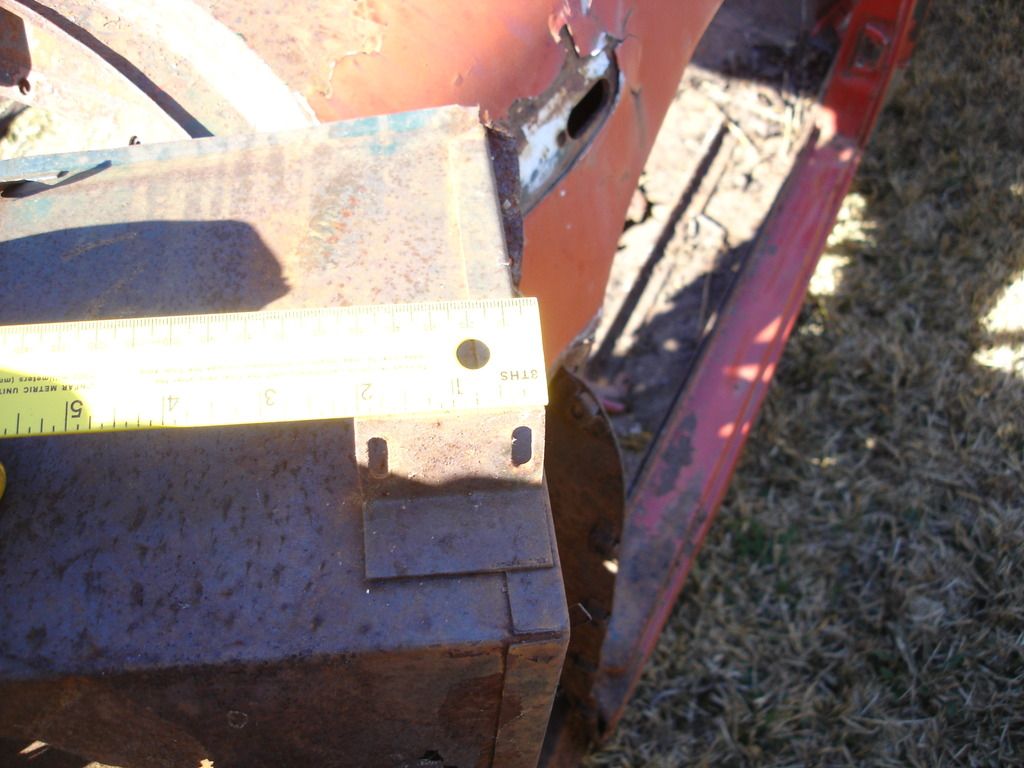
Here is the wire loom "T" on the right side of the box. Also note the angle bracket that attaches the dash brace. These parts do NOT come on new boxes...so they will have to be duplicated later. I will even go as far duplicating the yellow factory markings on the box...when the time comes.
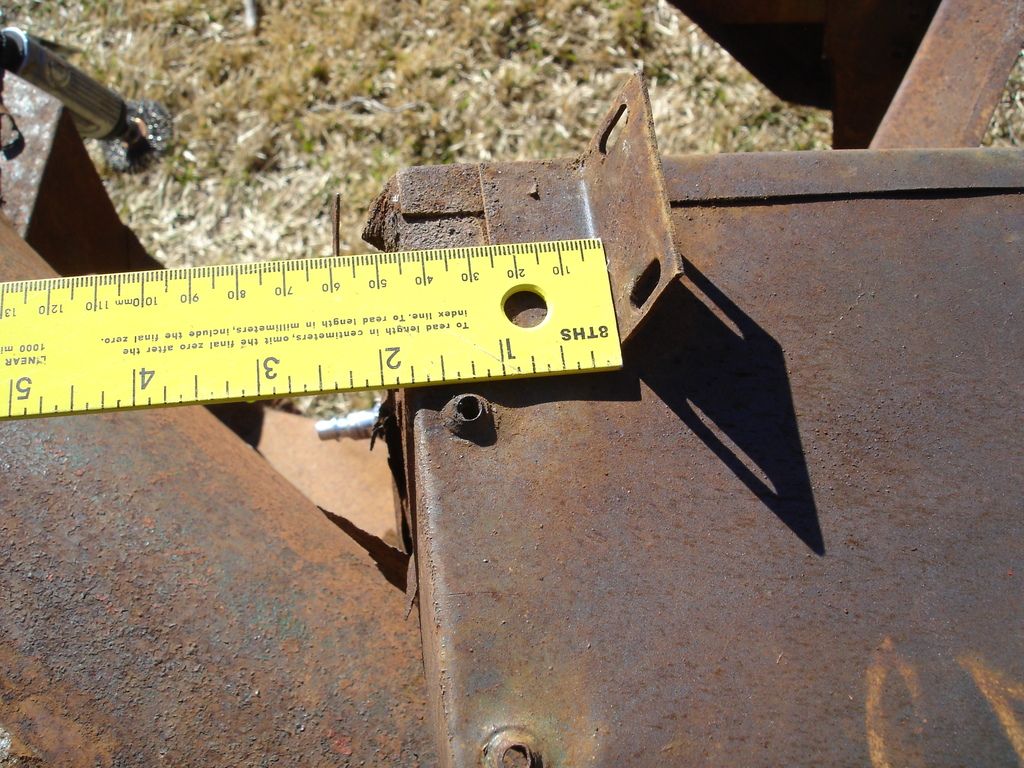
Since this is an overdrive car, the OD solenoid attaches to the left, rear corner. Here I note the spacing and location to duplicate.

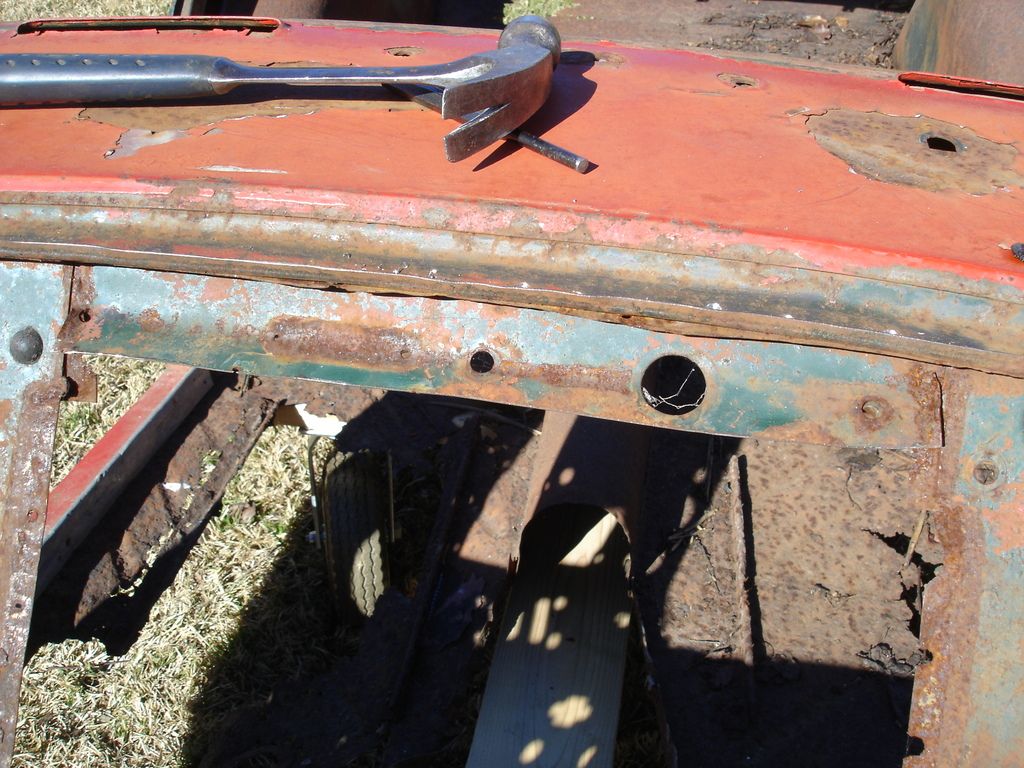
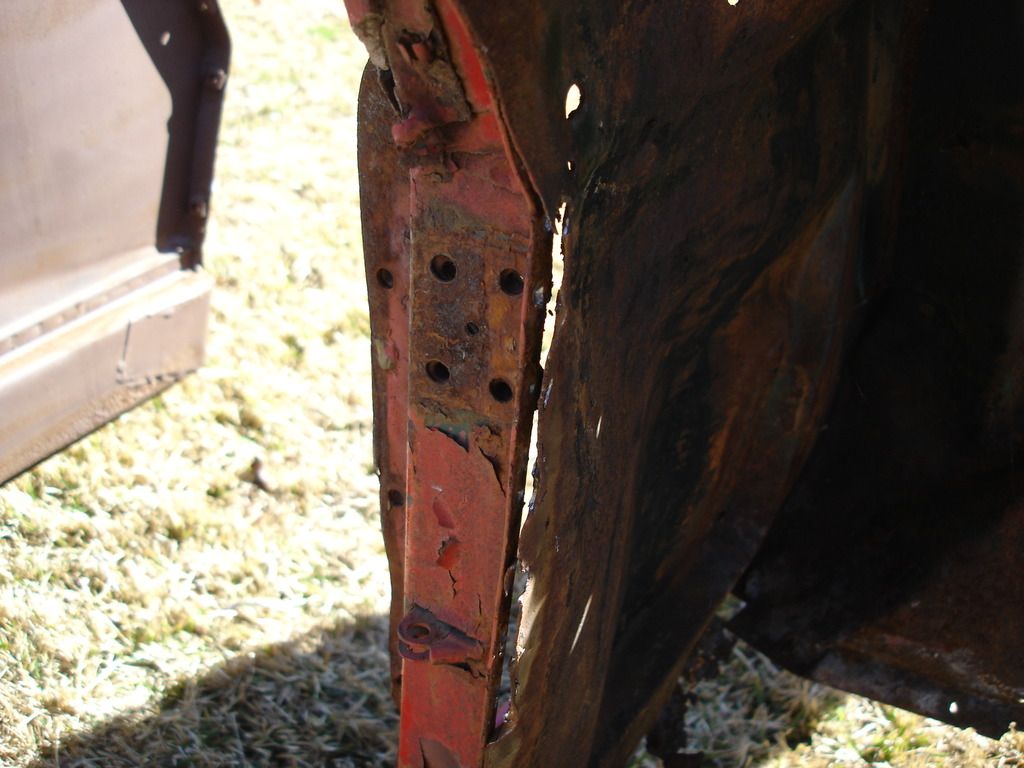
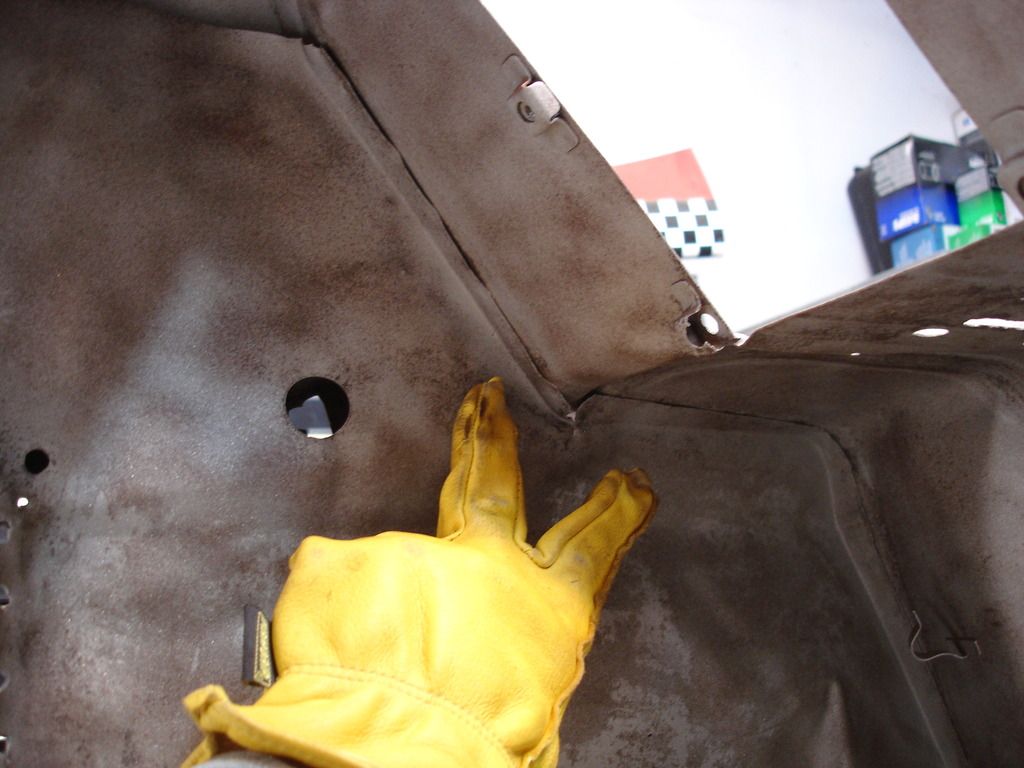
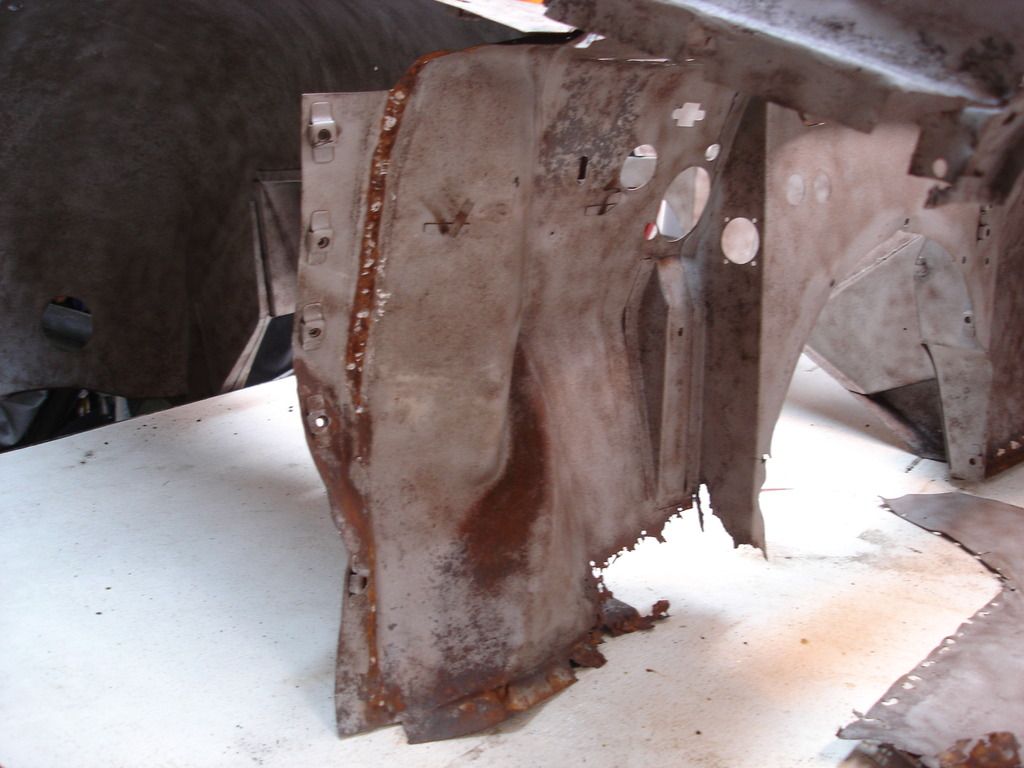
This is the left "A" post, to which the door hinges. The post in my TR2 was hit in an accident, and you can see the curve in the post. It should be perfectly vertical and straight. This is the point I will break the front clip from the rest of the tub.
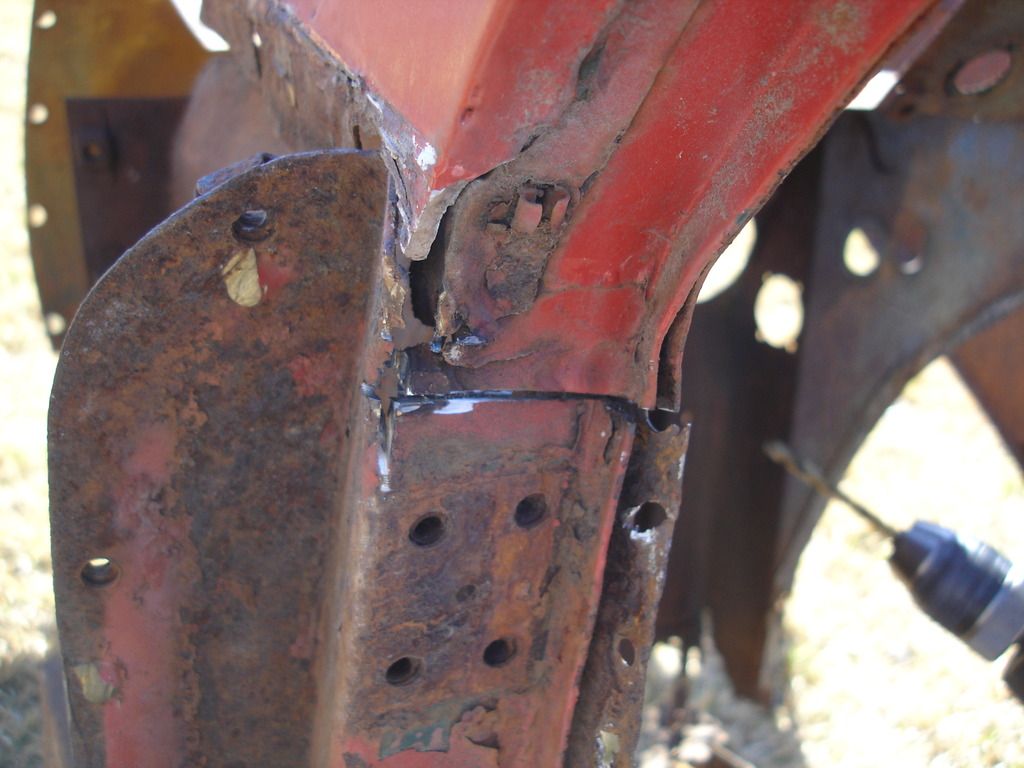
Now, breaking off the front clip sounds envolved, but you will see it is merely a matter of drilling the line of spot welds which are holding the side kick panels to the "A" posts. This is a matter of about a dozen spots per side.
Normally the floor would have to be removed too...but in my particular case..."what floor??"
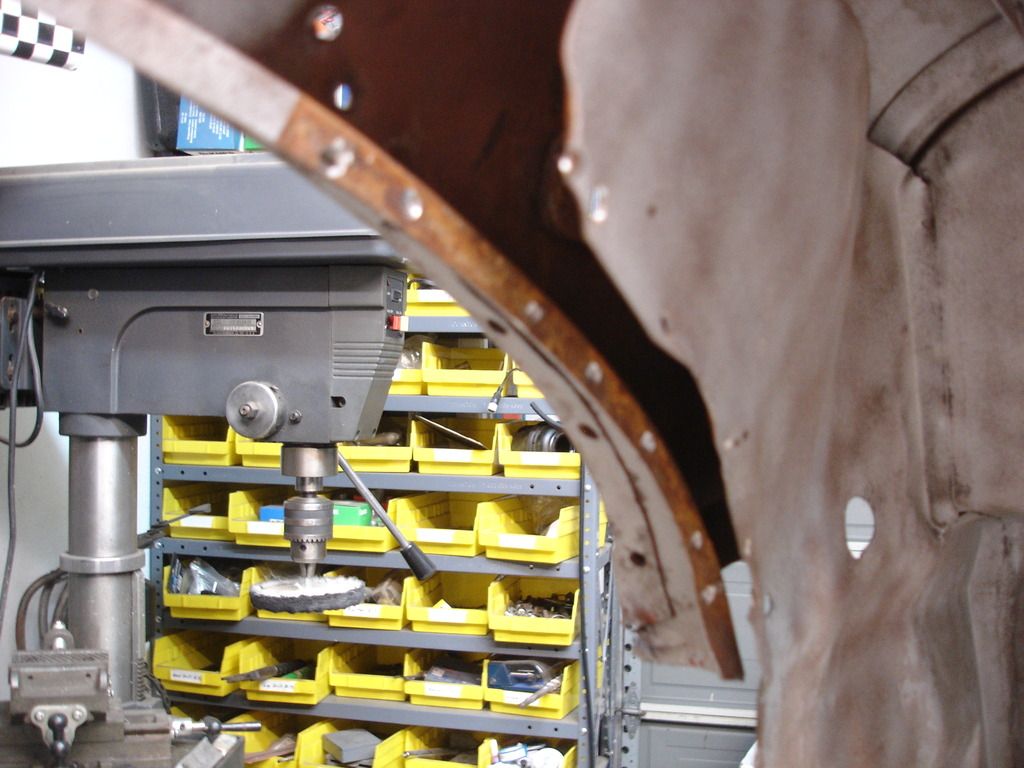
Here I am working my way up the A post drilling out the spots. You can start to see light between the kick panel and A post.
The very top of the post has one long weld, so here I used a cut-off disc to slice through it. I favored the kick panel side of the weld, since I will be re-using the kick panel and NOT the A post.
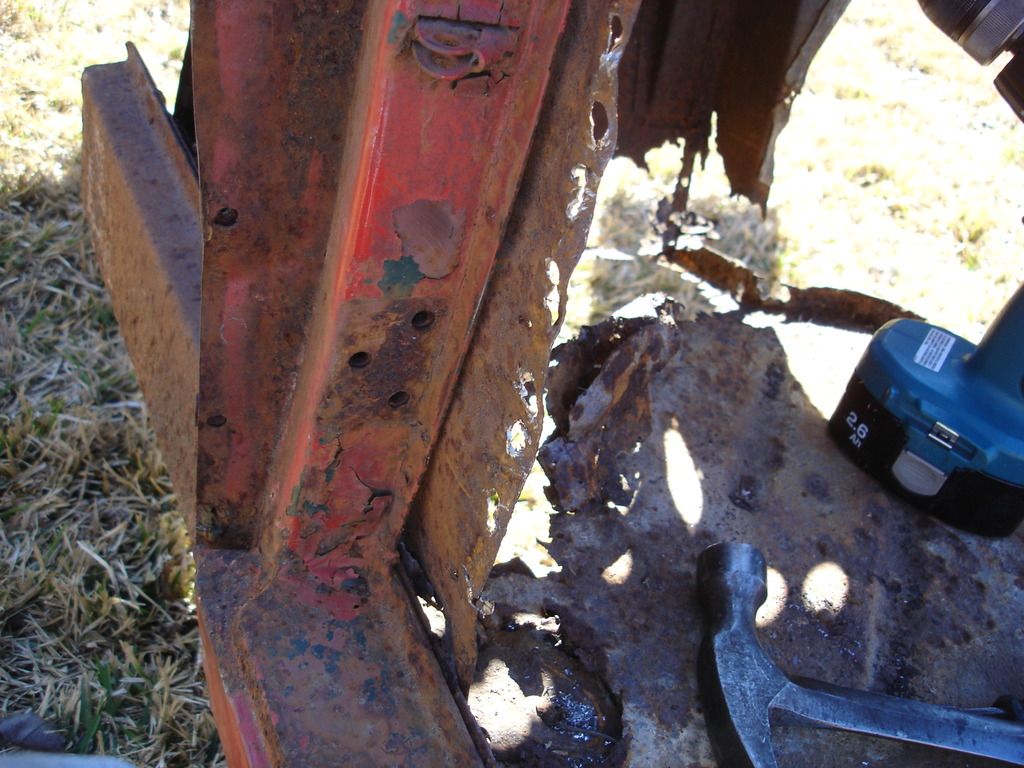
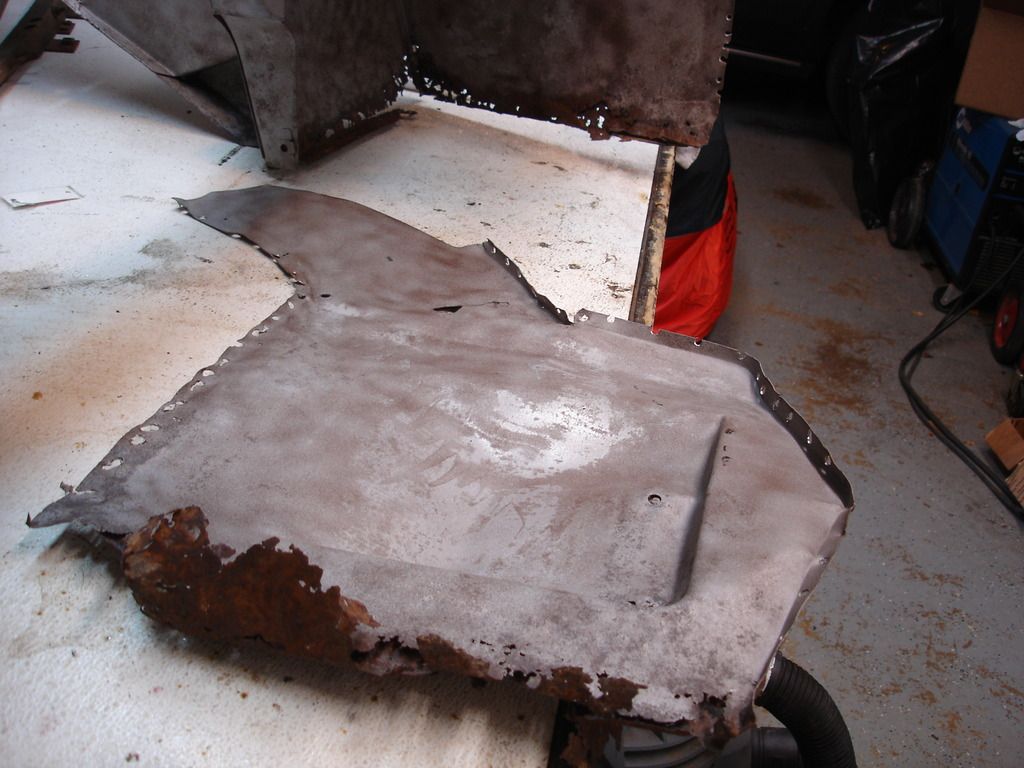
Once the last spot is drilled, the kick panel no longer supports the front clip, so here you can see it is rotating inward. One side down, one to go...
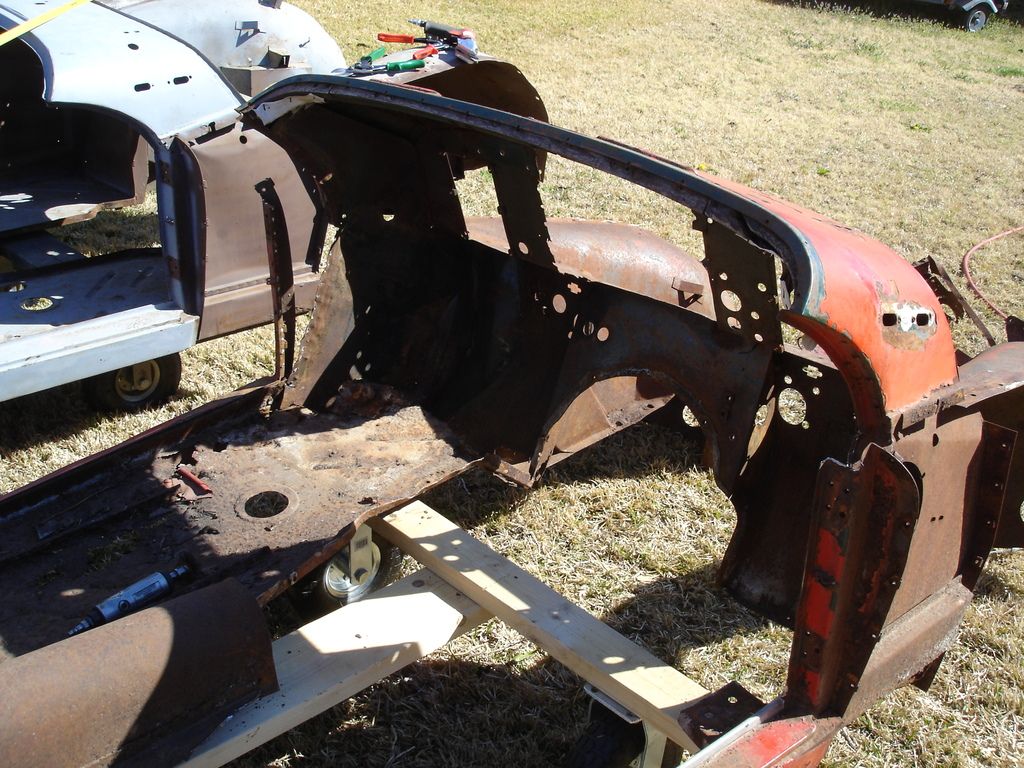
The right side was identical...and here is the front clip removed. I will be able to fit this entire part on my work bench as I patch and straighten it.
Well. This week marks an entire half year, just on bodywork. A milestone, although not a particularly good one.
As I left last week, I managed to come up with a tentative game plan for the tub. It envolves using the front cowl from the original car...since I was raised working on American metal, I'll refer to this as the front clip. Then, I will use the rear clip from the donor car. Finally, most of the metal in the middle will be new.
Sounds simple...if only it were simple.


This is a view of the battery box on the TR2 tub. I started removing it 3 years ago, and was so totally disgusted with the situation that I quit. 3 years later I am finishing the removal. The battery box in the donor car is intact, but it looks like some home made affair, and it was welded in to well to make removal easy. I will spring for the $58 for a new box.
Here, and the next few pics I am taking measurements so I can duplicate the series of holes that are in the original box. Also, the little "T" wire loom holders do not come on new battery boxes, so I am documenting their locations.


Here I went ahead and cut out the box, leaving just the spot welded top metal to be drilled out.

Standard 3/16" drill bit on each spot weld, and then I rapped the plates apart using a 3/16" drift punch. Any problem areas get chiseled. This process wears out drills and chisels fast, so I stop frequently to sharpen them.

The box removed. The tub already looks better, without the mangled box dangling there!

And, Just in case I get confused, I will save the top section with the holes, until I have duplicated them on the new box.


Here is the wire loom "T" on the right side of the box. Also note the angle bracket that attaches the dash brace. These parts do NOT come on new boxes...so they will have to be duplicated later. I will even go as far duplicating the yellow factory markings on the box...when the time comes.


Since this is an overdrive car, the OD solenoid attaches to the left, rear corner. Here I note the spacing and location to duplicate.

This is the left "A" post, to which the door hinges. The post in my TR2 was hit in an accident, and you can see the curve in the post. It should be perfectly vertical and straight. This is the point I will break the front clip from the rest of the tub.
Now, breaking off the front clip sounds envolved, but you will see it is merely a matter of drilling the line of spot welds which are holding the side kick panels to the "A" posts. This is a matter of about a dozen spots per side.
Normally the floor would have to be removed too...but in my particular case..."what floor??"

Here I am working my way up the A post drilling out the spots. You can start to see light between the kick panel and A post.

The very top of the post has one long weld, so here I used a cut-off disc to slice through it. I favored the kick panel side of the weld, since I will be re-using the kick panel and NOT the A post.


Once the last spot is drilled, the kick panel no longer supports the front clip, so here you can see it is rotating inward. One side down, one to go...

The right side was identical...and here is the front clip removed. I will be able to fit this entire part on my work bench as I patch and straighten it.
OP
CJD
Yoda
Offline


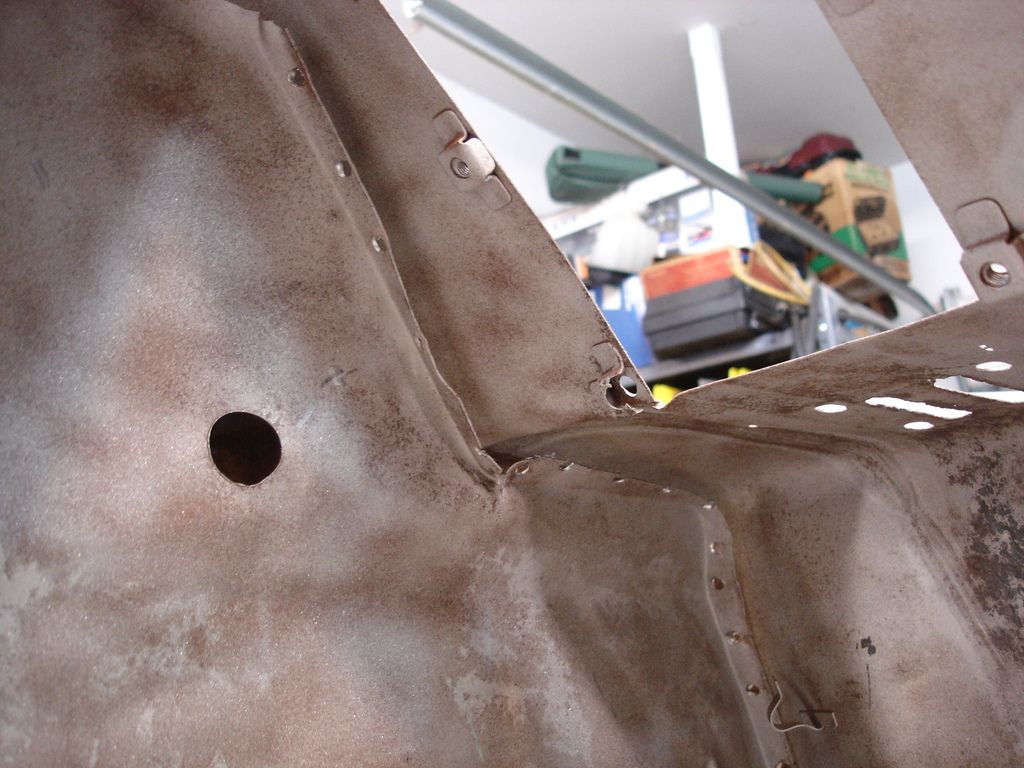
These are a couple shots of the right inner sill, where it extends forward from the A post. Other than the mounting pads to the frame, it really is better than I expected.

And the left inner sill.


I am now prepping for sand blasting. If you remember the pics earlier, the inner wings are rusting out where the forward body mount attaches. Here I have opened up some of that area so I can get the abrasive into it and clean the rusticles out.
Commercial break....


To clear my table for the front clip, I painted the frankenstien radiator. Looks pretty good with a coat of paint, huh!


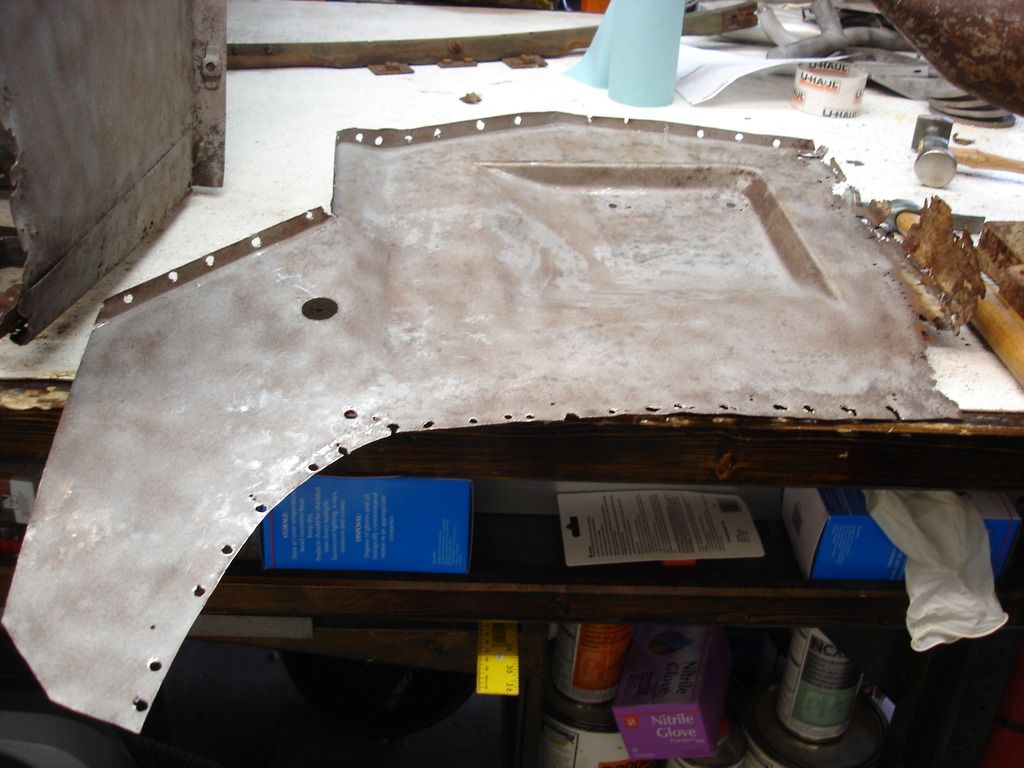
So, this is the front clip all blasted and set on the table. I spared you the gruelling pain of blasting, which took about 8 hours. I even destroyed my new compressor. No prob...it's still got 2 years of warranty. This will be the last car I plan to sand blast in my life, so I will try to stretch the ruined compressor until I'm done with the tub blasting...then I'll call Ingersoll Rand to give me a fresh one. Blasting is by far the hardest load you can put on compressors.
Looking ahead to next week...

This is looking in the drivers foot well. You can easily see the accident damage in the front firewall, kick panel...and not seen is the front scuttle. I will have to remove the kick panel to straighten all this metal BEFORE I can fab my first patch for the lower rust outs.


I thought I was done with my wood working for this project...
....nope.
This is the dash insert. The door woods were only a warm up for this mother of all wood working jobs!
Anyway, hope you guys are taking some time to enjoy the early spring weather...until next week...
M_Pied_Lourd
Darth Vader
Offline
Making great progress. It's looking better already.
Cheers
Tush
Cheers
Tush
OP
CJD
Yoda
Offline
Week 27

This week I start to tackle the repairs on the front clip. It is a toss up as to whether it would be easier to convert the TR3 front clip or repair the original TR2 clip. One thing I have learned is to not second guess yourself. Pick a path and stay on it ...until something knocks you off the path!
This is the corner of the scuttle, with a bit of rust through I will have to contend with. I decided to move to the opposite corner and take care of the accident damage first.

So, this is the starting point. Both the kick panel and firewall are bent like an accordion. I will first remove the kick panel to make it easier to access the damage and beat it out.
Here I am pointing to the line of spot welds that are holding the kick panel to the firewall. Just a matter of methodically drilling and splitting the welds.
Here I have broken the welds along the scuttle. I'll keep working my was forward and downward. Nothing special...
I drill the spot about 1/2 way through using a 3/16" drill bit, and then use a sharp chisel to break the weld apart. Some pop easily, others not so easily.
Almost done.
And finished. Now you can easily see the accident damage to the driver's side firewall. I'll come back to this. For now I will fix the kick panel that I just removed.
2 issues going on with the kick panel. First, I will have to straighten the accident damage. Once the panel is straight, then I will replace the rusted out section along the floor board.
Poof!! The panel is magically straight! I wish. I used the anvil as a dolly and just gradually worked the metal into shape. The anvil is not required, but using it for a backing frees one of my hands to align the panel for each tap.

This week I start to tackle the repairs on the front clip. It is a toss up as to whether it would be easier to convert the TR3 front clip or repair the original TR2 clip. One thing I have learned is to not second guess yourself. Pick a path and stay on it ...until something knocks you off the path!
This is the corner of the scuttle, with a bit of rust through I will have to contend with. I decided to move to the opposite corner and take care of the accident damage first.
So, this is the starting point. Both the kick panel and firewall are bent like an accordion. I will first remove the kick panel to make it easier to access the damage and beat it out.

Here I am pointing to the line of spot welds that are holding the kick panel to the firewall. Just a matter of methodically drilling and splitting the welds.

Here I have broken the welds along the scuttle. I'll keep working my was forward and downward. Nothing special...
I drill the spot about 1/2 way through using a 3/16" drill bit, and then use a sharp chisel to break the weld apart. Some pop easily, others not so easily.

Almost done.

And finished. Now you can easily see the accident damage to the driver's side firewall. I'll come back to this. For now I will fix the kick panel that I just removed.

2 issues going on with the kick panel. First, I will have to straighten the accident damage. Once the panel is straight, then I will replace the rusted out section along the floor board.

Poof!! The panel is magically straight! I wish. I used the anvil as a dolly and just gradually worked the metal into shape. The anvil is not required, but using it for a backing frees one of my hands to align the panel for each tap.
OP
CJD
Yoda
Offline

Now to replace the lower rusted out section. Here, note that I always straighten the metal first, and only then do I replace any metal. If you replace metal on a bent panel, you will lock in the bends and may not be able to ever remove them.
If you study this pic, you will notice that some of the floor is still attached, looking like double metal. Originally, the kick panel had a 1/2" bent ledge along the bottom, which rested inside the floor pan.. That 1/2" ledge is gone, so I will have to duplicate it.
Also, if you look closely at my index finger, I have ascribed a line precisely 2" up from where the ledge will be. I made it straight, and I made it 2" so I can keep a reference after the bad metal is sheered off.
I then formed a bottom section from fresh 20 gage metal to weld on to the cut edge. I've done this a good 2 dozen times, so I am sparing you the details.

Here is the lower mounting hole for the headlight dimmer switch on the kick panel. It is rusted out around the hole and the entire area has to be replaced. This presents a challenge...once I remove the metal, how do I know where to put the hole after?
The solution I used here is to mark the panel in a section far enough away from the repair that I can find the references later. In this case, I marked a 2" reference to locate both "x" and "y" directions.


I marked the area to be replaced, but before I cut it out, I shaped the replacement patch. The lower pic shows that the 2 edges have a slight curve I had to beat into the patch. Before I cut I could use the original as a pattern. If you cut first, it would be difficult to get the bends right.


And the patch is in place. I re-cut the hole using my reference points, and now only have to add the caged nut to the back side.


To emulate a spot weld, I punch 2 holes into the new cage. I will then hole-weld through these holes.


And the kick panel is done.
M_Pied_Lourd
Darth Vader
Offline
Super!
Cheers
Tush
Cheers
Tush
OP
CJD
Yoda
Offline

Now for the firewall. The severity of the damage poses (another) problem. If I just start beating the panel, I will end up with hammer dimples that will stretch it badly. Here I am showing a large 1/4" thick steel plate that I will use as a dolly. It has to be large to span the distance between the rumples in the metal.
Note....I really wanted to press this area out, by using 2 plates like I have in the pick. I could then clamp the plates to both sides of the firewall and use "C" clamps to press the whole panel at one time. That would avoid any hammer marks. But...I didn't have another steel plate, and going to get one would take more time than just using the one plate and a hammer. I mention the pressing technique as an alternative to those who follow.

This is about half way through the process. I am holding the plate on one side and hitting the high points on the opposite side. Do not hit so hard as to create hammer dimples. Just keep working gradually to minimize stretching. I am also alternating sides for the hammer and dolly...being ambidextrous would be nice for hammering left handed!

About 3/4 done. Again, this cannot be rushed. Study the dents and work them out by backing the lows and tapping the high spots. Because of the large area envolved, I had to work slowly across the entire panel, so as to only straighten a little at a time, then go back to the beginning and work slowly across the panel again.

Here, I have beat it a good as I can. The areas that are not straight have been stretched. Stretching was inevitable in damage this bad. So, now the process changed back to the shrinking technique. This is:
Find the spots that oil can.
Heat that spot red hot.
Before it cools, hammer and dolly it back to straight.
Repeat with the next oil can spot.
Anyway...this is as far as I got this week. For the coming week I will shrink the firewall to perfect shape and then replace the lower edge that is rusted out.
Until then...!
SteveBones
Jedi Trainee
Offline
I have been working on….doing the metal shaping on my rear fender for longer that I care to admit. Getting close to being finished. It has been a slow process.
Seeing all that you are posting with details on all the metal work you are doing…….very impressive. Your results make it seem so easy. I know different based on my own experience. You are obviously putting in a ton of time and the results reflect it.
I can not say enough on how much I enjoy seeing your details on approach, different steps involved, and the results. Thanks again for sharing.