• Hey there Guest!
    If you enjoy BCF and find our forum a useful resource, if you appreciate not having ads pop up all over the place and you want to ensure we can stay online - Please consider supporting with an "optional" low-cost annual subscription.
    **Upgrade Now**
    (PS: Subscribers don't see this UGLY banner)
Tips
Tips

Anyone every built their own kitchen (from that flat box) store

Gliderman8

Great Pumpkin
Country flag
Offline
Yes we are - they say that you have to follow the directions to a T - and that contractors often struggle because they think they know how to do it - and regret it. Mrs JP and I have done almost all the work on all our homes - when we were first married we couldn't afford anything else. Then when we got a bit of money we realized we could have nicer things if we did it ourselves and now we are at the point where they might as well be our mistakes as someone else's. Plus you just can't even get trades to answer the phone these days. We will get our son to help and are taking a week off - everything is going where it was and there isn't a ton of prep so we should be OK. Famous last words - will keep you posted. :D
I totally agree. More than likely you will do as well or better than the contractor. Mrs. gliderman8 and I have been looking for a new kitchen floor.
I've been looking at a Cortec floating flooring. After looking at installation videos it looks like it goes together like a Lego set (so to speak). I'll probably tackle that job in the spring.
Post some pics of your install.
 

JPSmit

Moderator
Staff member
Silver
Country flag
Offline
I totally agree. More than likely you will do as well or better than the contractor. Mrs. gliderman8 and I have been looking for a new kitchen floor.
I've been looking at a Cortec floating flooring. After looking at installation videos it looks like it goes together like a Lego set (so to speak). I'll probably tackle that job in the spring.
Post some pics of your install.
will do - we put a floating floor in the basement this summer. Totally doable. I made a couple of jigs and bought a pull bar. Not perfect but I am the only one who knows where

1635732861548.png
 

JPSmit

Moderator
Staff member
Silver
Country flag
Offline
Well, a start. A small start but a start none the less. I promised to keep you posted so, here goes.

First of all we are pretty much decided that we won't have a farmhouse sink. The more we researched the more we realized that fireclay farmhouse sinks are prone to cracking and given that we have a big cast iron pan and two cast dutch ovens it seemed like an accident waiting to happen. So, likely a new ikea order but that's OK.

But back to beginnings. As long as we have lived here we have had a barnwood frame around the eating area entry. It is not original and doesn't appear structural though it is the original back wall of the house.

1636076860448.png


Unfortunately it has to go as the cupboard which is planned for over the fridge requires a flat surface to go against. Today the tight hand post came out. I have previously observed that a previous owner must have worked in a screw factory judging by the number and size of screws holding things together. This was no exception with them all attached from the back. Fortunately I could get enough space to get my sawzall behind it to cut them. The big surprise was that the post was attached to the floor - well! and the hardwood laid around it. Sawzall to the rescue and some hardwood repair in my future. Oh and the power will be restored to the eating area soon. 😁

1636077184024.png
 
Last edited:

Gliderman8

Great Pumpkin
Country flag
Offline
Let the fun begin!
 

DrEntropy

Great Pumpkin
Platinum
Country flag
Offline
Love my Sawz-All!!

We've a space like that in the tile flooring after I'd put a pocket door in the wall between bath and main bedroom, replacing a hinged door that required bedroom floor space to be swung open. I've "planned" to simply put a hardwood threshold plate over the area. It may be considered a mini "knee-knocker" but beats tearing up that partial tile, finding a matching patterned one and cutting it to fit. Wood would be much simpler.

Ain't home ownership fun?!? :giggle:
 

JPSmit

Moderator
Staff member
Silver
Country flag
Offline
Love my Sawz-All!!

We've a space like that in the tile flooring after I'd put a pocket door in the wall between bath and main bedroom, replacing a hinged door that required bedroom floor space to be swung open. I've "planned" to simply put a hardwood threshold plate over the area. It may be considered a mini "knee-knocker" but beats tearing up that partial tile, finding a matching patterned one and cutting it to fit. Wood would be much simpler.

Ain't home ownership fun?!? :giggle:
I know!

Fortunately we have wood and, in the 'after' pic the pantry in the back left is something I put in a few years ago. (It was always there with a cheap bifold door - opened it up and put the new (old) doors ($5 at a yard sale!)

But managed to find a partial box on our local ad site which I used to fill in the back - I have enough for the repairs and, when this is all done the floors get refinished anyway so should be invisible.
 

DrEntropy

Great Pumpkin
Platinum
Country flag
Offline
My "problem" and having set the "chunk" of tile to level it out for the solution. Need to grout it, then take the door out (a real PITA!) and shave a quarter-inch off the bottom. Then replace it to install the threshold wood. All a miserable project just now.

problem1.JPG


solution1.JPG
 

JPSmit

Moderator
Staff member
Silver
Country flag
Offline
I feel your pain - both tile AND pocket doors!
 

DNK

Great Pumpkin
Country flag
Offline
... then take the door out (a real PITA!) and shave a quarter-inch off the bottom. ...
You do know that pocket doors have adjustments on them?
Unless it's already at it's maximum height
 

Madflyer

Jedi Knight
Country flag
Offline
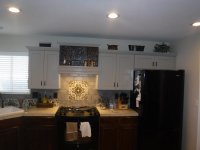
I did all new upper cabinets. They were from ( RTA - READY TO ASSEMBLE ) and come unassembled good qty self closing hinges. Simply run wood glue in groves and turn self locking screw about ten min a cabinet. door are made to cut out for glass if you wish. All wood no PB
 

Attachments

  • DSCF2762.JPG
    DSCF2762.JPG
    3.5 MB · Views: 24

JPSmit

Moderator
Staff member
Silver
Country flag
Offline
That looks terrific! I really like the detail insert over the stove.
 

DrEntropy

Great Pumpkin
Platinum
Country flag
Offline
You do know that pocket doors have adjustments on them?
Unless it's already at it's maximum height

Yes, I do know. They're wound up tight, Don. It's a cheap box store pre-framed door, veneer skins on a fir framework and hollow for the most part. Game plan is to take the electric plane to it first, in small increments. Then it will get finished with the belt sander and sealed. And any further adjustment with the trucks is not a consideration, as the latch is already set in the frame. Just some tedium not anticipated.
 

DNK

Great Pumpkin
Country flag
Offline
Yes, I do know. They're wound up tight, Don. ..., as the latch is already set in the frame. Just some tedium not anticipated.
I guess raising it up that high would really screw with the latch alignment
DOH
 

JPSmit

Moderator
Staff member
Silver
Country flag
Offline
Doc, do you have an oscillating tool? would take some time, but with a steel guide would be much easier than removing the door. I love mine and constantly find new uses.

1636160215790.png
 

DrEntropy

Great Pumpkin
Platinum
Country flag
Offline
One of those things I've always thought to be a "nice to have" but never got. When I did the floor tile it would have been sooo much easier to trim the doorjambs. Did that by hand with an offset saw. Tiresome.

The door would still need to be removed; my OCD would not allow me to trim only the part of the door that's exposed and accessible when in place. It goes deeper into the frame at the recessed side. And sealing it from humidity and "invading species" (think Florida environs & dry wood bugs) would be a contest.

But a New Tool is certainly not to be ruled out! 😉
 

JPSmit

Moderator
Staff member
Silver
Country flag
Offline
well one step forward and erm one step back. We both had some work to do today so things didn't get rolling till noon or so. Before I get to today's insights, let us review. We have to remember that the entrance to the eating area has to go. Sawzall and boom, out it came - here is where it used to be - look at the bottom of the post.

1636243528985.png


this is what it was

1636243591888.png


:oops:

and this is what was left

1636243663390.png
1636243663676.png


Now the bad news is that I will not confirm nor deny that I cut a wire but the good news is that this hole means I can actually access the wires and put in a box in a helpful and legal way. I also added a wall outlet where there always should have been one. Unfortunately got all back together and while the room lights (and weirdly the downstairs bathroom) now work, the pantry didn't. So, more rewiring ensued and then the pantry also worked so, I buttoned it all up and now it doesn't work again. sigh. So time for a CAB and some takeout pizza and walk away for the night. Progress! (ish)
 

Madflyer

Jedi Knight
Country flag
Offline
That looks terrific! I really like the detail insert over the stove.
Thanks copper panel and removeable to get to fan and duct. The glass door cabinets I lined in the same gray and made shelves that I could paint and also a grove at the back of the shelf to stand plates up
 
Top