• Hi Guest!
    You can help ensure that British Car Forum (BCF) continues to provide a great place to engage in the British car hobby! If you find BCF a beneficial community, please consider supporting our efforts with a subscription.

    There are some perks with a member upgrade!
    **Upgrade Now**
    (PS: Subscribers don't see this gawd-aweful banner
Tips
Tips

5 speed vs. 3.9 diff - either or both?

UPDATE: OK, got it all... Datsun 210 tranny, adaptor plate, all the bits... and the 3.9 diff (which I removed from the donor Morris Minor today).
In the case of the diff, I just pulled the half-shafts and pulled the diff (easy).
Now to tackle the Bugeye conversion!

In this photo, I'd put the wheels back on the Morris (minus the axles). Sleeping?... working?... hiding a Margarita?... you decide.
Mark under Minor getting differential small.jpg
 
Hopefully this bit of humour/story is not inappropriate, but I heard many years ago of a lady coming home from work (somewhere in Australia) and her husband was under the car, out on the driveway in much the position illustrated above. She couldn't resist her sense of humour and reached into his pants etc., and then ran giggling into the house. Whereupon she met her husband, coming out the door....
A buddy was over, helping with the car. He sustained a pretty good gash on the forehead from suddenly trying to sit up, and also managed to knock himself out.
Mark - I hope you're wear personal protective equipment. Doug
 
LOLOL Oh my!
 
My 3.9 arrives Saturday and 5 speed and Gerard's Kit are already in the garage. Now to get recovered from Rotator Cuff surgery on Wednesday. I haven't even uncovered Bugsy's Christmas Present sitting on a pallet in the garage. didn't want to be too anxious.
 
My 3.9 arrives Saturday and 5 speed and Gerard's Kit are already in the garage. Now to get recovered from Rotator Cuff surgery on Wednesday. I haven't even uncovered Bugsy's Christmas Present sitting on a pallet in the garage. didn't want to be too anxious.

That's great, Jim. I've been in email touch with Gerard to help explain all the bits I have. He's been SO helpful. My conversion is, essentially, the same as his (but pre-dates it is all - coming from the late Paul Asgiersson). I might be missing a few things that I'm hoping to acquire from Gerard. Fortunately, I also have a local friend (Gary from the "blown engine" thread) who has his conversion from Gerard all apart while he swaps out the new 1275 I found him locally.

Frankly, although it was fun pulling the diff and it wouldn't be at all difficult to install the new one in the Bugeye, I'm actually contemplating letting a local shop do the work (that will let me help). 10 years ago I'd not have hesitated to jump in. We'll see.

As for Bugsy's Christmas present.... hmmmm... let me see... :cool:
 
Can you multiply 1275*1.040
 
If you have any engines mods, it would be best to choose your diff base upon your power band of the camshaft. Otherwise, your engine can't stay in the camshafts power band defeating its purpose. You can easily do the math base on RPM, tire diameter, differtial ratio, and gear ratio.
 
One of the wonderful bits from Gerard (that Paul A. never even thought to supply) is a spacer that goes between the diff and the driveshaft. The effect of this is to slide the yoke further up the transmission shaft so that it is less likely to interfere with the (HIT) the tunnel. Paul's solution to the problem was to ----- with the car on jack stands, start the engine, and at the same time as the clutch was disengaged, to toss a broom handle up the tunnel---! The yoke would catch the broom stick and beat the tunnel, reshaping it from the inside. -- It took a couple of tries to get the timing just right... Been there, done that.
 
Thanks Bill. Yes, I would like to add that spacer.

[nope, don't want to use Paul's "method" :wink-new: ]
 
Was pleased to have the opportunity to see Gary's car and 5 speed out of his car (though he's not pleased to have it all out - blown engine, per another thread). :( Seeing all the pieces and how it was done made all the difference in the world. Reading a manual is one thing, but getting up close to all the bits in place is another. Doesn't look difficult at all. Some fettling required.
 
OK... I have all the bits (for the full conversion - also having produced a better shifter and modified the Datsun tranny)... and we're GOING IN!!!!!!! Many thanks to Gerard (https://www.gerardsgarage.com/) for answering a million questions, and selling me a few remaining pieces (e.g., his special pilot bushing, rear transmission bracket and prop shaft spacer at the diff). Thanks, too, to Gary ("gfholl" on the forum) for letting me visit his car with the engine/5-speed out (and then back in again), and answering still more questions.

Actually, I might wait a week or two so-as to be sure I have the help and shop ready to roll.
 
Last edited:
Got it all other than the Spacer. Tranny and rebuilt 1,326 on the schedule for Early Spring. Hopefully Spacer will not be needed.
 
Can you elaborate on "also having produced a better shifter and modified the Datsun tranny". Thanks, Doug
 
2016-11-13 13.46.51.jpg
2016-11-13 13.46.56.jpg
2016-11-13 13.47.27.jpg
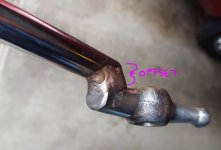
Doug, I had received a Datsun 210 shifter that was set up for a Morris Minor conversion... which was, amongst other things, too long (and it was also angling back too high). The shifter needs to come off the base with a bit of an angle. I'm attaching a pic. I'll be honest that although I had the luxury of some trial fitting into an existing 5 speed AND had another 5 speed shifter to compare to, I found that copying Gerard's shifter was the best approach (though he no longer has someone to make it - but might be soon after he gets more interest). Also, the shifter stem needs to be off-set by about the width of the shaft.

The fundamental issue is that without the proper angle (or approximation of it), the shifter will hit the "can" (base) in 1st, 3rd or 5th... or the boot just won't fit well. Gary showed me his solution which was to cut the "can" a little bit more (to make the hole more like 3 and 5/8" in diameter) and then use a big-Healey boot... but I'm not sure I'll need to do that. I'll wait and see. [BTW, you may know that some just build a gater of metal or wood and use a later tall leather boot, but I think that looks too different.] My goal is to keep this looking as original as I reasonably can.

So, to cut to the chase, have a look at my photos. I haven't fit this yet, but it should work well.
I will definitely report back soon.

[EDIT MONTHS LATER: it worked!!!]
 
Last edited:
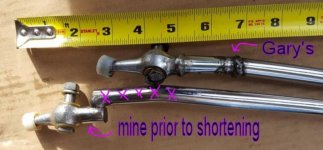
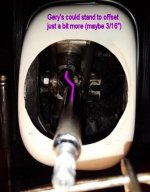
OK, because this can be confusing, here are two more shots.
1) my original shifter (for a Morris Minor) prior to cutting the weld, shortening and re-welding. Gary's is above it with a different off-set welding.
2) Gary's shifter in-situ... showing his offset which could stand to be just a bit more.

My "new" one is fully offset by the width of the shaft or base.
2016-10-29 11.07.03.jpg 2016-11-10 19.09.05.jpg
 
Last edited:
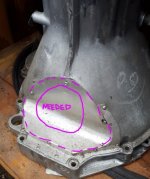
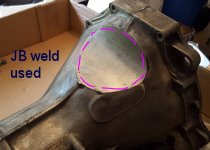
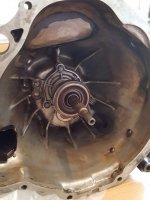
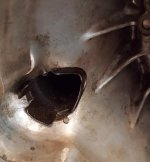
Sorry, Doug, I forgot the other half of your question... "modification of the original 210 tranny." I think it is wise to cut away part of the original bell-housing so-as to get the entire thing back into the car without banging-up the heater-box tray. Here, attached, is a shot of the modification (though with Gerard's kit he will have you cut less away); mine was aggressively done (and not needed so much). In the photo, you'll see that the bell-housing ends up with a huge "notch" or indentation that makes for an easier install. One can apply a patch of aluminum sheet metal (held with rivets, screws or even JB-Weld).
The first photo is of mine, overdone (but I inherited this way). The next two are from Gary's who nicely followed Gerard's instructions (and has a smaller hole cut). The cut can be done with a reciprocating saw or jig-saw... and is pretty easy.
Datsun 210 tranny cut-out for Morris Minor.jpg tranny cut-out top.jpg tranny clutch housing.jpg

Finally, for the other modification, one can cut a hole for the starter to stick out. I'll post that next.
 
Last edited:
OK, the other modification of the tranny is, actually, optional. IF you want to use the existing starter motor, it will stick through the side of the Datsun 210 bell-housing. This requires cutting a hole and building a cover for it. See attached pics (this is from Gary's car). Gary did a very nice job (using a piece of exhaust pipe adapter). My attempt ended up much uglier.
I started to do it and gave up. :wink-new: By the time I had spent awhile on it, I figured I might as well just switch to a gear-reduction (better) starter; such a starter does not require cutting the hole.
starter fit with measurement.jpg
2016-10-29 10.52.33 -covers protrucing starter.jpg
2016-10-29 10.52.43.jpg
My attempt wasn't TERRIBLE (or nearly as phallic-looking, LOL), but I didn't like what I ended up with and riveted a plate over my mess. :rolleye:
 
Last edited:
Got it all other than the Spacer. Tranny and rebuilt 1,326 on the schedule for Early Spring. Hopefully Spacer will not be needed.

Fantastic, Jim. I'd love a new engine... but I'll make mine work (since I rebuilt the head not too long ago).
 
INVENTORY of parts I needed for the complete conversion:
1) rebuilt Datsun 210 5-speed transmission (then modification of the bell-housing) - and new throw-out bearing
2) adapter plate (available from Gerard - though had an original Paul Asgersson plate)
3) assorted bolts, washers, nuts
4) clutch slave cradle (with bolts and a longer/adjustable slave rod) - this holds the slave out a bit and away from the bell-housing
5) transmission to flywheel/crank pilot bushing (available from Gerard as a single piece unit)
6) a machined flywheel (made a bit thinner)
7) Datsun clutch assembly (which, to my way of thinking, is better than the Rivergate approach because the Datsun clutch is bigger)
8) Datsun shifter (to be modified as per the posts above) - and including new plastic bushings
9) a transmission output fork and a adapting U-joint (Datsun to MOWOG)
10) transmission mounting system (bracket with rubber pad) - that I was very lucky enough to buy from Gerard
11) [in my case] a 3.9 differential (and I'll be replacing seals, O-rings and a gasket at the same time)
12) drive-shaft spacer (in front of the differential) - that I obtained from Gerard
13) gear-reduction starter (optional but I have one)
14) ... maybe a change in my master cylinder (to go from 7/8" to 3/4" bores), but I may wait and see what the peddle pressure is like [PS - turns out my master was 3/4" which is more appropriate for disc brakes and makes for better peddle action for the clutch]

Again, I was very fortunate to inherit most of this gear, but a complete set is available from Gerard.
 
Last edited:
Back
Top