• Hi Guest!
    You can help ensure that British Car Forum (BCF) continues to provide a great place to engage in the British car hobby! If you find BCF a beneficial community, please consider supporting our efforts with a subscription.

    There are some perks with a member upgrade!
    **Upgrade Now**
    (PS: Subscribers don't see this gawd-aweful banner
Tips
Tips

5 speed vs. 3.9 diff - either or both?

Mark,
The Datsun specs show 1 to 2mm of freeplay. I have mine at about 1/8 inch or about in the middle of the rod.
Gary

Thanks Gary. Perfect! Will do.

EDIT: Found the photo I'd taken of your set-up.
clutch slave bracket.jpg
 
Last edited:
Gary,

The pushrod I supply with my kit is not the same as what Paul used to. I found in some cases, it did not offer enough range, so the one I supply is (the one you have) is longer. So, you can compare by how much you see sticking out.

Notice that Mark's has the square end, while yours is a screwdriver slot.


Mark,
The Datsun specs show 1 to 2mm of freeplay. I have mine at about 1/8 inch or about in the middle of the rod.
Gary
 
Phase 4: (update with the drive-train back in the car, much fettling still to do)

Used a flexible hydraulic line to run from the normal clutch line termination to the slave (which is now on the driver's side). Replaced the water-pump with a better one (not that stamped impeller sort). Touched up some paint here and there, and cleaned the bay.
drive-train back in - 12Dec2016.jpg
tranny with clutch slave.jpg
clutch slave.jpg

I'm hoping that bleeding the slave won't be quite as bad as I thought (in this new, tight, location). Hope springs eternal. :eek:
 
Last edited:
Two more shots for the interested... machined flywheel on and using Gerard's special one-piece pilot bushing, and the (far beefier) Datsun clutch assembly on.
flywheel on with pilot bushing.jpg
flywheel and clutch on.jpg
 
Last edited:
Thanks. Thought many would enjoy it. I considered starting new threads on the tranny and diff but decided this was working. Hopefully with the subject line it will pop up in future searches (though the photos may not be there - I don't think they last forever).

One problem did pop up yesterday. The front U-joint was hitting, just a bit, the tunnel. I had presumed that the new rear spacer that Gerard offers might move it forward just enough. So, we had to use a pry-bar to bend, just a little, the tunnel so-as to make the necessary room.
 
Sometimes it does, sometimes not. There's just enough inconsistency in these cars, both from manufacturing to whatever ever abuses or distortions they've suffered over the years, to no be able to predict 100%. Certainly, it makes the mod last drastic. The real solution would be to turn down the shoulders on the driveshaft yoke, but cost is prohibitive to be inclusive.

One problem did pop up yesterday. The front U-joint was hitting, just a bit, the tunnel. I had presumed that the new rear spacer that Gerard offers might move it forward just enough. So, we had to use a pry-bar to bend, just a little, the tunnel so-as to make the necessary room.
 
Thanks Gerard. Yes, we finally figured as much. Thankfully, a little pry-bar in the tunnel gave a good 3/32" clearance. One thought was to sort of saw/shave the rubber transmission mounting bar down a 1/16" but once that was all in there it just wasn't possible. We did load the car just to be sure it was sitting correctly too. I suppose if I went over some big bump where the rear suspension is severly compressed, there might be a scrape... but I don't think so.
Clearly your spacer disc back by the differential moved it forward enough that it was essentially where it needed to be. Thanks!
 
Still more photos:
2016-12-13 13.27.01.jpg
2016-12-13 13.30.51.jpg
2016-12-13 13.30.58.jpg

The first one shows Gerard's clever solution to the front U-joint of the prop shaft hitting the tunnel. It moves everything forward just enough.
The second one shows the gear-reduction starter (which is a tight fit). This is not an essential thing to convert to, but it eliminates the need to cut a hole in the transmission bell-housing for the original starter (and it's a better starter too). Also, in the photo is the clutch slave cylinder on its special cradle (where the slave is basically flipped up-side-down).
The third image shows the stem of the flexible hydraulic clutch line that runs from the slave over the top to the original termination point (where the normal slave sits). One can fashion a hard line but I had the flexible one handy. Surprisingly, the bleeder is actually not that difficult to operate (and I HATE the original bleeding process on the normal MOWOG system). [adding: one could also run the flexible line right up to the master cylinder which is right above, but what I did sort of preseves the look of the engine bay] This shot also shows the special rear transmission bracket that sits on the cross-member and in the front of the prop tunnel. This is a special bracket with a rubber bumper that it all sits on.
BTW, all these bits (including the engine to tranny back-plate adapter) are available with Gerard as a complete kit (you supply your own Datsun 210 tranny). I had most of it, but he kindly sold me the tranny bracket, the prop/diff spacer and the pilot bushing.
Should be ready to fire this baby! Just taking advantage the time to tweak other things that needed tweaking.
 
Last edited:
OK, one more for now. The modified shifter is now in and the original boot in place. Believe it or not, it goes through all the gears just fine (notably 5th and reverse)... but we glued the boot in place. Probably not the best solution and it will be interesting to see if this doesn't just quickly wear out (or pop out). I may well be changing to either the bigger opening (with big-Healey boot) or the fiberglass assembly... but time should shortly tell. Bullwinkle approves. :eek:
shifter in with glued boot.jpg

And here's a repeat pic of the shifter I made (which is a copy, using photographs, of the one that Gerard used to provide and may start to remake). Two things seem critical: a) the offset to the right, which will center the stick, and b) the approx. 10 degree angle.
2016-11-13 13.46.56 - 7.5 inches from hole to threads.jpg
2016-11-13 13.47.05 about 10 degrees.jpg
2016-11-13 13.47.11 TIG weld.jpg
 
Last edited:
Phase 5 - the job is done (after some fussing about)!!!!!!!

It wouldn't be a special project without the requisite fettling... and there was a fair bit of that!
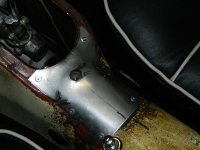
Most of the Datsun 5 speed conversion "kit" parts went together very nicely. However, due to normal variability with Bugeyes, there were a few problems. Despite the use of Gerard's special prop-shaft spacer (that's fitted between the rear U-joint and the differential - see previous post with photo), the front U-joint did hit the tunnel just a wee bit. Gerard reports, above, that this can happen (again, due to normal variables between cars); the prop-shaft spacer at the diff end does, otherwise, generally/usually solve this difficulty. So, reaching in the shifter opening in the tunnel (with the cupola/can/housing removed), we had to use a pry-bar to bend the sheet-metal upward just a little (though not noticed and covered by the tunnel carpeting anyway - and this front U-joint is right behind the shifter housing with the Datsun tranny so it wasn't a far reach). Even at that, there was a very slight "ticking"/touching in 4th and 5th gears, which we think might have been due to routine engine twisting from torque in those gears (but who knows). Therefore, a little experimentation was in order. This involved slightly jacking the engine up - and the noises disappeared. So, we fabricated 1/8" metal shims to go under the engine rubber motor-mounts. We believe that this altered the geometry such that the rear transmission bracket served as a bit of a pivot point which lowered the front U-joint creating room to spare! Slick (see attached photo of motor-mount on the left side, and obviously there's also one on the right side). Amazing how much difference such a small shim could make!

All is working well!!! 'Course with the current weather, the wee beasty will be staying indoors for awhile. :-(
motormount shim.jpg

P.S. - I could go on and on about other things done while the conversion was underway, but that work was unique to the needs of my car. BTW, I converted to Evans waterless coolant.
 
Last edited:
I will post a performance review when I get to driving the car a bit more.
All I will report at this time is that the shake-down drive went REALLY well. Transmission was very tight and this baby can go FAST.
 
Last edited:
I again mention Paul A.'s solution... with the car up on jackstands, toss a broom handle up the tunnel and let it catch the u joint, spin around, and beat clearance from the inside... . LOLOLOL. ..not elegant, but it works. .... I only mention it because shimming the engine will change the alignment of the drive shaft and put extra load./wear on the u-joints. ?
 
The best solution I've seen for this is to use a palm nailer with a large head stove bolt in it. Makes a bit of a racket, but quick and easy work. Of course, you have to do this before the engine and gearbox go in.

I again mention Paul A.'s solution... with the car up on jackstands, toss a broom handle up the tunnel and let it catch the u joint, spin around, and beat clearance from the inside... . LOLOLOL. ..not elegant, but it works. .... I only mention it because shimming the engine will change the alignment of the drive shaft and put extra load./wear on the u-joints. ?
 
Not a bad idea, Gerard... though, as you will have surmised, too late for me now. Gary, and we, used a pry-bar with some success too.
Bill, I don't think the shims changed the geometry much if at all (and no more so than many cars with worn engine mounts), and certainly nothing a U-joint can't easily handle. And, actually, I THINK that this improves the straightness of it all (given that the tail end of the tranny is a bit higher than the ribcase - so with the shims it's slightly closer to where the ribcase would have had it); afterall, if the ribcase did fit and the Datsun doesn't fit perfectly (requiring the spacer or enlarged tunnel), then moving it down should improve alignment to the original location for the ribcase. The effect is very subtle but seems effective.

I think I could still probably work the sheet-metal up... pulling it. The only annoyance, in that regard, is that the previous owner GLUED the carpeting down, and removing it without damaging it is next to impossible. We did find a way to work the shifter housing off with a bit of back-and-forth (leaving the carpet in place). I wonder, too, if one couldn't drill a small hole (through the carpet and metal) and install a screw, and then use some body-work puller to tug the metal up.
Anyway, the problem seems very much solved with those shims.
 
Last edited:
Gerard, Is there a specific place where additional clearance is needed before I start major pounding in the Spring.

Any updates on the Quick Shifter?
 
Jim, if I were to do it again, the pre-emptive pounding would be JUST behind the shifter housing... on the top and to either side just a bit.
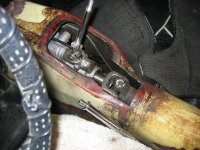
Here is a photo I shot of Gary's car (looking in the shifter housing). I marked with a line where you can see the end of the transmission. The U-joint in question is just an inch or two further back (which I guesstimated with my "X marks the spot"). I also attached a photo of my tranny with the U-joint/yolk assembly. So, near as I can tell, the hitting happens right at the end of the tunnel where the housing starts.
2016-11-10 19.08.31.jpg
2016-11-16 10.54.18.jpg

I think that Gerard's spacer disc (at the differential) really does the job... and you could just wait and see. Otherwise, if you have the shifter housing off, you could do some pre-emptive or after-the-fact work.

Bill, Paul's method would scare the crap out of me. :p
 
Last edited:
Thanks Mark,

Front End rebuild is going to happen along with Front Discs before the engine and 5 Speed install. Temps are supposed to warm into 50's for Christmas so plan will be to get Bugsy out of the garage and get the 1,326 hoisted up and off of the pallet and on to a dolly so engine is moveable. Right now sitting directly in front of Bugsy taking up too much room in my 1 Car garage. Engine still sitting all wrapped up still, and banded. I told Bugsy he was going to get a nice Christmas Present and he's been trying to sneak a peek at his new mill. I'm anxious to see as well.

One more present coming from WI. Ordered new set of front shocks today from Peter C.'s wife. One of the nicest people to deal with on the phone. Thanks Jane.
 
Yes, I just acquired a remote housing as a "buck" to have in the machinists hands for development and testing. I expect it tomorrow.

Here are a couple pix that will give you a pretty accurate indication of the yoke's location in situ. It's the shoulder that can hit. You can see that's Mark's location is pretty accurate too.

IMG_2984.jpgDSCN0019.jpg

Gerard, Is there a specific place where additional clearance is needed before I start major pounding in the Spring.

Any updates on the Quick Shifter?
 
OK so it appears that Yoke can hit at 9:00 area if looking at the tranny as it sits in the car. That's the area that needs a bit of relief. I like the creative work done to add more clearance. If all else fails that is a definite solution. My neighbor does TIG Work. I see an upcoming job for him rather than my hamfisted MIG abilities.
 
Back
Top